
Blog
![]()
We're excited to announce a powerful new addition to our Xero integration: Tracking Categories Synchronisation. This feature bridges the gap between how you organise your business in At The Yard and how you report on it in Xero, giving you more granular financial insights without any additional manual work.
For those unfamiliar, Xero Tracking Categories are a powerful reporting tool that allows you to categorise transactions by dimensions such as department, location, cost centre, or project. Unlike account codes which determine what a transaction is, tracking categories help you understand where or why revenue was generated. You can read more over at Xero.
For example, a livery yard might want to track income by:
Previously, this level of reporting required manual data entry in Xero after invoices were synced to add the tracking category. No longer.
Many businesses using At The Yard already organise their products, services, and facilities into categories for internal management purposes. Perhaps you categorise your services by discipline (dressage, jumping, hacking) or your products by type (feed, bedding, equipment).
The challenge was that this organisational structure didn't carry through to your accounting. When invoices synced to Xero, all that context was lost. To get meaningful reports, you'd need to manually tag each invoice line item once it's in Xero - tedious work that often didn't get done.
Our new Tracking Categories feature allows you to map your At The Yard categories to Xero tracking options, ensuring every invoice line item arrives in Xero with the correct tracking information attached.
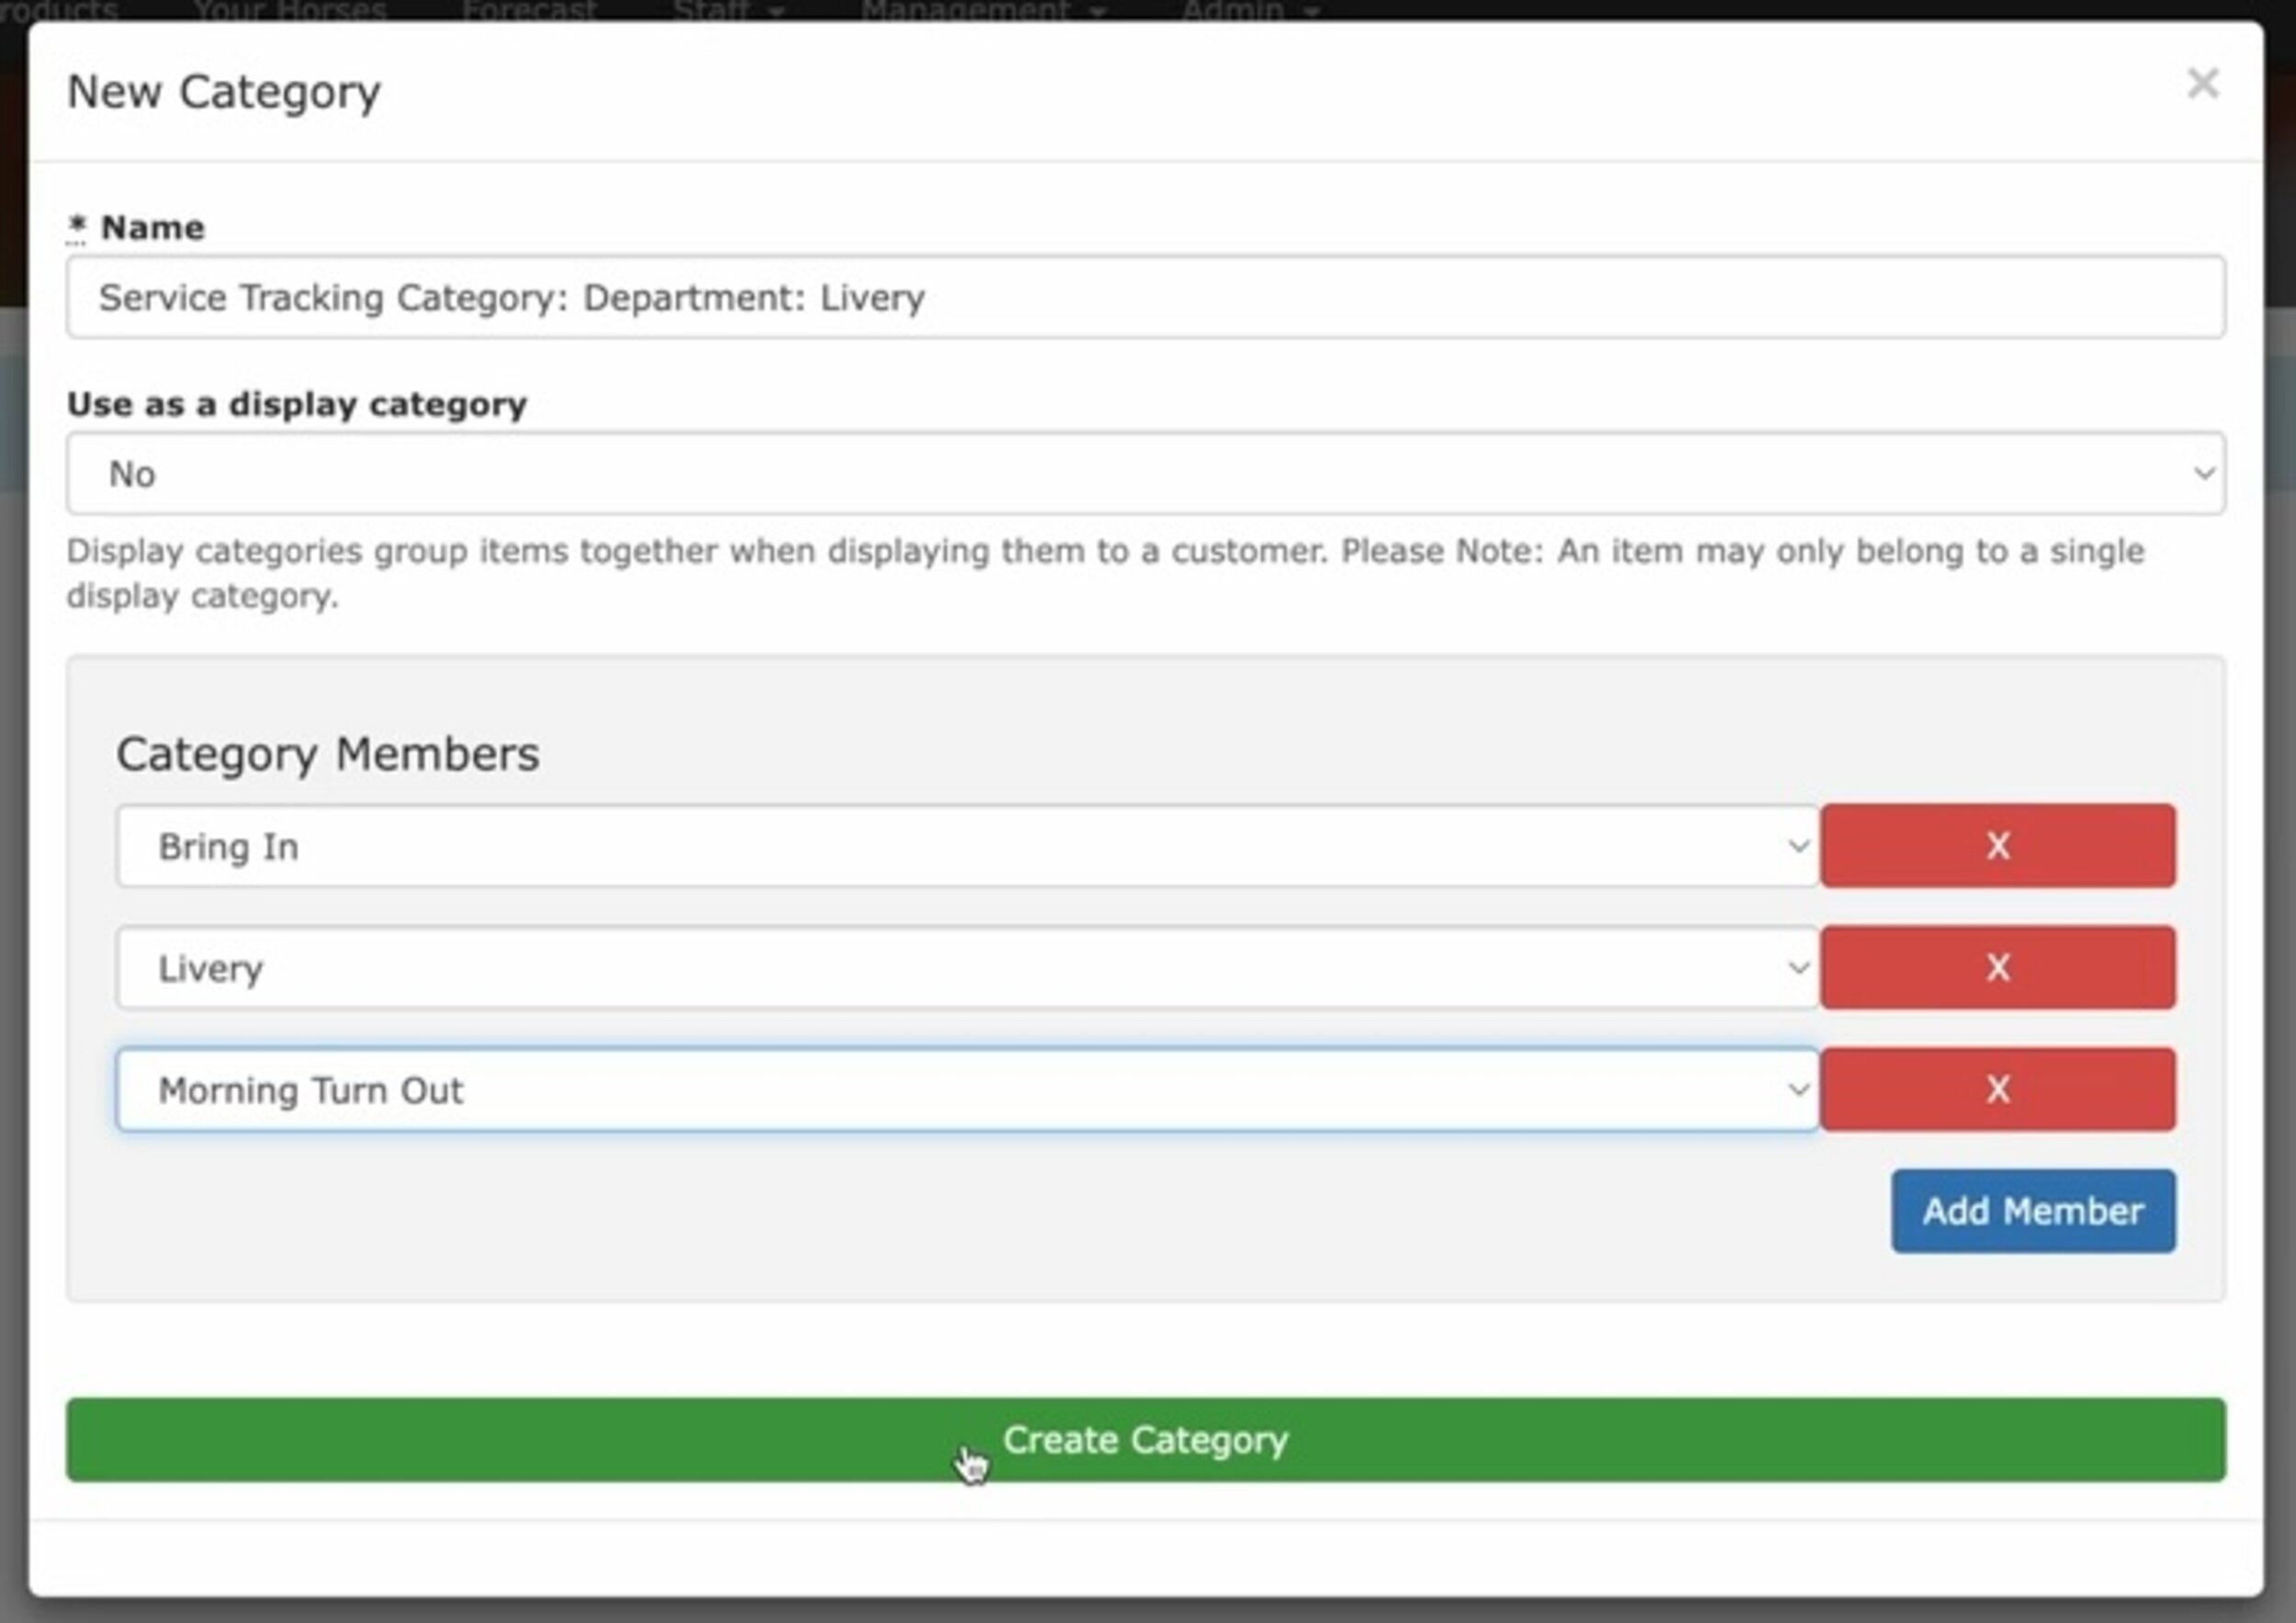
First, you'll need to set up categories in At The Yard to group your products, services, or facilities:
Click "New Category" and give it a meaningful name. We recommend using the helpful naming convention as follows:
Tracking Category: TRACKING CATEGORY NAME : TRACKING OPTION NAME
So for example you might have the following:
Add your Product, Service or Facility to the category you want to receive the Tracking Category Option when they're synced to Xero. (You have to create a category for each item type).
Save your category
You can create as many categories as you need to reflect how you want to analyse your revenue in Xero.

If you haven't already, set up your tracking categories in Xero. This is done within Xero itself under Settings > Tracking Categories.
Once your categories exist in both systems: 1. Navigate to your Xero integration settings in At The Yard 2. Click on "Tracking Categories" 3. For each At The Yard category, select the corresponding Xero tracking category and option
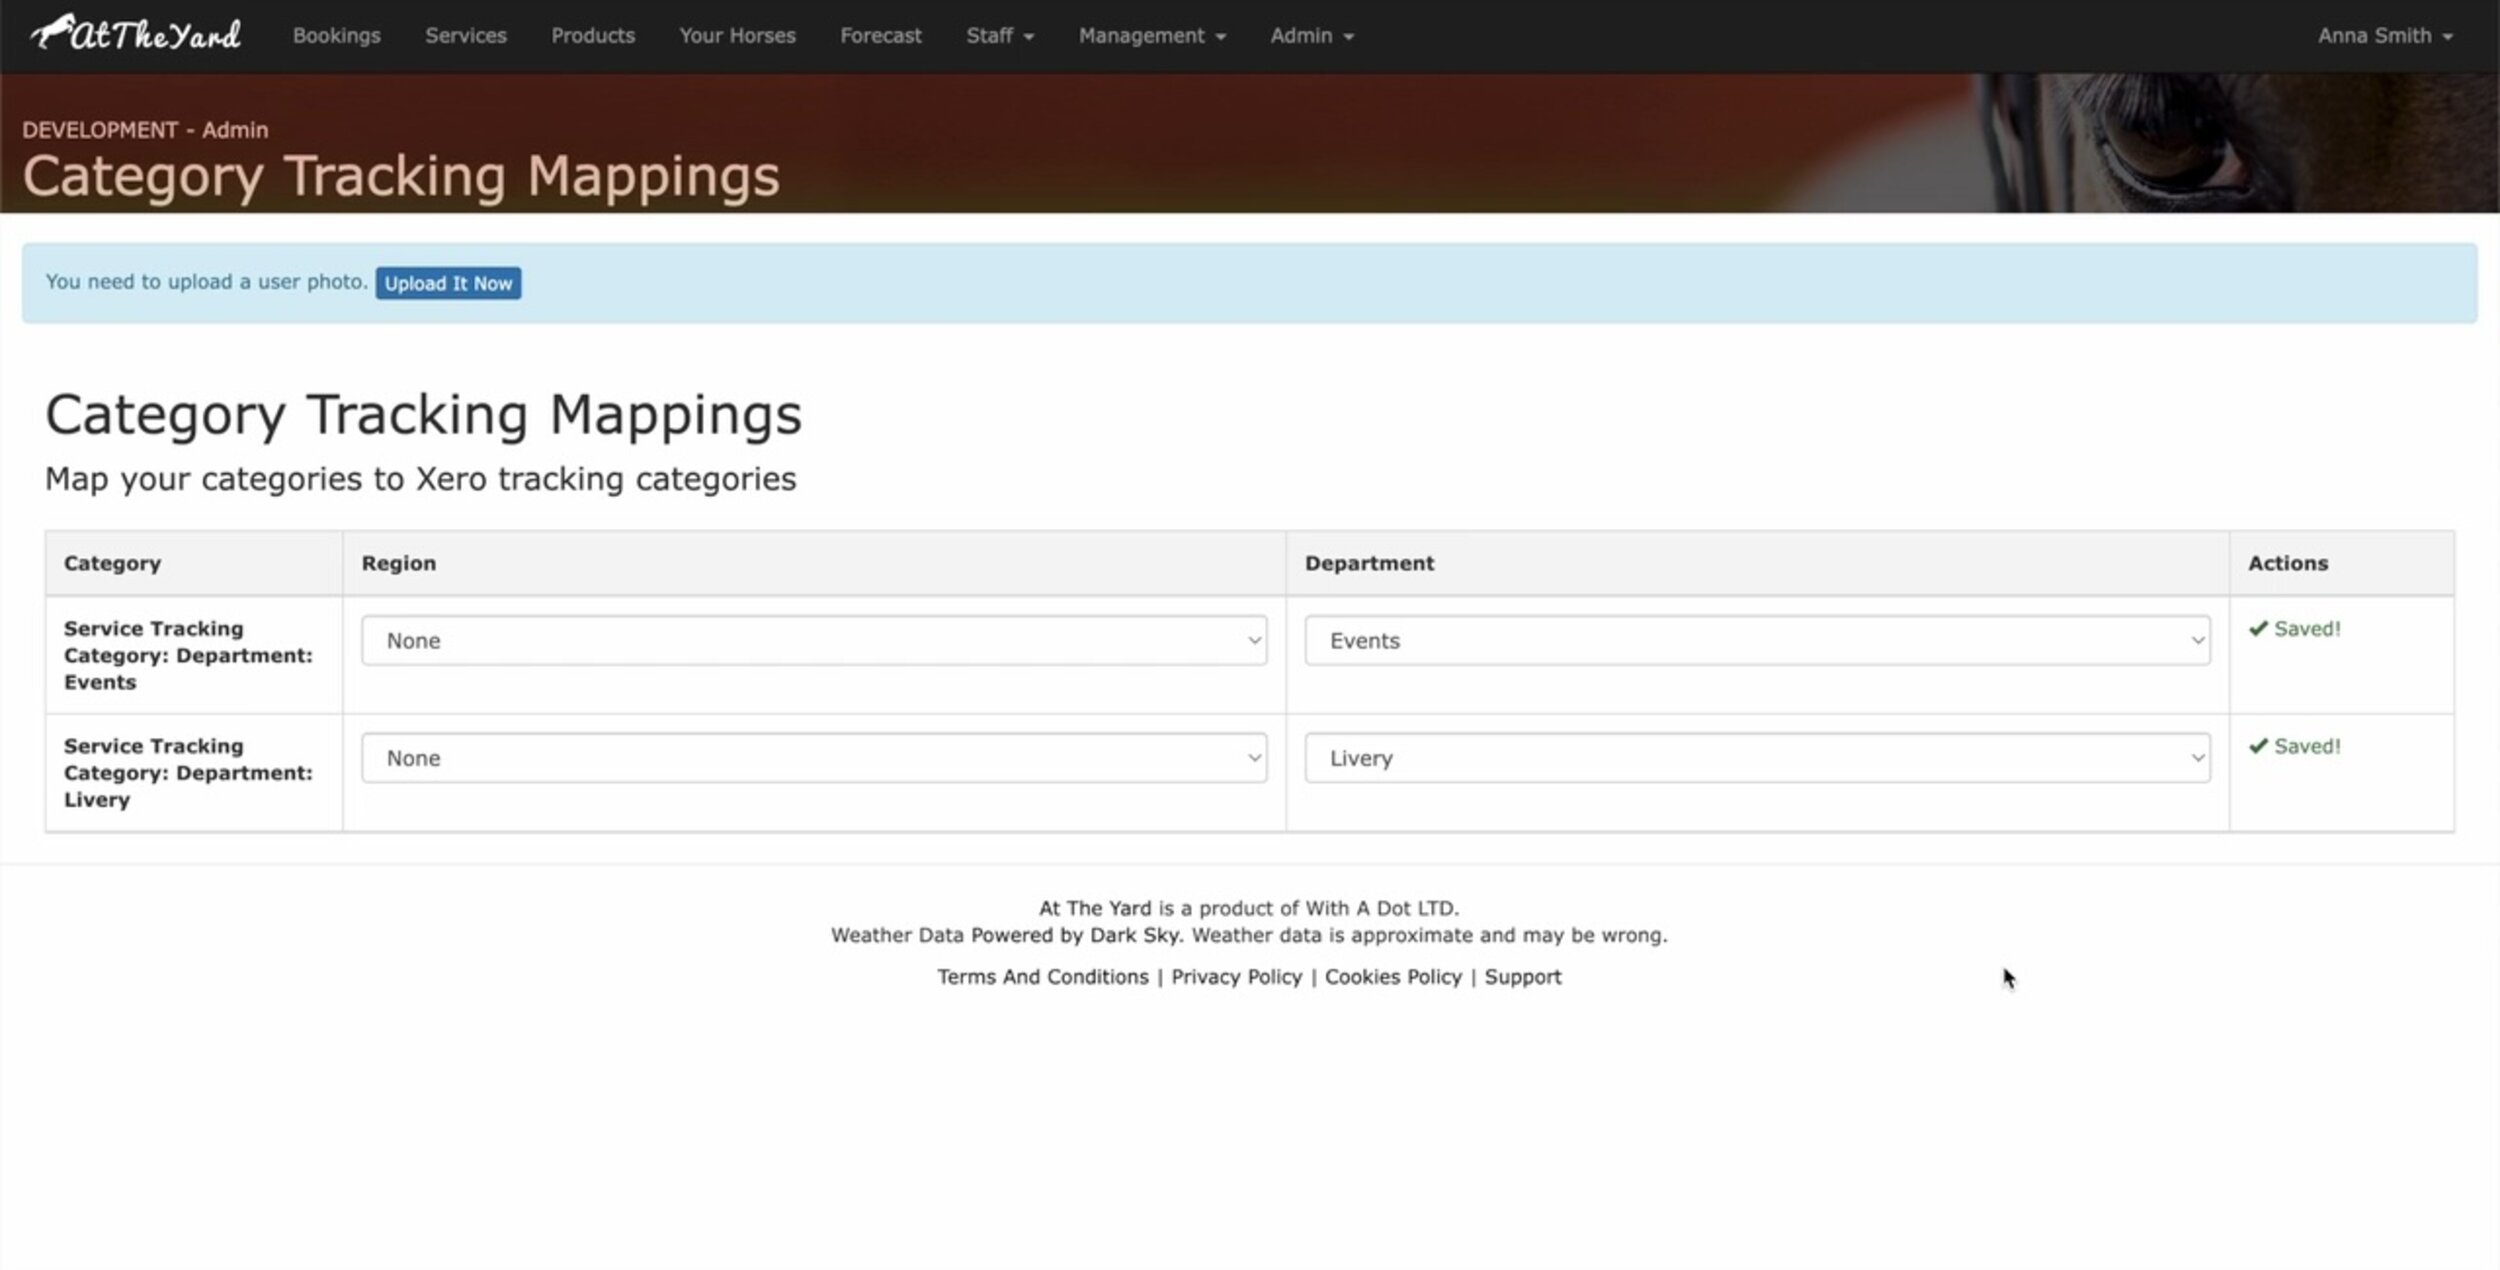
Once configured, the system handles everything automatically. When an invoice containing a categorised product, service, or facility syncs to Xero, the appropriate tracking data is attached to each line item.
There is a requirement to ensure each item only appears in a single tracking option for each tracking category.
To understand this lets look at an example with two Tracking Categories each with multiple Tracking options.
┌─────────────────────────────────────────────────────────────────────┐
│                     XERO TRACKING CATEGORIES                        │
├─────────────────────────────────┬───────────────────────────────────┤
│      Tracking Category:         │      Tracking Category:           │
│          LOCATION               │        BUSINESS AREA              │
├─────────────────────────────────┼───────────────────────────────────┤
│   ┌─────────────────────┐       │   ┌─────────────────────┐         │
│   │     Main Yard       │       │   │       Livery        │         │
│   └─────────────────────┘       │   └─────────────────────┘         │
│   ┌─────────────────────┐       │   ┌─────────────────────┐         │
│   │      DIY Yard       │       │   │      Lessons        │         │
│   └─────────────────────┘       │   └─────────────────────┘         │
│                                 │   ┌─────────────────────┐         │
│                                 │   │       Events        │         │
│                                 │   └─────────────────────┘         │
└─────────────────────────────────┴───────────────────────────────────┘

✓ VALID: "Dressage Lesson" assigned to ONE option per category

     ┌───────────────────┐
     │  Dressage Lesson  │
     └─────────┬─────────┘
               │
     ┌─────────┴─────────┐
     ▼                   ▼
┌─────────┐        ┌──────────┐
│Main Yard│        │ Lessons  │
└─────────┘        └──────────┘
(Location)        (Business Area)


✗ INVALID: Item in multiple options of the SAME tracking category

     ┌───────────────────┐
     │  Dressage Lesson  │
     └─────────┬─────────┘
               │
     ┌─────────┴─────────┐
     ▼                   ▼
┌─────────┐        ┌──────────┐
│Main Yard│        │ DIY Yard │   ← Both are "Location" options!
└─────────┘        └──────────┘
(Location)          (Location)
When multiple At The Yard categories are mapped to the same Xero tracking category, each item (product, service, or facility) can only belong to one of those categories. For example, if you have categories for "Dressage" and "Showjumping" both mapped to a "Discipline" tracking category in Xero, a lesson service cannot be in both—it must belong to one or the other. This ensures each invoice line item receives a single, unambiguous tracking assignment. At The Yard will alert you should this happen in error.
Automated accuracy – Eliminate manual tagging errors and ensure consistent tracking across all your invoices.
Time savings – What previously required manual work after an invoice synced to Xero now happens automatically along with other data.
Better reporting – Unlock the full potential of Xero's reporting capabilities with properly tracked transactions.
Flexibility – Map your existing category structure to Xero's tracking categories without changing how you organise your business.
Discipline-based tracking lets your yard see exactly how much revenue comes from dressage versus showjumping versus cross-country. Understand which disciplines are driving your business and where to focus your investment.
Mixed-use facilities can separate income streams—seeing at a glance how much revenue comes from livery versus lessons versus events versus retail.
Instructor performance tracking becomes straightforward for yards with multiple freelance or employed instructors, letting you see revenue generated by each without manual spreadsheet work.
Arena and facility income can be tracked separately, showing you which facilities generate the most bookings and whether that new all-weather arena is paying for itself.
If you're already using our Xero integration, the Tracking Categories feature is available now. Start by creating categories in At The Yard that reflect how you want to analyse your revenue, then head to your Xero integration settings to map them.
If you haven't yet connected At The Yard to Xero, there's never been a better time. Our integration handles invoices, payments, contacts, and now tracking categories—keeping your financial records accurate and up-to-date without the administrative burden.
This release represents our ongoing commitment to making financial management effortless for equestrian businesses. By connecting the operational tools you use every day with professional accounting software, we're helping you spend less time on admin and more time doing what you love.
Have questions about setting up Tracking Categories? Our support team is here to help. Get in touch and we'll guide you through the configuration process.
We've shipped several improvements that didn't warrant their own blog post. You may already be using them, but in case you missed anything, check them out below.
We've added new options to help you customise how you manage bookings and billing.
Minimum cancellation notice periods are now configurable. When set, the system automatically prevents customers from cancelling bookings too close to their scheduled time, eliminating the frustration of last-minute cancellations that leave unfilled slots.
Flexible billing dates give you more control over cash flow. For services that bill on completion, staff can now choose whether to bill on the scheduled date or the actual completion date when they mark work as complete.
User search functionality is now available in the admin users interface. No more paging through long lists—just search and find the user you need.
View past booking requests, not just active ones. This makes it easier to track patterns, follow up on previously declined requests, or reference historical inquiries.
File attachments for horse profiles let you upload documents, veterinary reports, or competition results directly to horse profiles where they're easily accessible when you need them.
Customisable price displays Choose how prices appear when listing products or services: - Smallest order unit price - Smallest order total price - Lowest possible unit price The default display remains unchanged, but you can now adjust this per item in the shop settings.
We've got more improvements on the way. In the meantime, if you have questions or feedback, we'd love to hear from you.

We're excited to announce a new feature for users of the At The Yard shop - customizable delivery options! This update allows you to set specific delivery patterns for each product in your shop, giving both you and your customers more flexibility and control over when items are delivered.
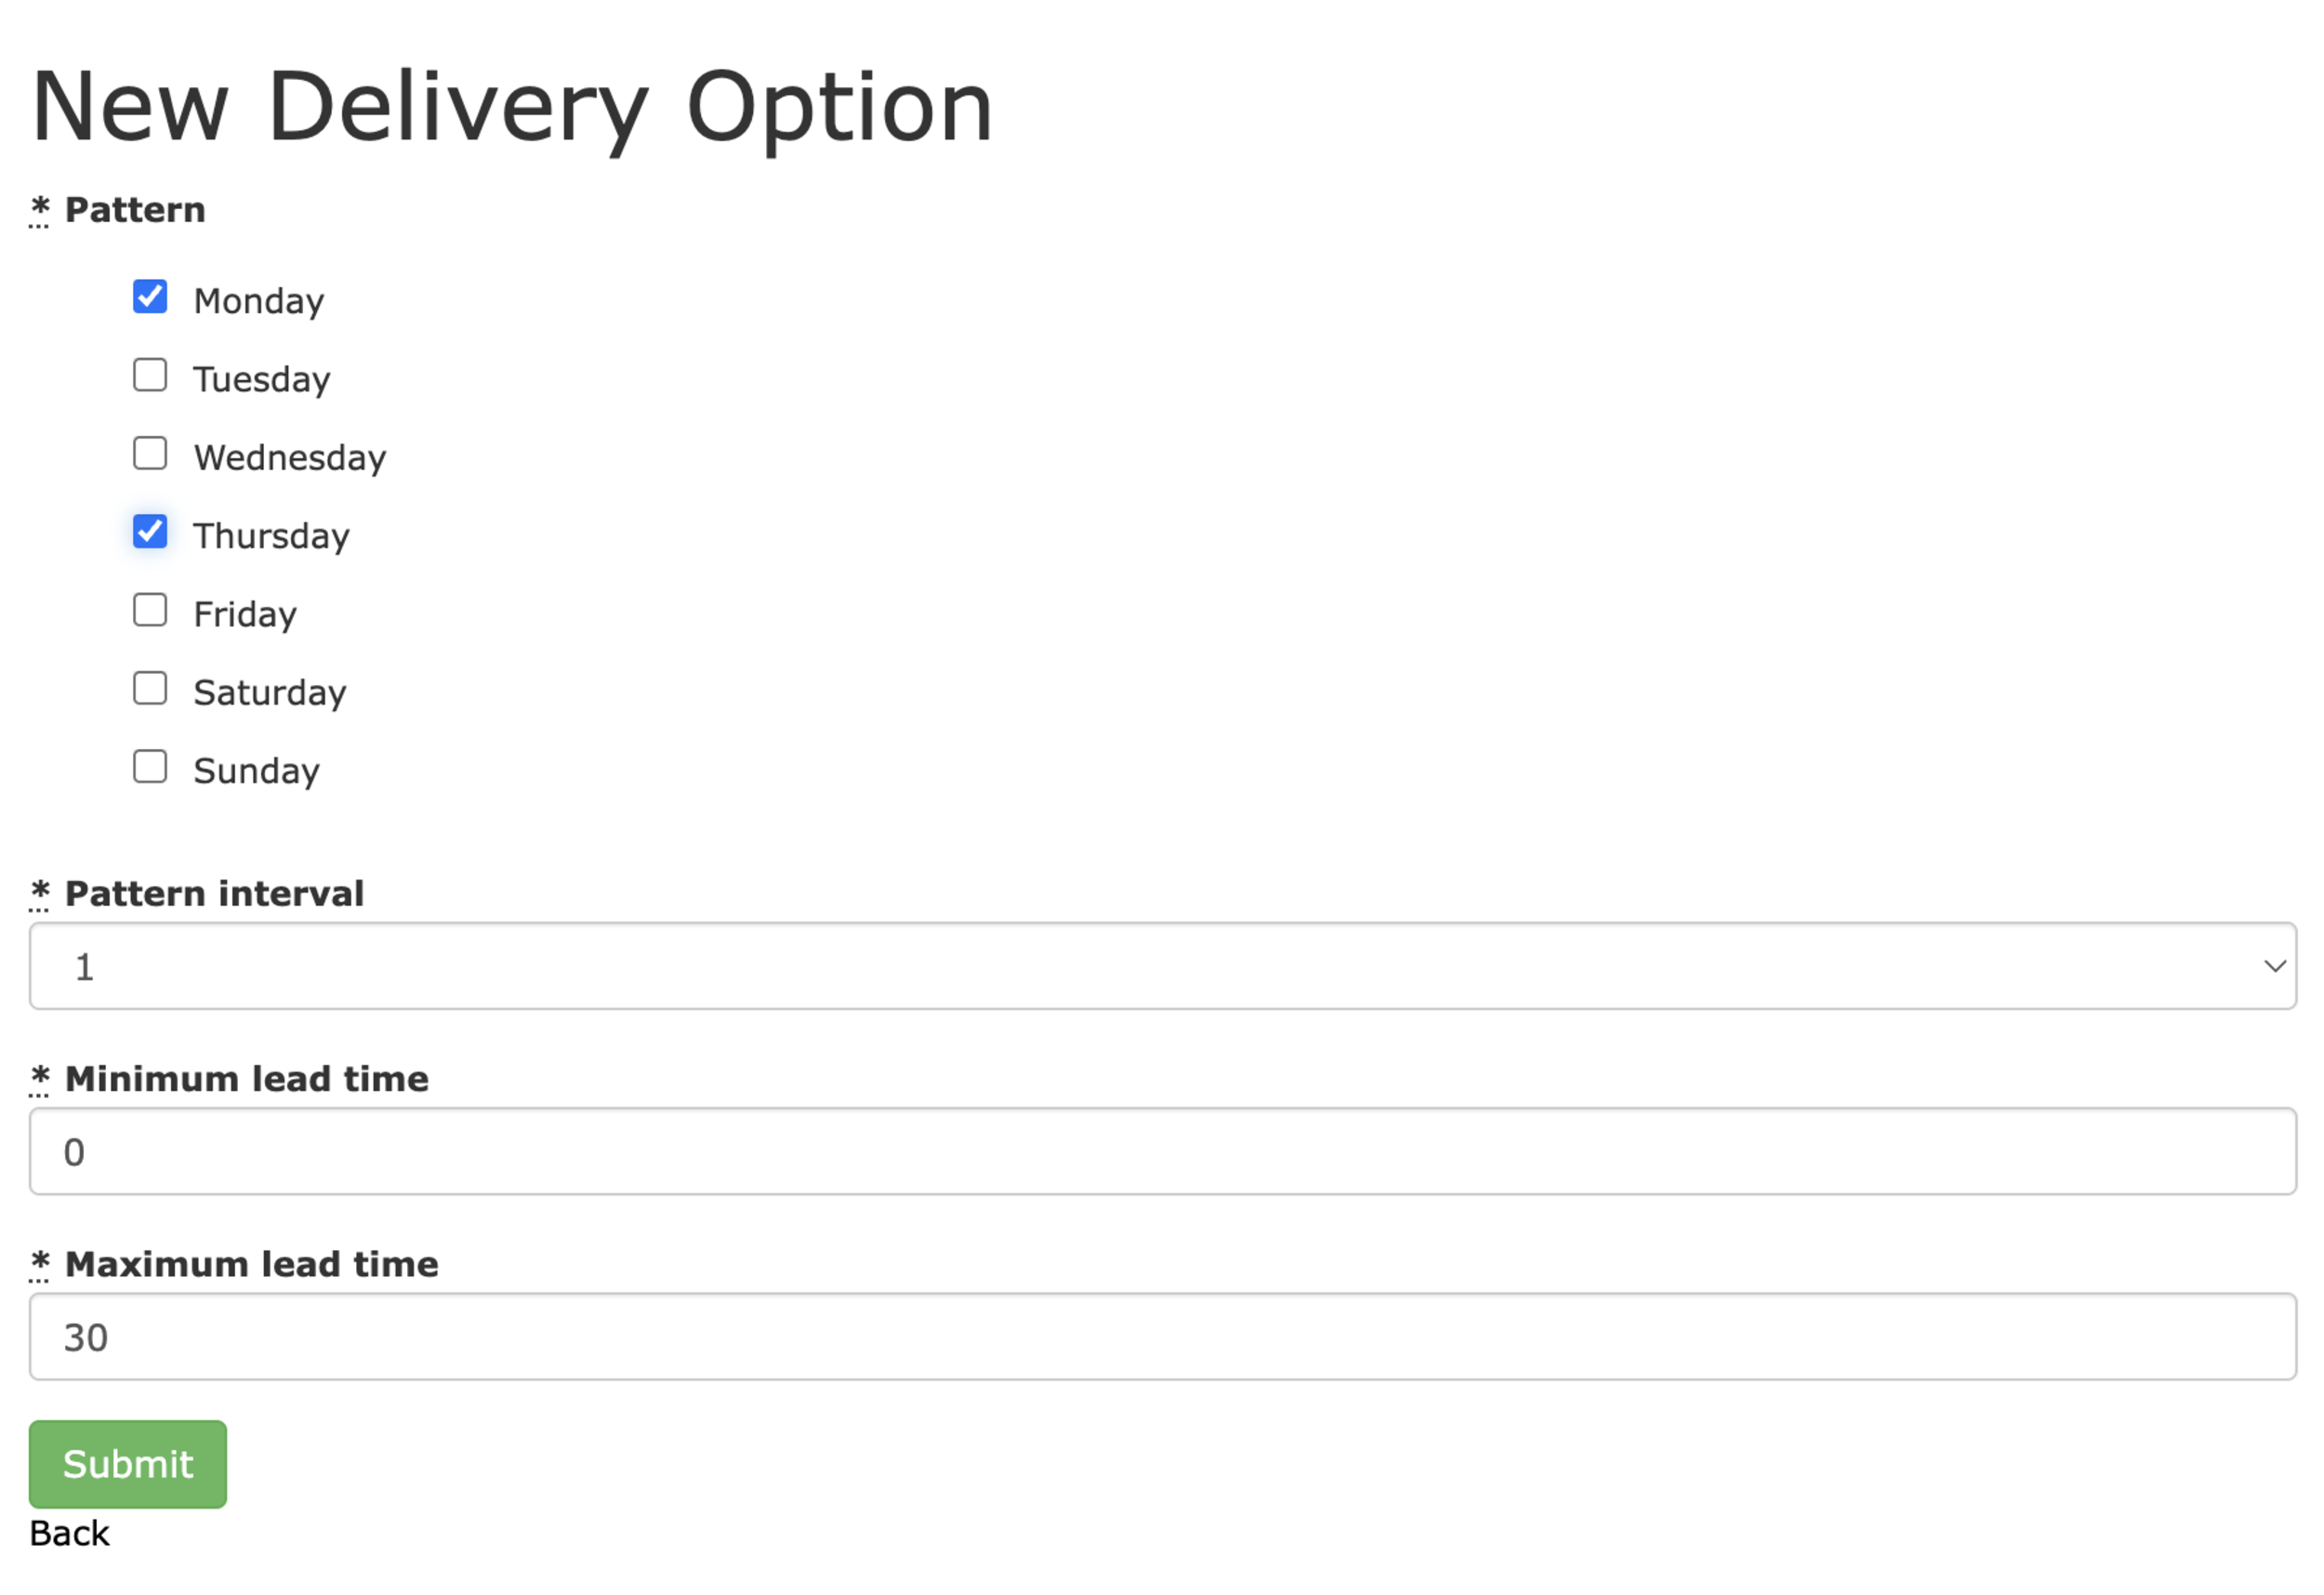
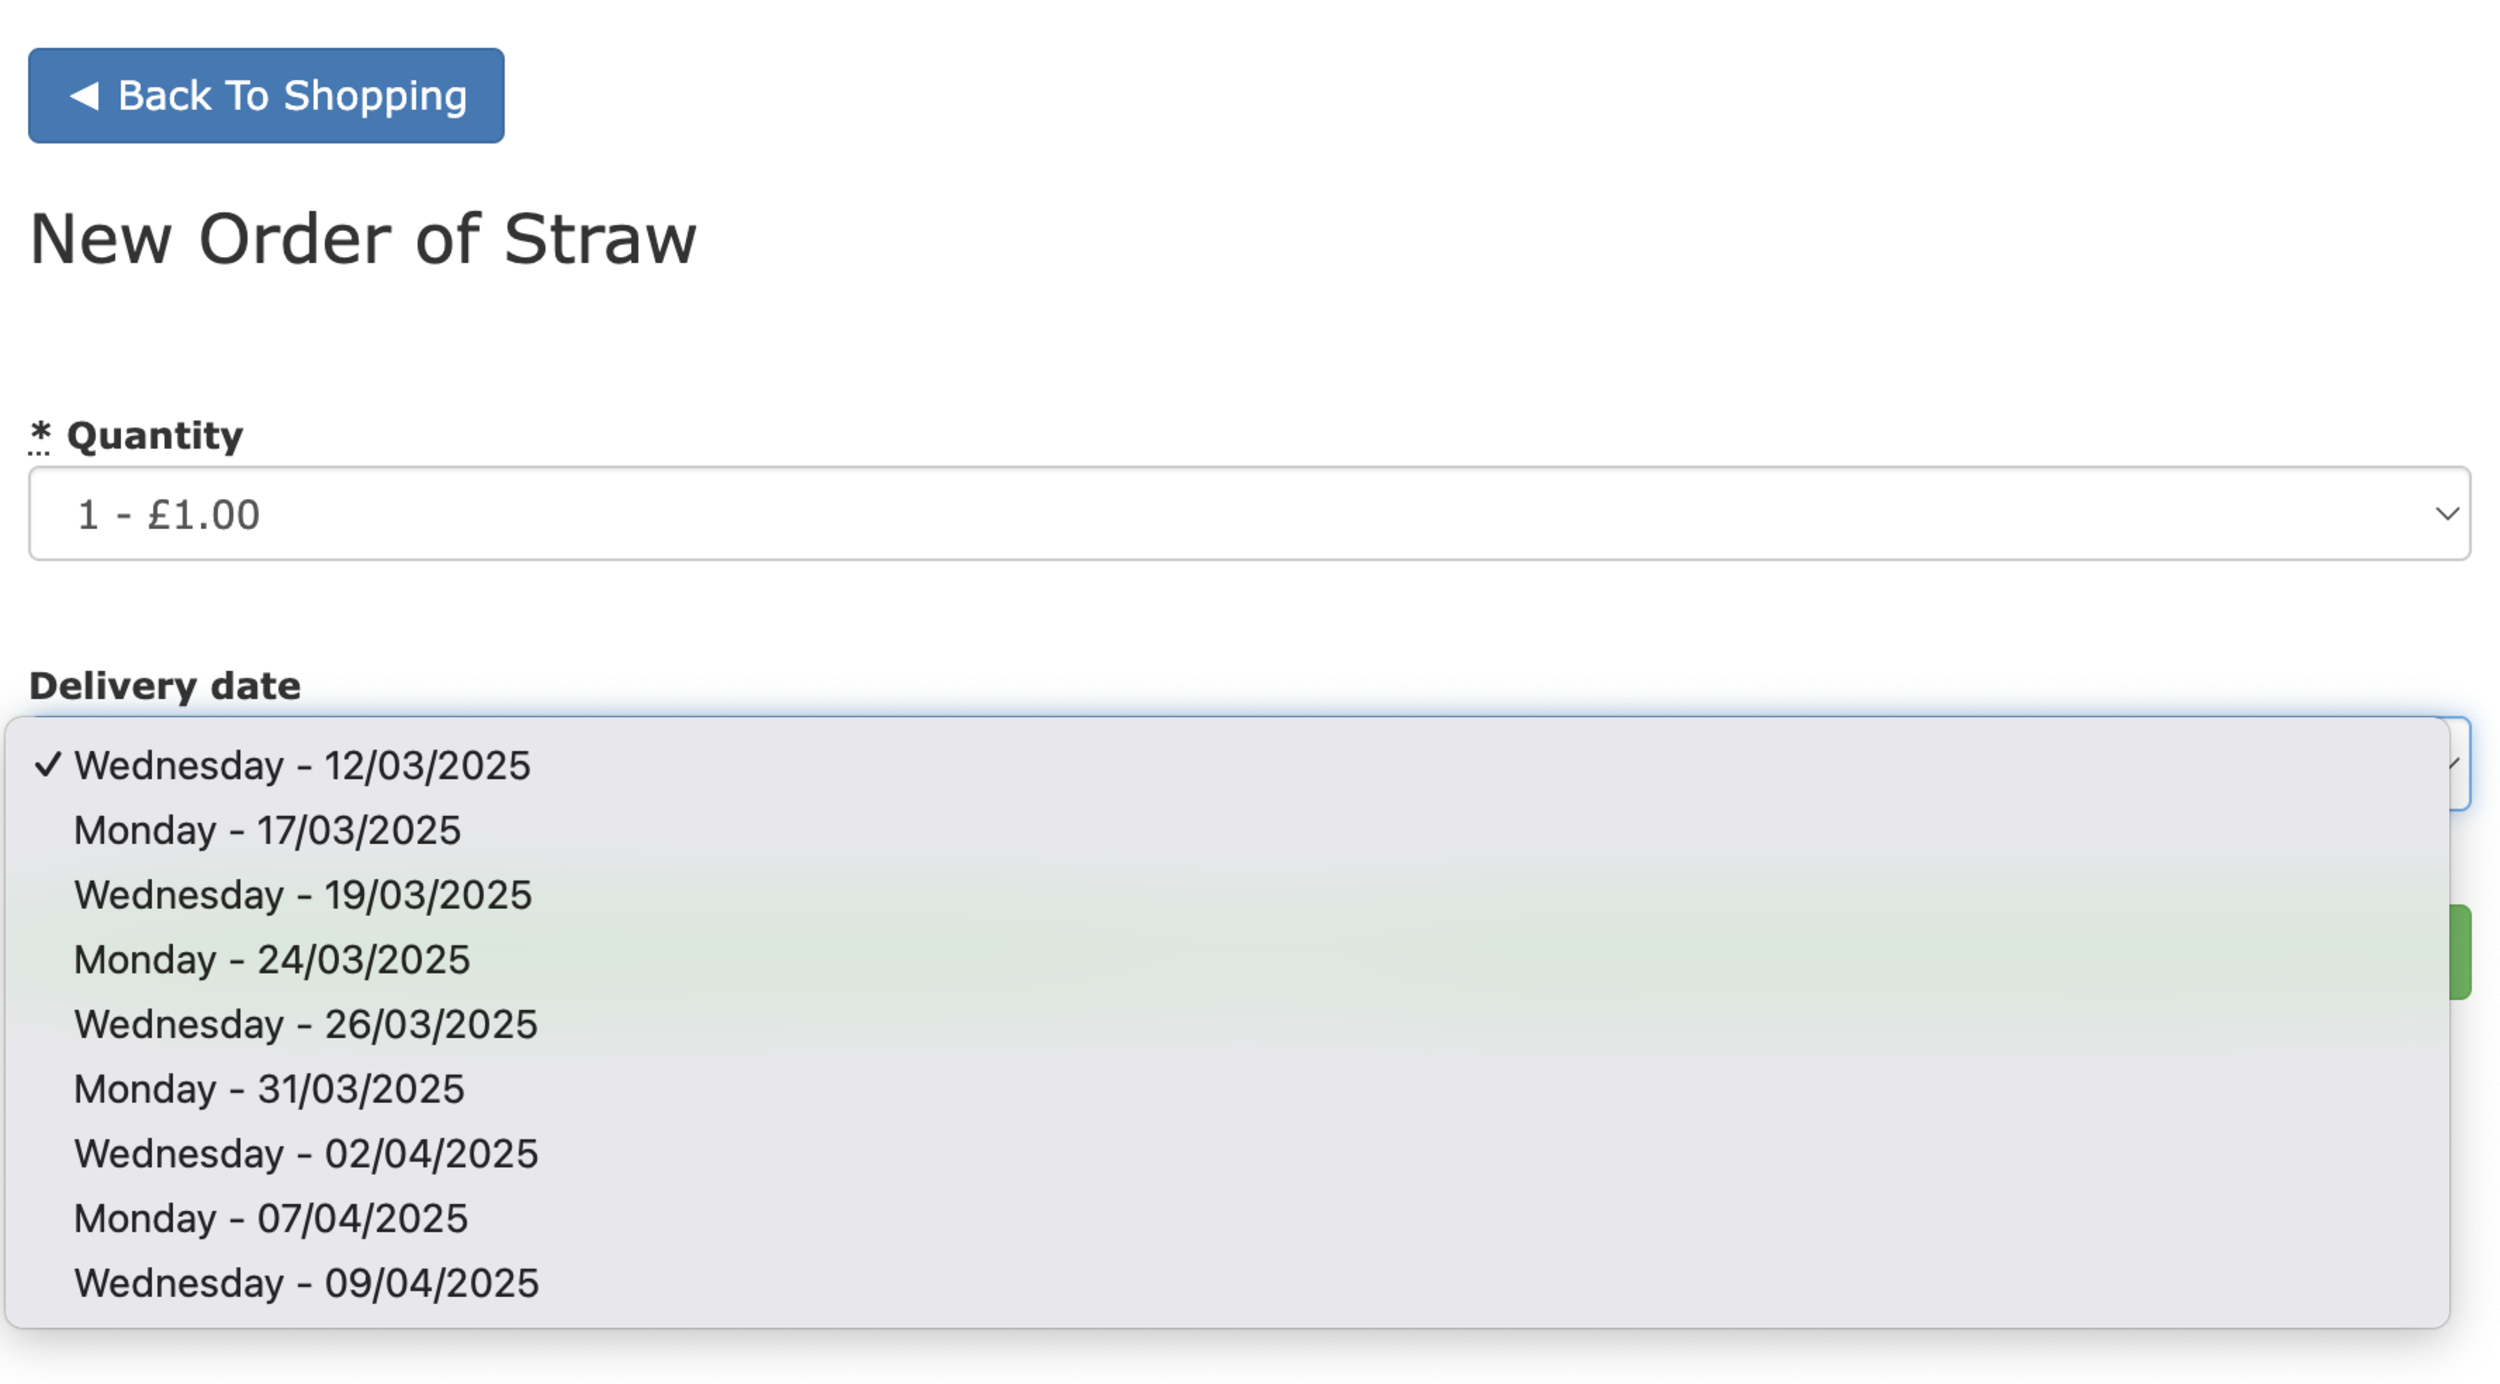
When customers shop on your site, they'll now see available delivery dates based on your configured patterns. The date selector will only show dates that match your delivery rules, making it clear when they can expect their items.
In the Shop Product Orders management screen, you can now see orders organized by delivery date. This makes it easier to plan your fulfilment schedule and manage your inventory effectively.
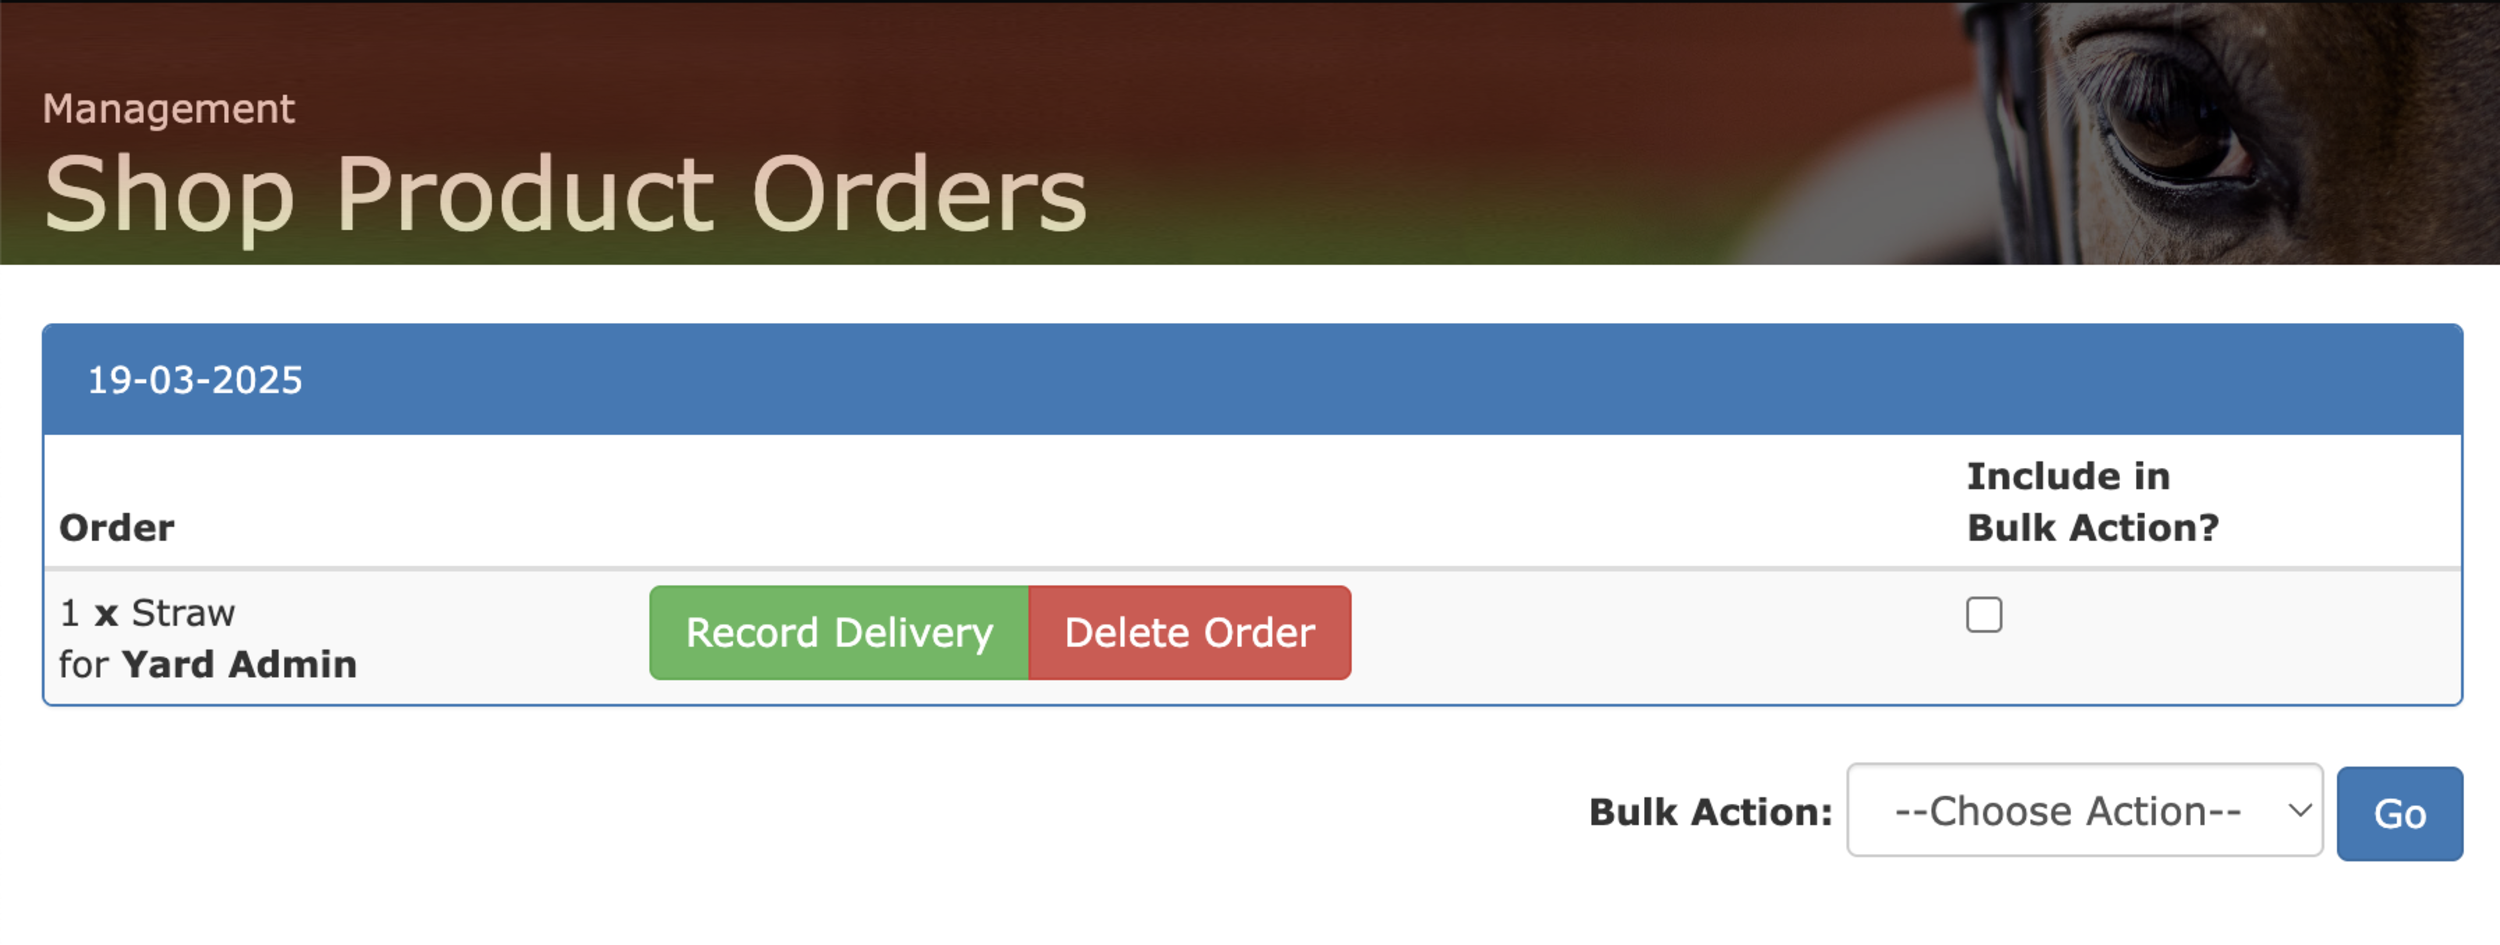
This feature is available now to all At The Yard shop owners. Log in to your admin panel today to start configuring delivery options for your products!

Ever found yourself wondering why an invoice was removed months ago? Or had a livery owner question a charge that seems to have vanished from their account? Managing the finances of a busy yard requires meticulous record-keeping, and today we're making that just a little bit easier.
Previously, when you needed to remove an invoice or charge in At The Yard, that information disappeared completely. It was simple but limiting—rather like mucking-out by throwing everything away instead of separating the good bedding for reuse!
Thanks to your feedback, we've implemented a much more sophisticated approach: our new void system. This allows you to maintain a complete financial history whilst still removing charges when needed.
Instead of the delete button sending your financial records into the digital equivalent of a muck heap, the new void function works more like putting them in a clearly labelled filing cabinet:
Before: Invoice/Charge deleted → All information gone forever
Now: Invoice/Charge voided → Removed BUT record kept with your explanation
This seemingly small change brings substantial benefits for yard managers:
Using the new system is refreshingly straightforward:
That's it! The charge no longer affects your accounts, but the information remains accessible in your financial history.

Running a successful livery yard means balancing excellent horse care with sound business practices. This update reflects our commitment to helping you maintain that balance with minimal additional effort.
We understand that you'd rather be in the arena or stables than puzzling over financial records, which is exactly why we've made this process both more powerful and just as simple to use.
The void system is automatically available to all At The Yard users starting today. No training is needed—just look for "Void" where you used to see "Delete."
Has this new feature made your yard management easier? Do you have ideas for other improvements? We'd love to hear from you, get in touch with your account manager today.
Managing a busy livery yard involves countless impromptu tasks and important observations that need to be communicated between staff members. Whether it's noting that a horse seems slightly under the weather or coordinating special arrangements for a visiting instructor, ensuring the right information reaches the right people is crucial for maintaining high standards of equine care and customer satisfaction.
We're excited to announce improvements to our Work Notes system, enhancing your ability to target these communications more effectively.
Our Work Notes system has long allowed you to share important information with either all staff or a single team member through both the Forecast view and Staff Dashboard. Now, we've enhanced this functionality to give you more granular control over who receives each note and how completion is tracked.
The most significant improvement is the ability to select any combination of staff members when creating a Work Note. This means you can now:
This enhanced flexibility bridges an important gap in yard communication. For instance, imagine you've noticed some mild swelling in a horse's leg that needs monitoring throughout the day. Previously, you would have needed to either create separate notes for each staff member or broadcast to everyone. Now, you can create a single note assigned precisely to those who need to keep an eye on it.
To complement this more flexible assignment system, we've also introduced new completion tracking options. You can now specify whether a Work Note should be considered complete:
This allows you to match the completion criteria to the nature of the task. For instance, if a vet has requested that three specific observations be made of a horse throughout the day, you can ensure each assigned staff member confirms their observation before the note is considered complete.
These improvements make Work Notes even more valuable for managing those important but irregular tasks that don't fit into standard routines. Consider these scenarios:
A client has requested photos of their horse's recovered injury site to share with their vet. You can create a Work Note assigned to both the morning yard supervisor and the afternoon groom, ensuring the horse is photographed in good light and the images are sent to the client. The note will remain active until both staff members have confirmed their parts are complete.
When a maintenance issue needs attention, like a loose fence rail spotted during morning checks, you can assign the task to your maintenance team and the yard manager. The note can be set to complete after any assigned person has fixed the issue, while keeping all relevant staff informed of the resolution.
These updates reflect our commitment to making yard management software that truly serves the practical needs of equestrian professionals. By offering more precise control over task assignment and completion tracking, we're helping you maintain the high standards of care your clients expect while keeping communication efficient and focused.
We're keen to hear how these new features are working in your yard. How are you using work notes to improve your daily operations?