

Blog
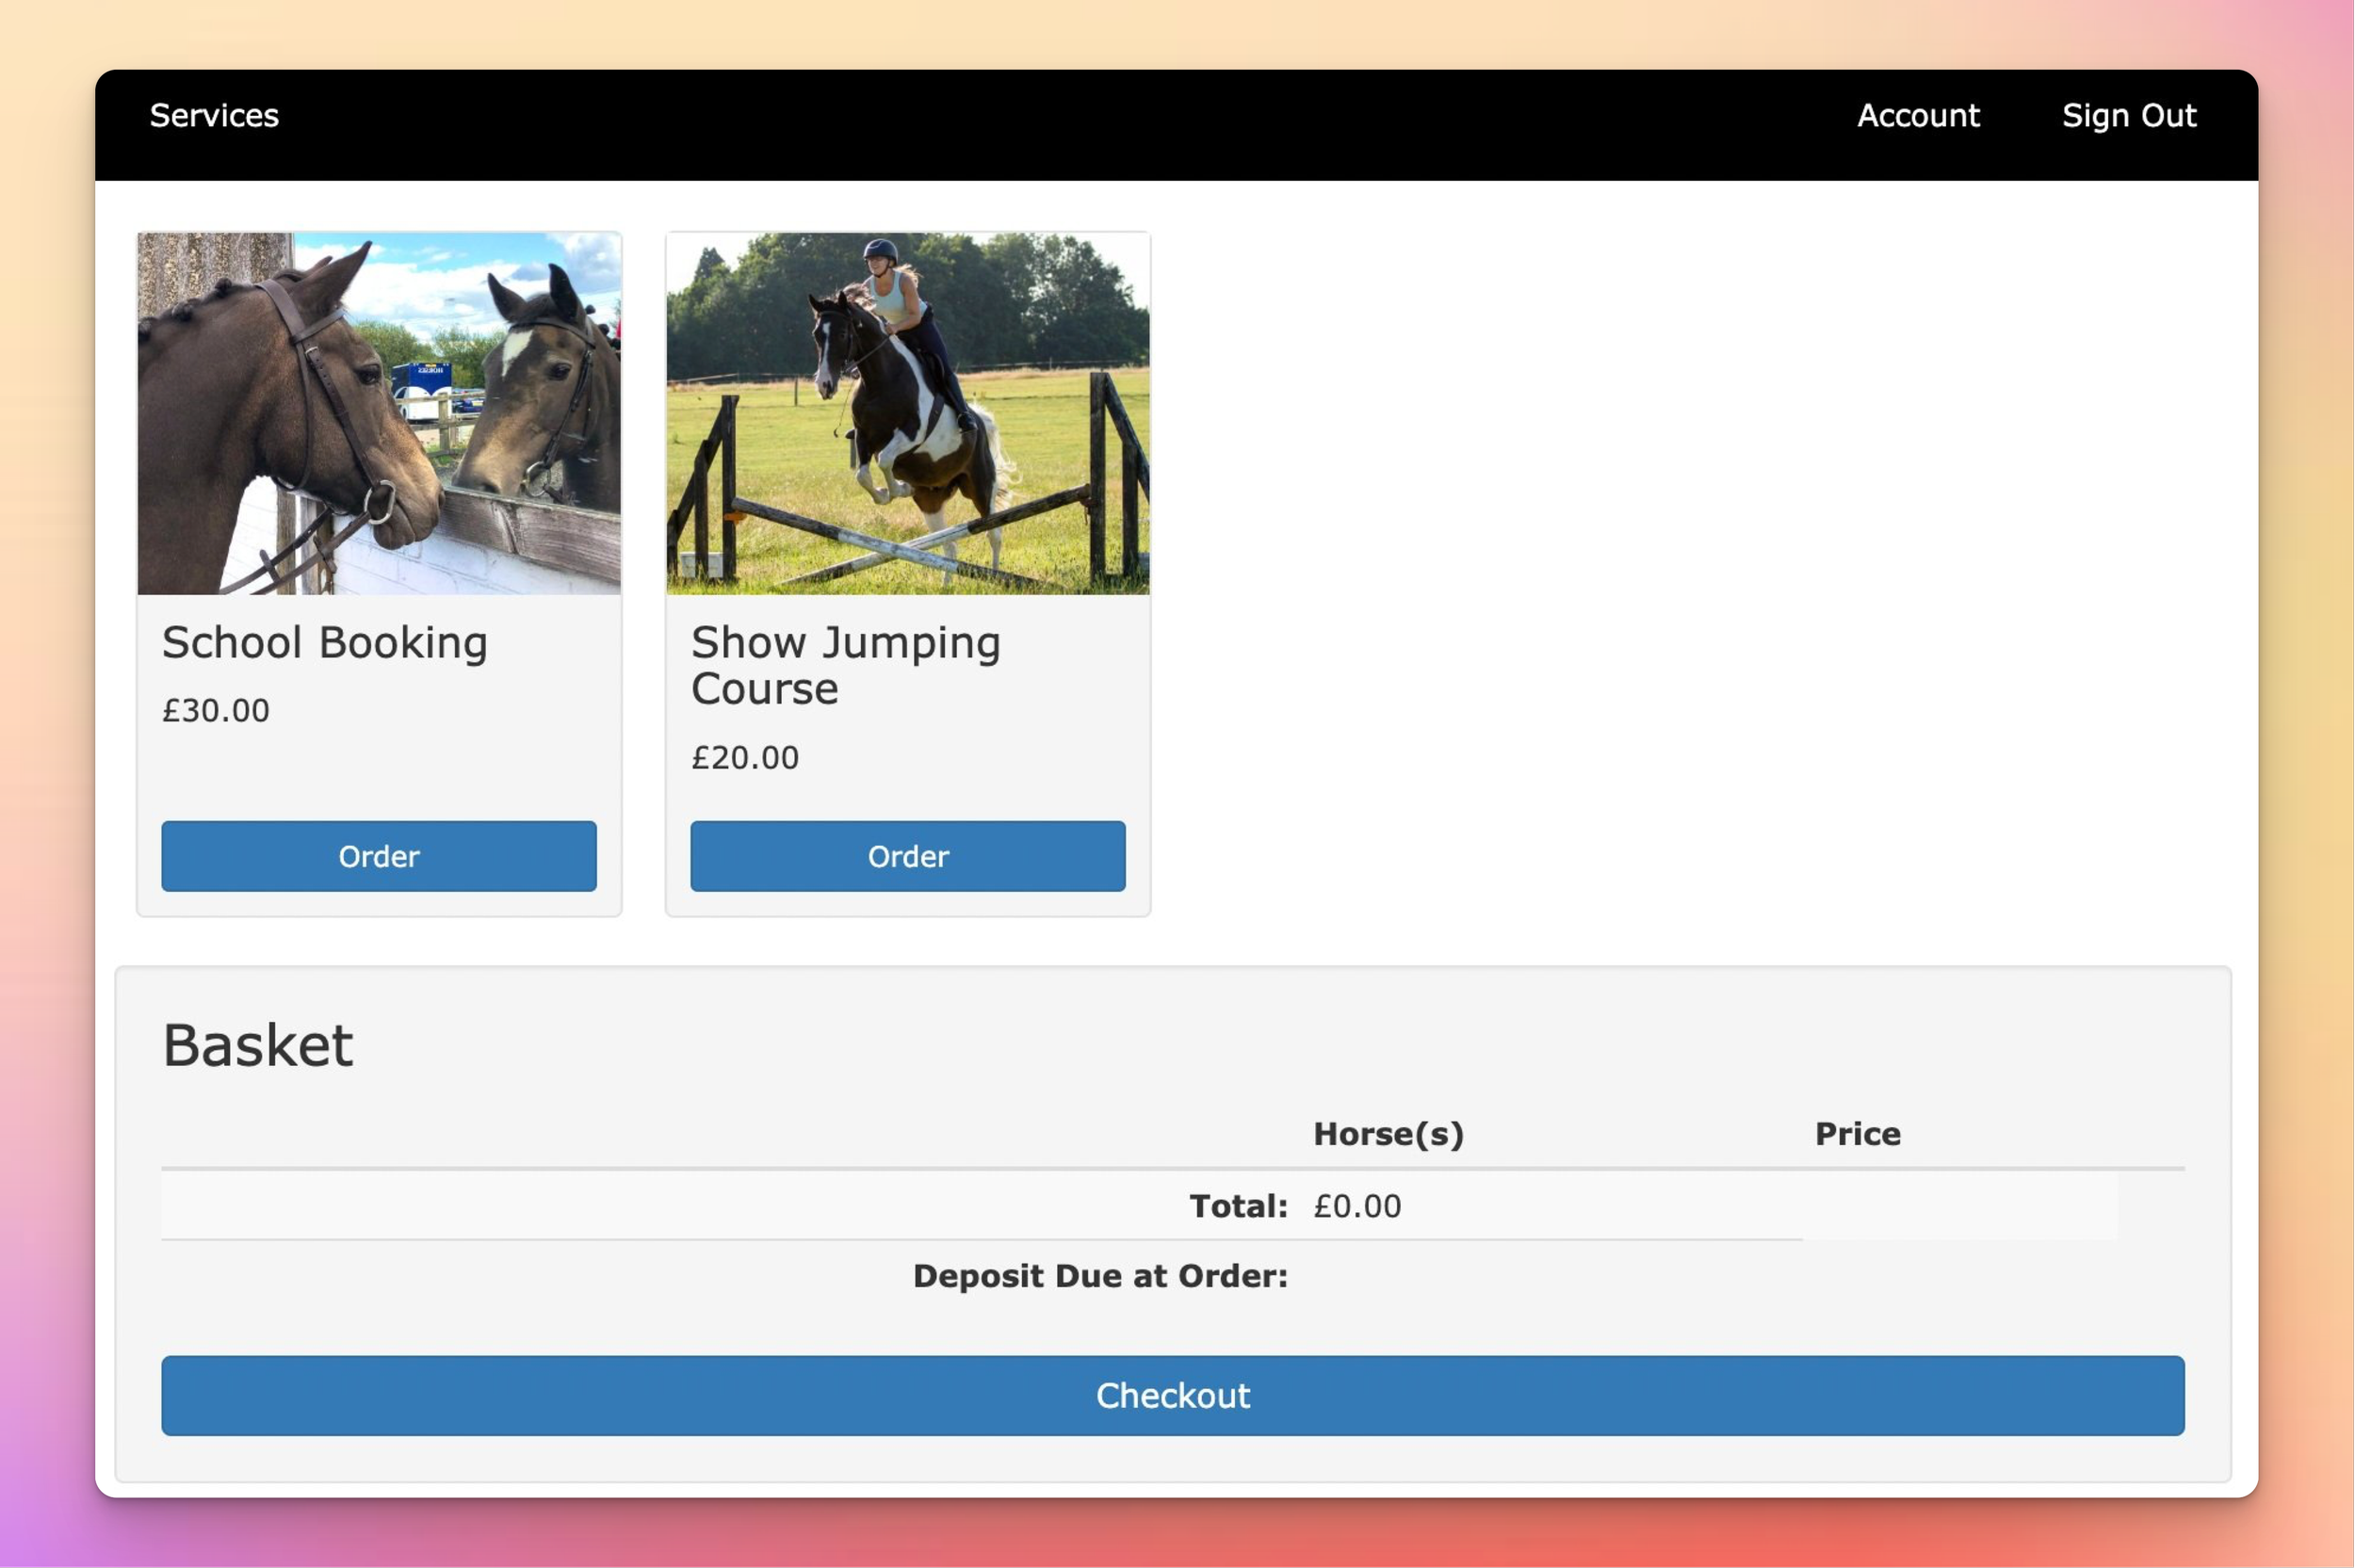
This step-by-step guide will walk you through the process of setting up your shop in At The Yard, empowering you to maximise your reach, connect with potential customers and seamlessly manage payments. Get ready to expand your businesses horizons and unlock new opportunities in the equestrian community!
If you haven't already, visit At The Yard's website and request a trial account. A member of our team will review your request. Once reviewed your account will be created and you'll gain access to the full suite of features and services At The Yard has to offer.
Upon logging in (as an admin), locate the "Manage Shop" menu item within the admin menu. Clicking on it will take you to the shop configuration page from where you can set up and manage your shop.
To streamline transactions and automate payment processing we've integrated a number of payment gateways with At The Yard.
Before you begin you'll need to have an account with one of these payment providers. If you don't already have one you'll need to create one (see links below):
We recommend Stripe for the majority of clients as it offers some extra features. However SumUp is available, upon request, for markets where Stripe is not available (e.g. Channel Islands).
Once you've got your account at a provider you'll need to return to the Shop Configuration page in At The Yard to connect At The Yard to the payment provider. To do this go to payment providers panel where you'll see the link complete a configuration step in the integrations panel.
![\[/s/Screenshot 2023-05-15 at 10.05.09.png\]](/assets/blog/Screenshot-2023-05-15-at-100509_2500-3f9e41c230894f90850f50ac30f230210ef9f7bada13d965bcb957ad73c1e63a.png)
The link takes you to At The Yard's integration page. The first step is to enable your payment provider of choice by clicking 'Enable'. Then find the link 'Connect with Stripe/SumUp' and click on it to proceed to the next step.
Follow the instructions the payment provider gives you until you return to At The Yard. Your provider is now connected! You can return to the shop management page where you'll now have the option to tick your choice of payment provider (remember to click Save once you're done).
![\[Screenshot 2023-05-14 at 10.23.24.png\]](/assets/blog/Screenshot-2023-05-14-at-102324_2500-8945188272a5732391115c23e4b6295c4da8ef5ae4e011821e41ad4077b0c179.png)
Before you can publish anything in your shop you first need to set them up in At The Yard as a service. This can be done on the Services page (listed under the admin menu tab). You can use existing services or create new ones exclusively for the shop.
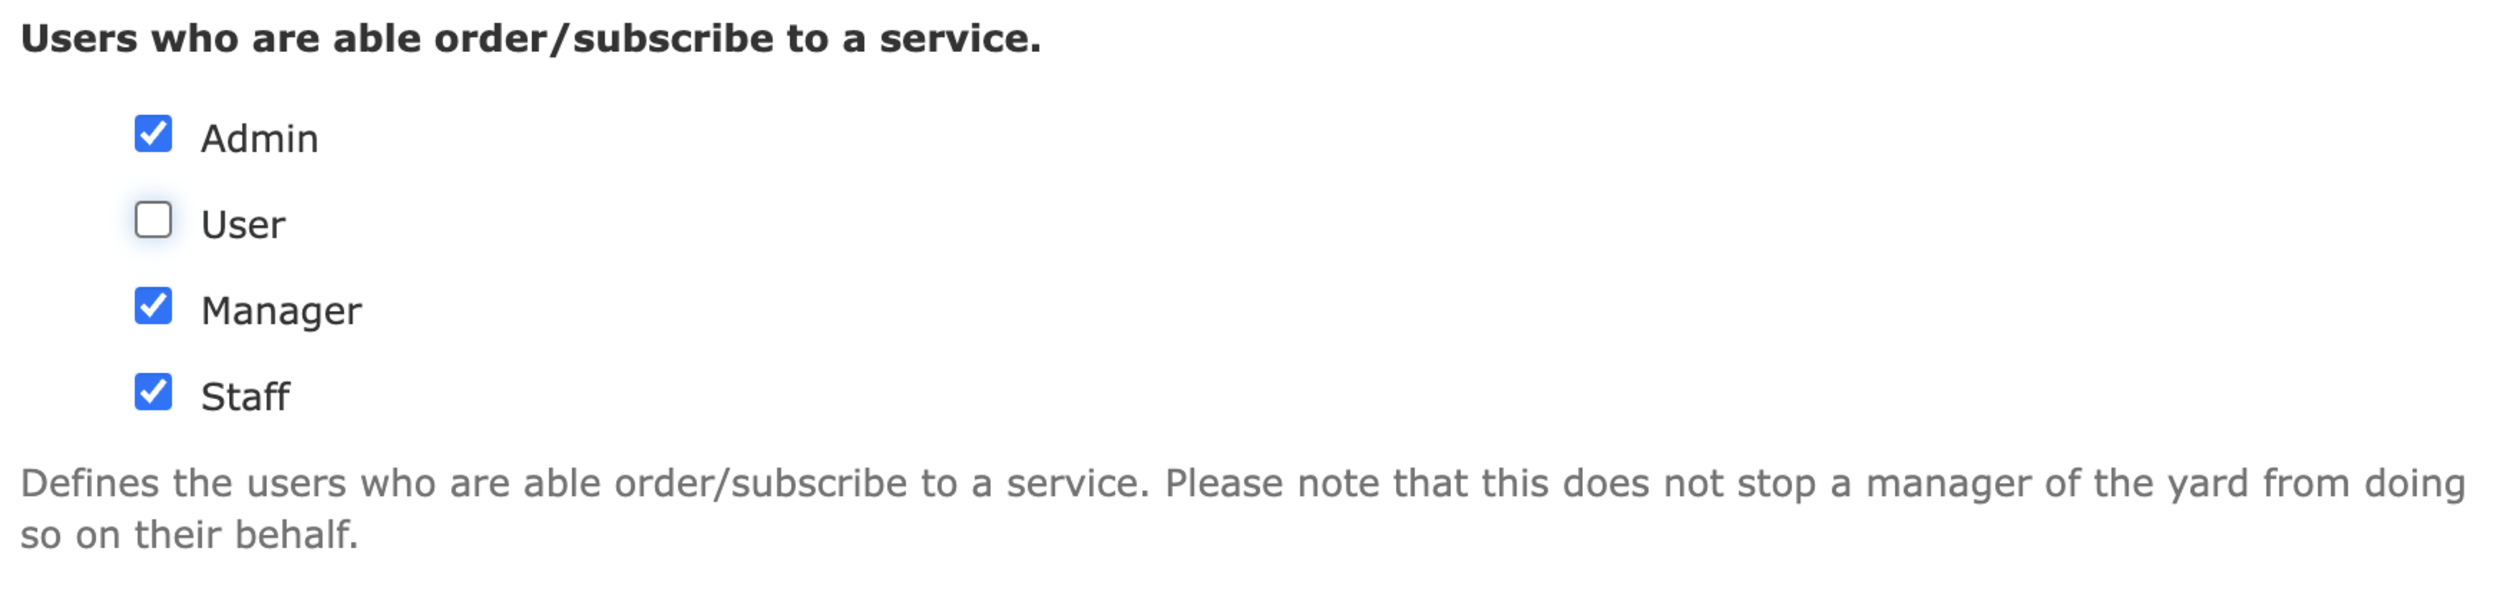
Helpful Tip: To make the service only available in the shop, and not to your existing livery users, remove the tick from User in 'Users who are able order/subscribe to a service' option when creating the service (shown below).
As with all services in At The yard you can specify the availability and any relevant ordering policies for the service, ensuring a smooth and efficient scheduling process for your customers.
When publishing a facility (sand school, arena etc) you will first need create a new service with the Allow ordering by calendar? option set. This will allow users to pick from a calendar. This can be linked to your existing facility with the Dependant Facility feature (as shown below).
![\[Screenshot 2023-05-15 at 10.42.21.png\]](/assets/blog/Screenshot-2023-05-15-at-104221_2500-da0455fecaceb0f1fdd2c6a11a860b0cf3f39632269b9d52fc5eca14eec355c7.png)
Now you've created the services you're ready to publish each of them. To do this go to the shop manager and click Publish New Service at the bottom of the service publications panel.
To showcase your offerings effectively you'll want to include a detailed description, high-quality images and all the information a prospective customer needs when making a booking.
To support this each publication has a number of options available to you which we've outlined below:
![\[Service_Publication_1.jpeg\]](/assets/blog/Service_Publication_1_2500-1258473270332776474c3291a918753c46c46f78eeafbf1c94e830390de42d03.jpeg)
Service: Select the new or existing service.
Price: Select the price your customers will be charged in the shop for a single order/booking.
Deposit: If you wish to only take a deposit (leaving the rest to collect manually when they arrive) enter the amount here.
Minimum Orders: You can require the customer to order more than 1 unit of a service by changing this value (this needs to be combined with a corresponding pricing option shown below).
Unit Name: Use if you need to change the name of the unit (for example to 'rounds' if you're hosting a clear round competition).
Active: When unchecked it stops users from ordering this service.
Hidden: When checked the service is available but is hidden from the front page of the shop. Customers can still access the service if they have the web address shared with them.
![\[Screenshot 2023-05-14 at 19.08.47.png\]](/assets/blog/Screenshot-2023-05-14-at-190847_2500-5f758e55400768f52555495d23f70d22239cdb0d30d0b04886dc50a3014f091e.png)
Pricing Options give you more flexibility in pricing your services for customers, allowing you to set a different price dependant on the number of orders they make.
Please Note: It is important that you create a pricing option for every different size of order you want to support. If you, for example, create a pricing option for 2, 3 and 5 orders (4 has been skipped) then they're will be no option for a customer to order 4 of that service.
![\[Service_Publication_3.jpeg\]](/assets/blog/Service_Publication_3_2500-bf7cdc087c80d5e25afd57fe755bb83b46d3533452475e771abb75c8e6d93766.jpeg)
Information: Here you can provide all the additional information a customer might need to know when they're ordering a service.
Marketing Image: This is the image that will show on the front page of the shop.
Gallery Images: You can upload as many images as you want here to showcase this service/facility at it's best.
Once you've finished adding all of your services you're almost ready to go. Take a moment to take a look over the ordering of the services in your shop - you can make adjustments up and down by using the green and orange arrows.
![\[Screenshot 2023-05-14 at 19.05.40.png\]](/assets/blog/Screenshot-2023-05-14-at-190540_2500-41f207936a2f66dedbecb3b05596f44b4e3c90a2f212a3f33d2ab7d30eda8de0.png)
Finally do one last review of everything. Proofread your descriptions, double-check your pricing and once you're satisfied, hit the Enable Shop button on the shop management page and watch your shop go live with At The Yard!
The web address for the shop will be shown at the top or left of the shop configuration page (it'll end in /shop).
Now that your shop is up and running, it's time to spread the word. Leverage your existing networks, social media platforms, and equestrian communities to promote your new shop.
Setting up your shop with At The Yard is a straightforward process that can significantly expand your equestrian business horizons. By following these steps, you can create an enticing shop, showcase your services and facilities, automate payment processing, and tap into a broader community of riders and enthusiasts.
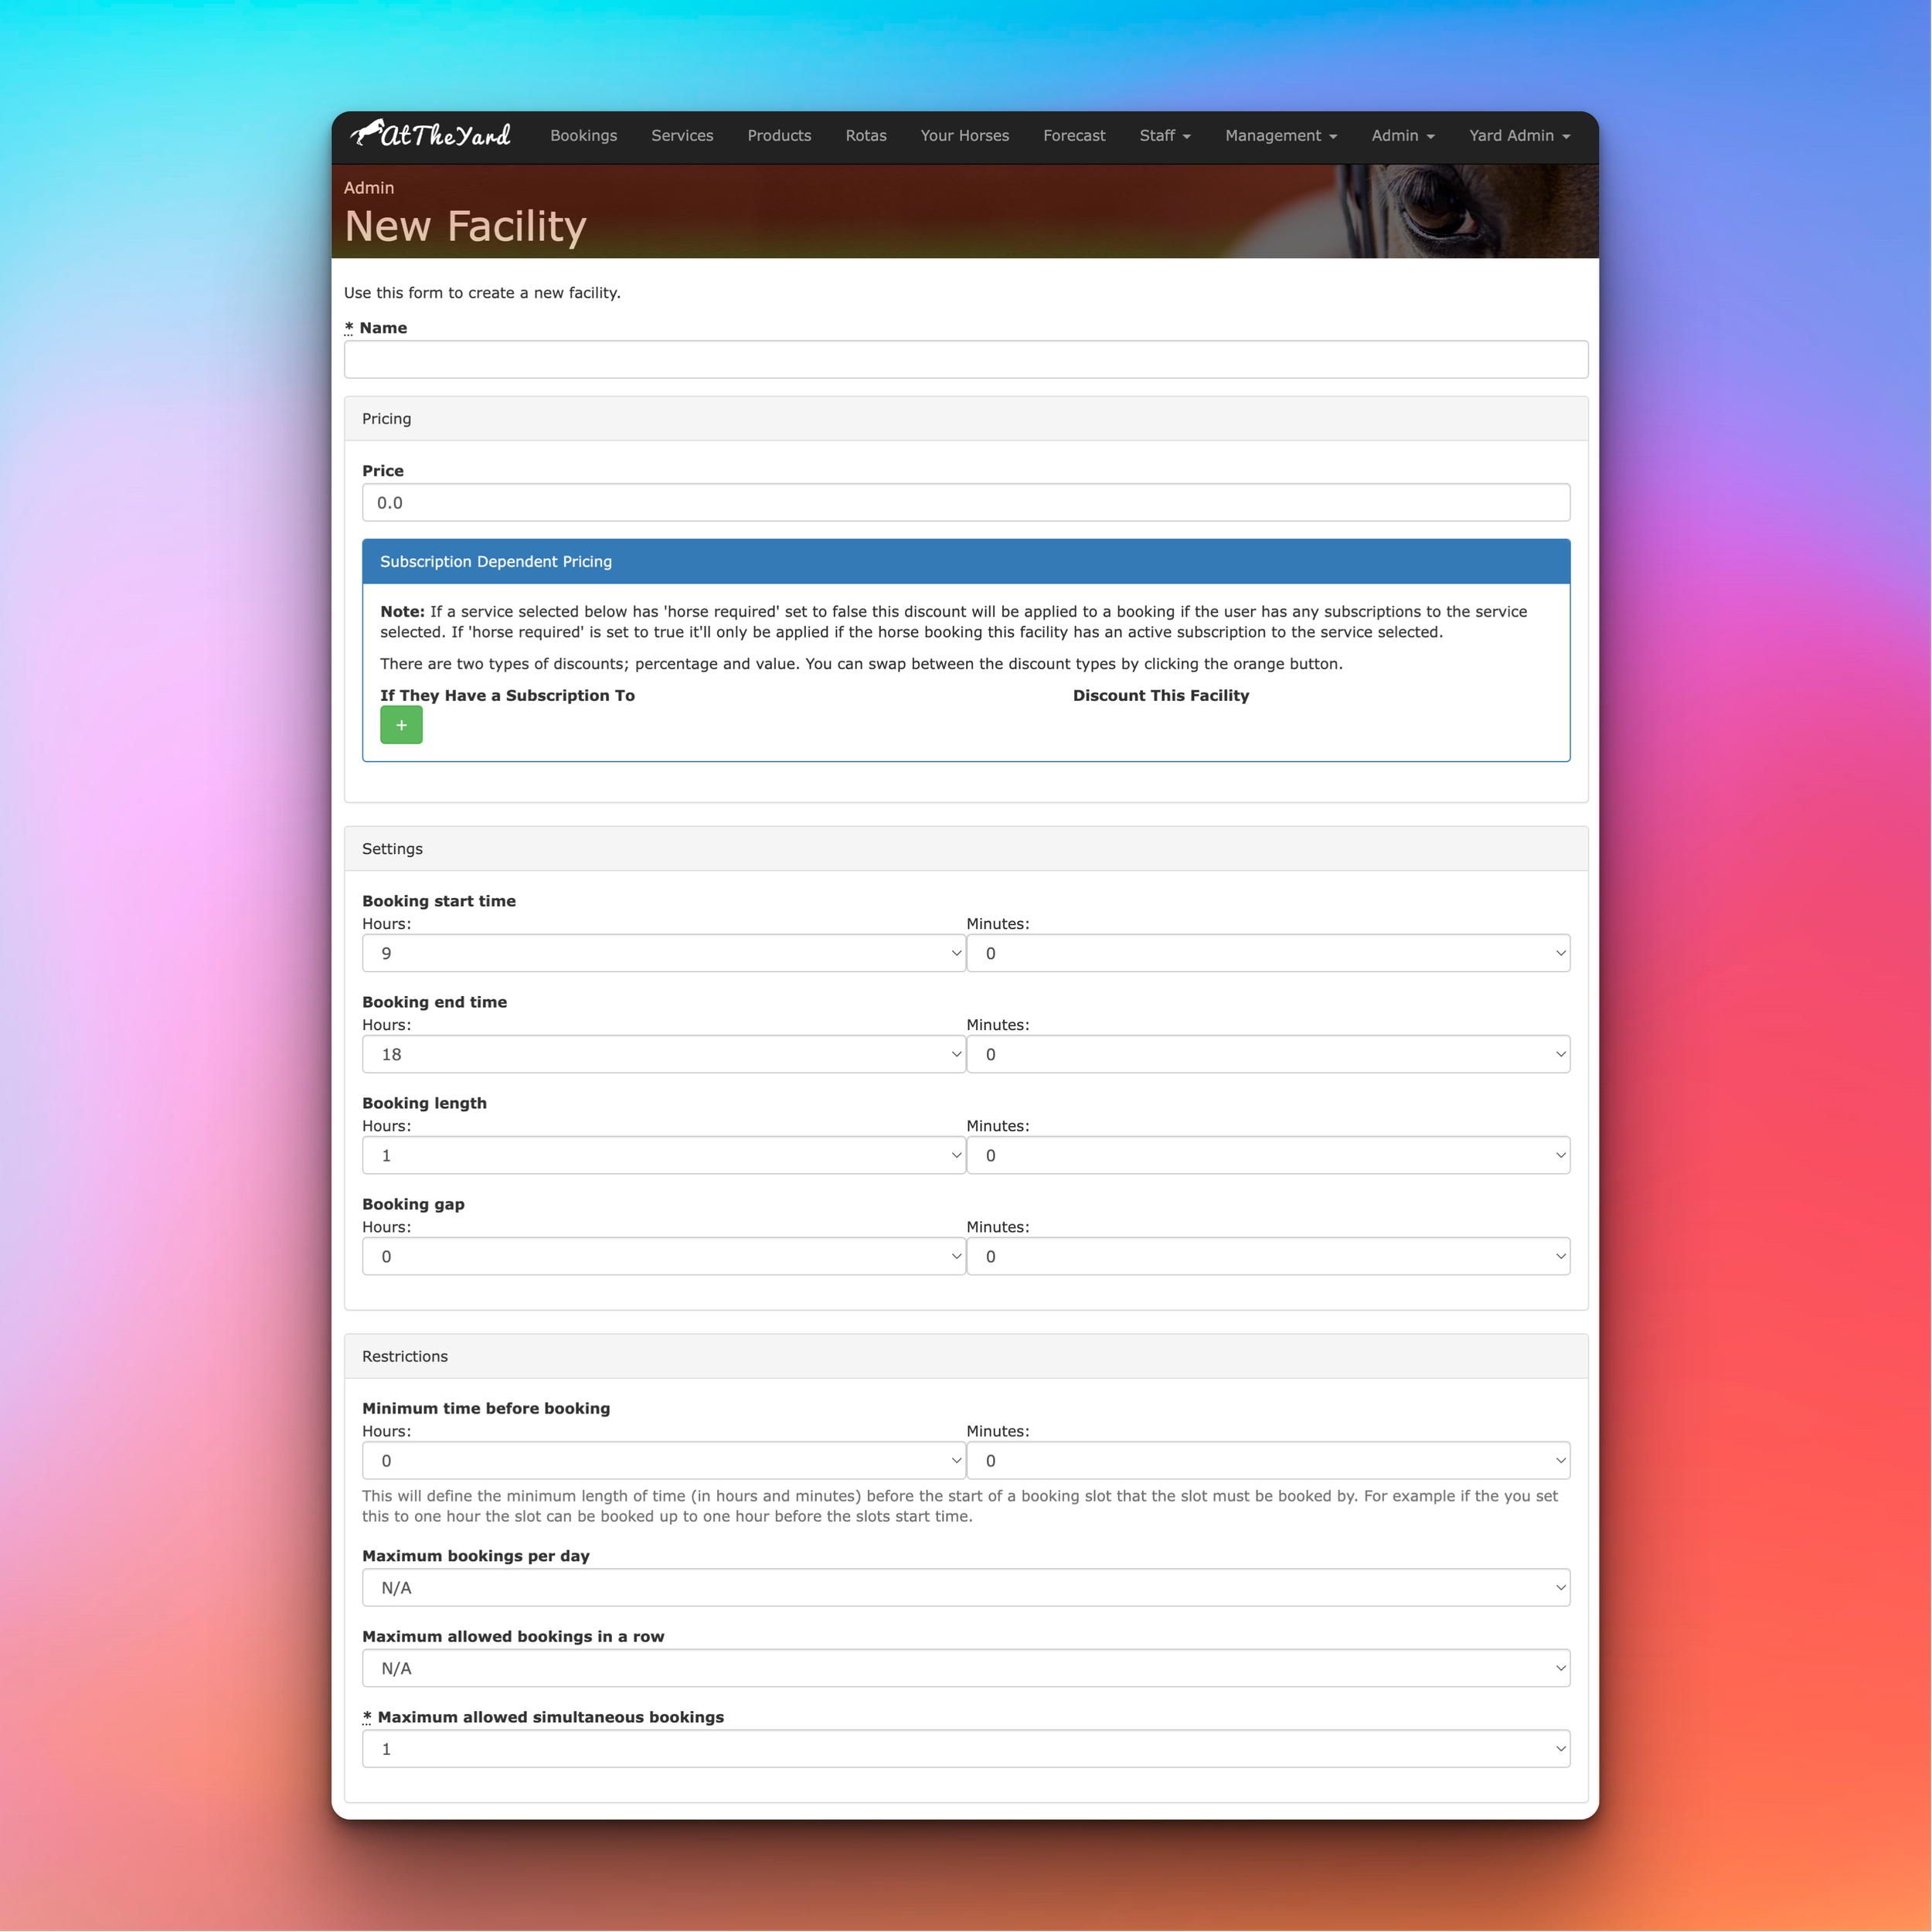
At The Yard has a broad range of options to allow you to setup bookings for your facilities to run just the way you like. In this blog post we’ll be taking a look at all of them and explaining why and how you can use them.
If you are looking to setup your facility to be available to the public you’ll need to look at our guides on setting up your shop. This guide is purely for setting up facilities for bookings within your yard.
For some yards/facilities this section can be completely ignored. If you don’t charge your customers a fee for using your facilities you can leave it as is. However if there is a charge this section will allow you to configure all the options available.
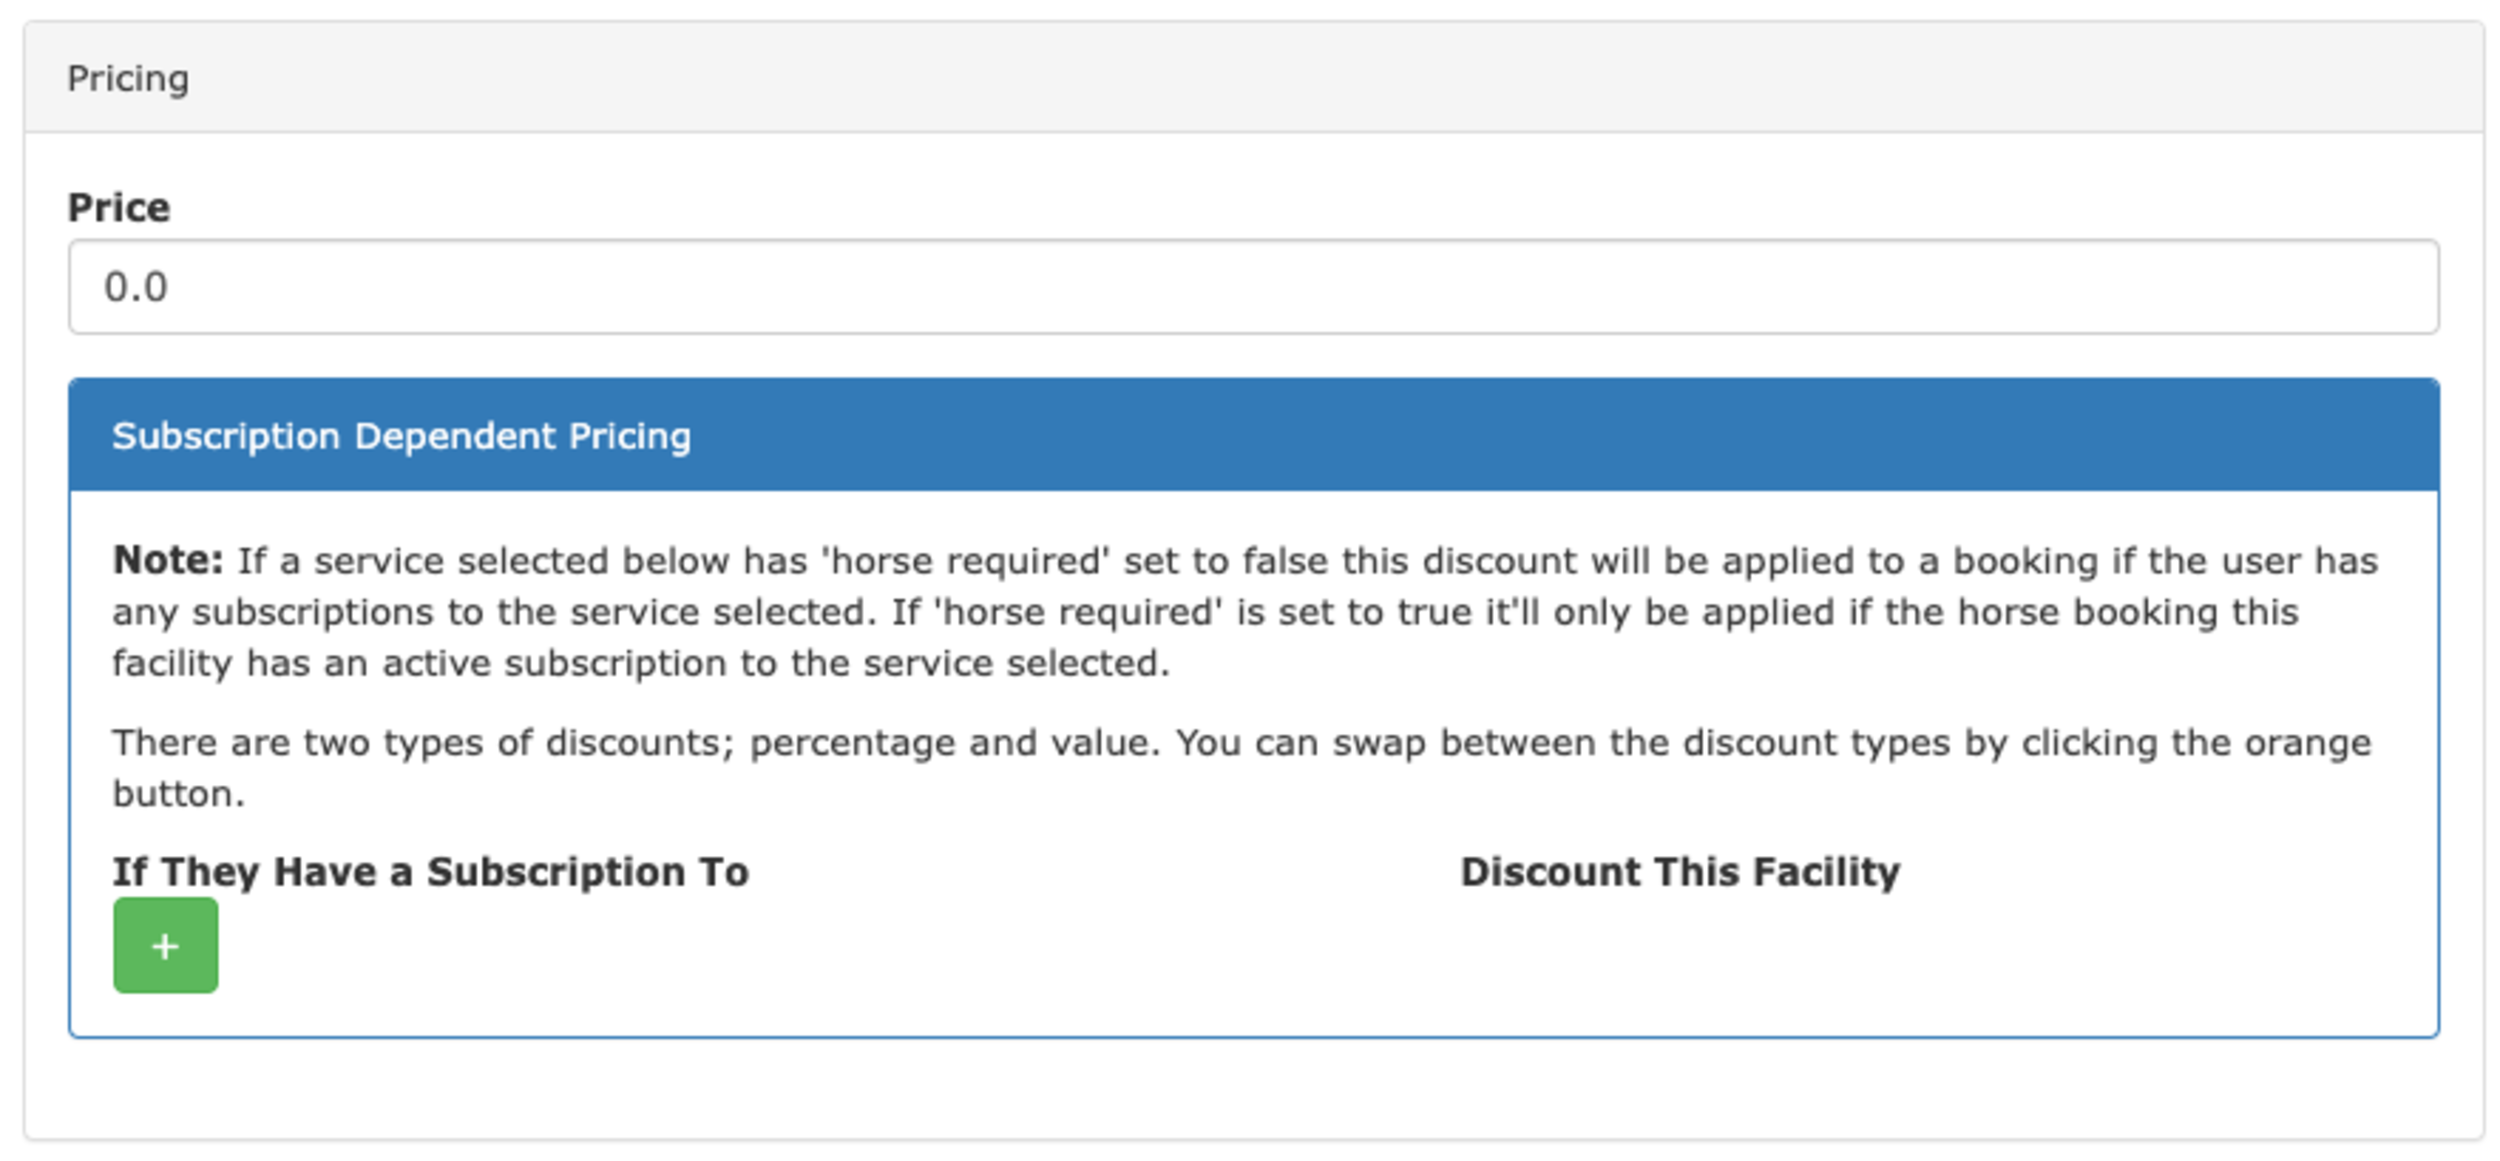
The initial option is the standard price for the service (if you’re VAT registered you’ll see the options here to set the VAT code as well).
The price you set here will be the amount charged to your customer when their booking takes place (e.g. if booked on the 01/04/23 at 10:00 the charge will be raised on 01/04/23 at 10:00).
The next section is Subscription Dependent Pricing. This allows you to vary the price a customer will pay based on the subscriptions they have (e.g. if they have a certain livery package or a membership package you can offer them a reduced rate or allow them to use it for free).
To set this up you click on the plus button, chose the service to which they must have a subscription and set the discount. You can do this for as many different services you have, allowing you to create multiple levels of benefits to your users to fit the needs of your business.
We also support including a number of visits to a facility as part of livery or membership package. This can be configured once you’ve created your facility and instructions on how to do this can be found here.
Settings allows you to configure the overall availability and slot lengths throughout the day.
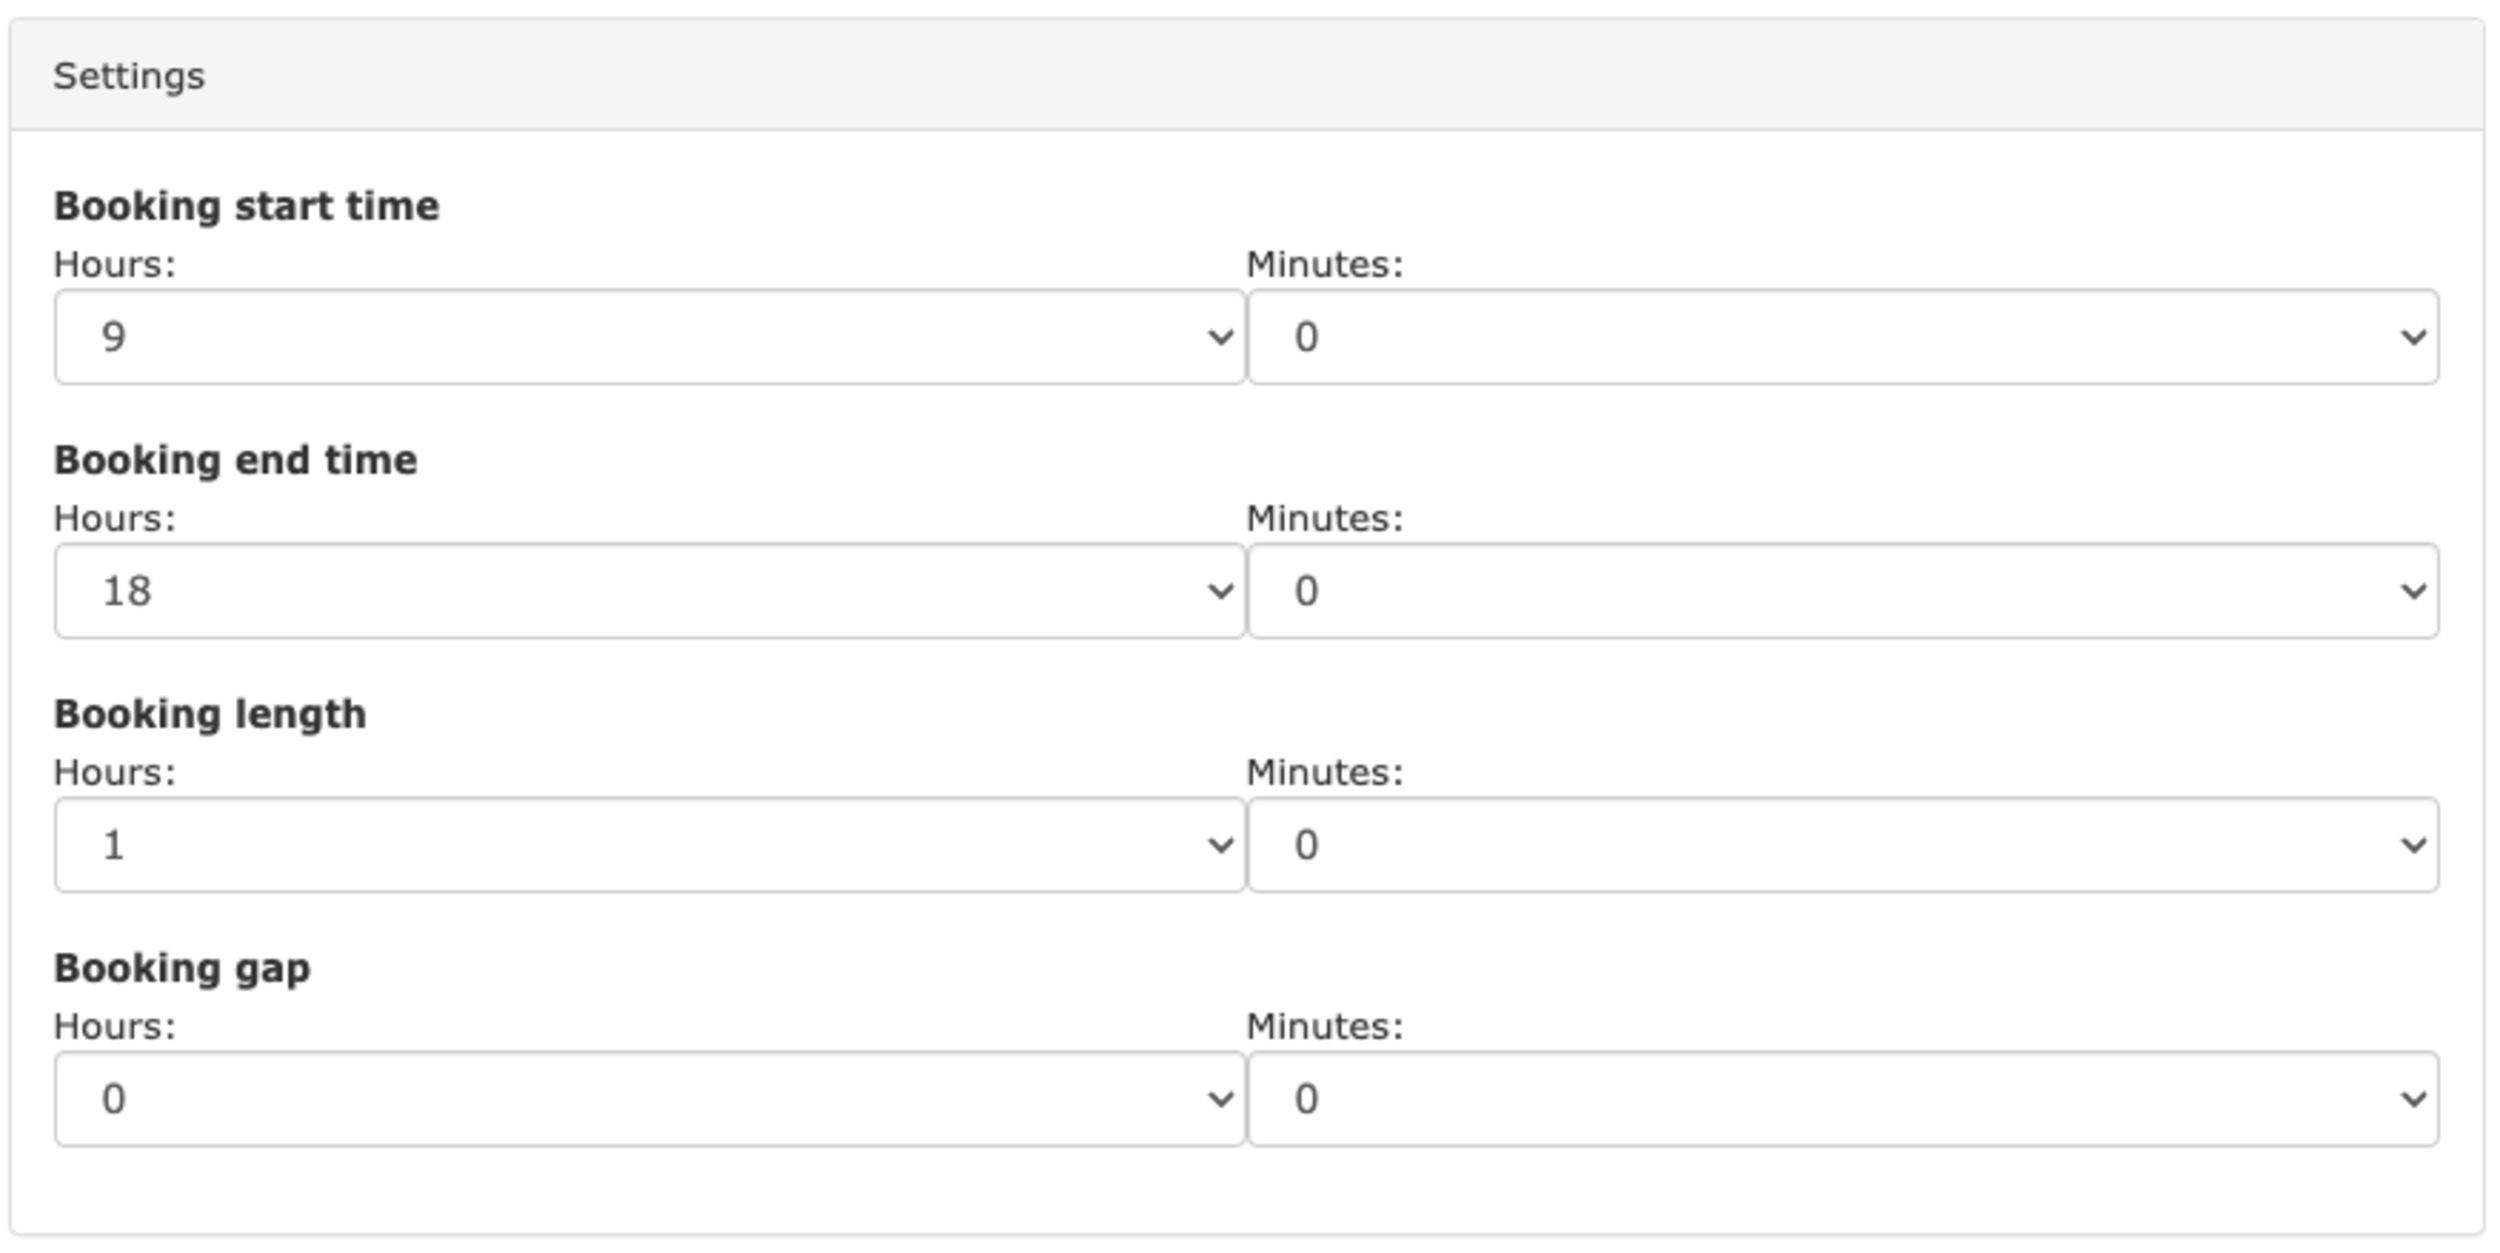
Start and end times dictate when the facility is open and closed. Booking length sets the length of the slots themselves and gap length sets an un-bookable gap between slots (great for giving time to tidy the school).
Handy Tip: With booking length it’s generally a good idea to keep this relatively small (15-30 minutes). Users are presented with a button when booking to extend their booking over multiple slots. Because of this keeping slot length small allows the most flexibility.
Restrictions are the opposite of settings. Where settings allow access, restrictions constrain users in certain ways to allow you to keep control over your facilities.
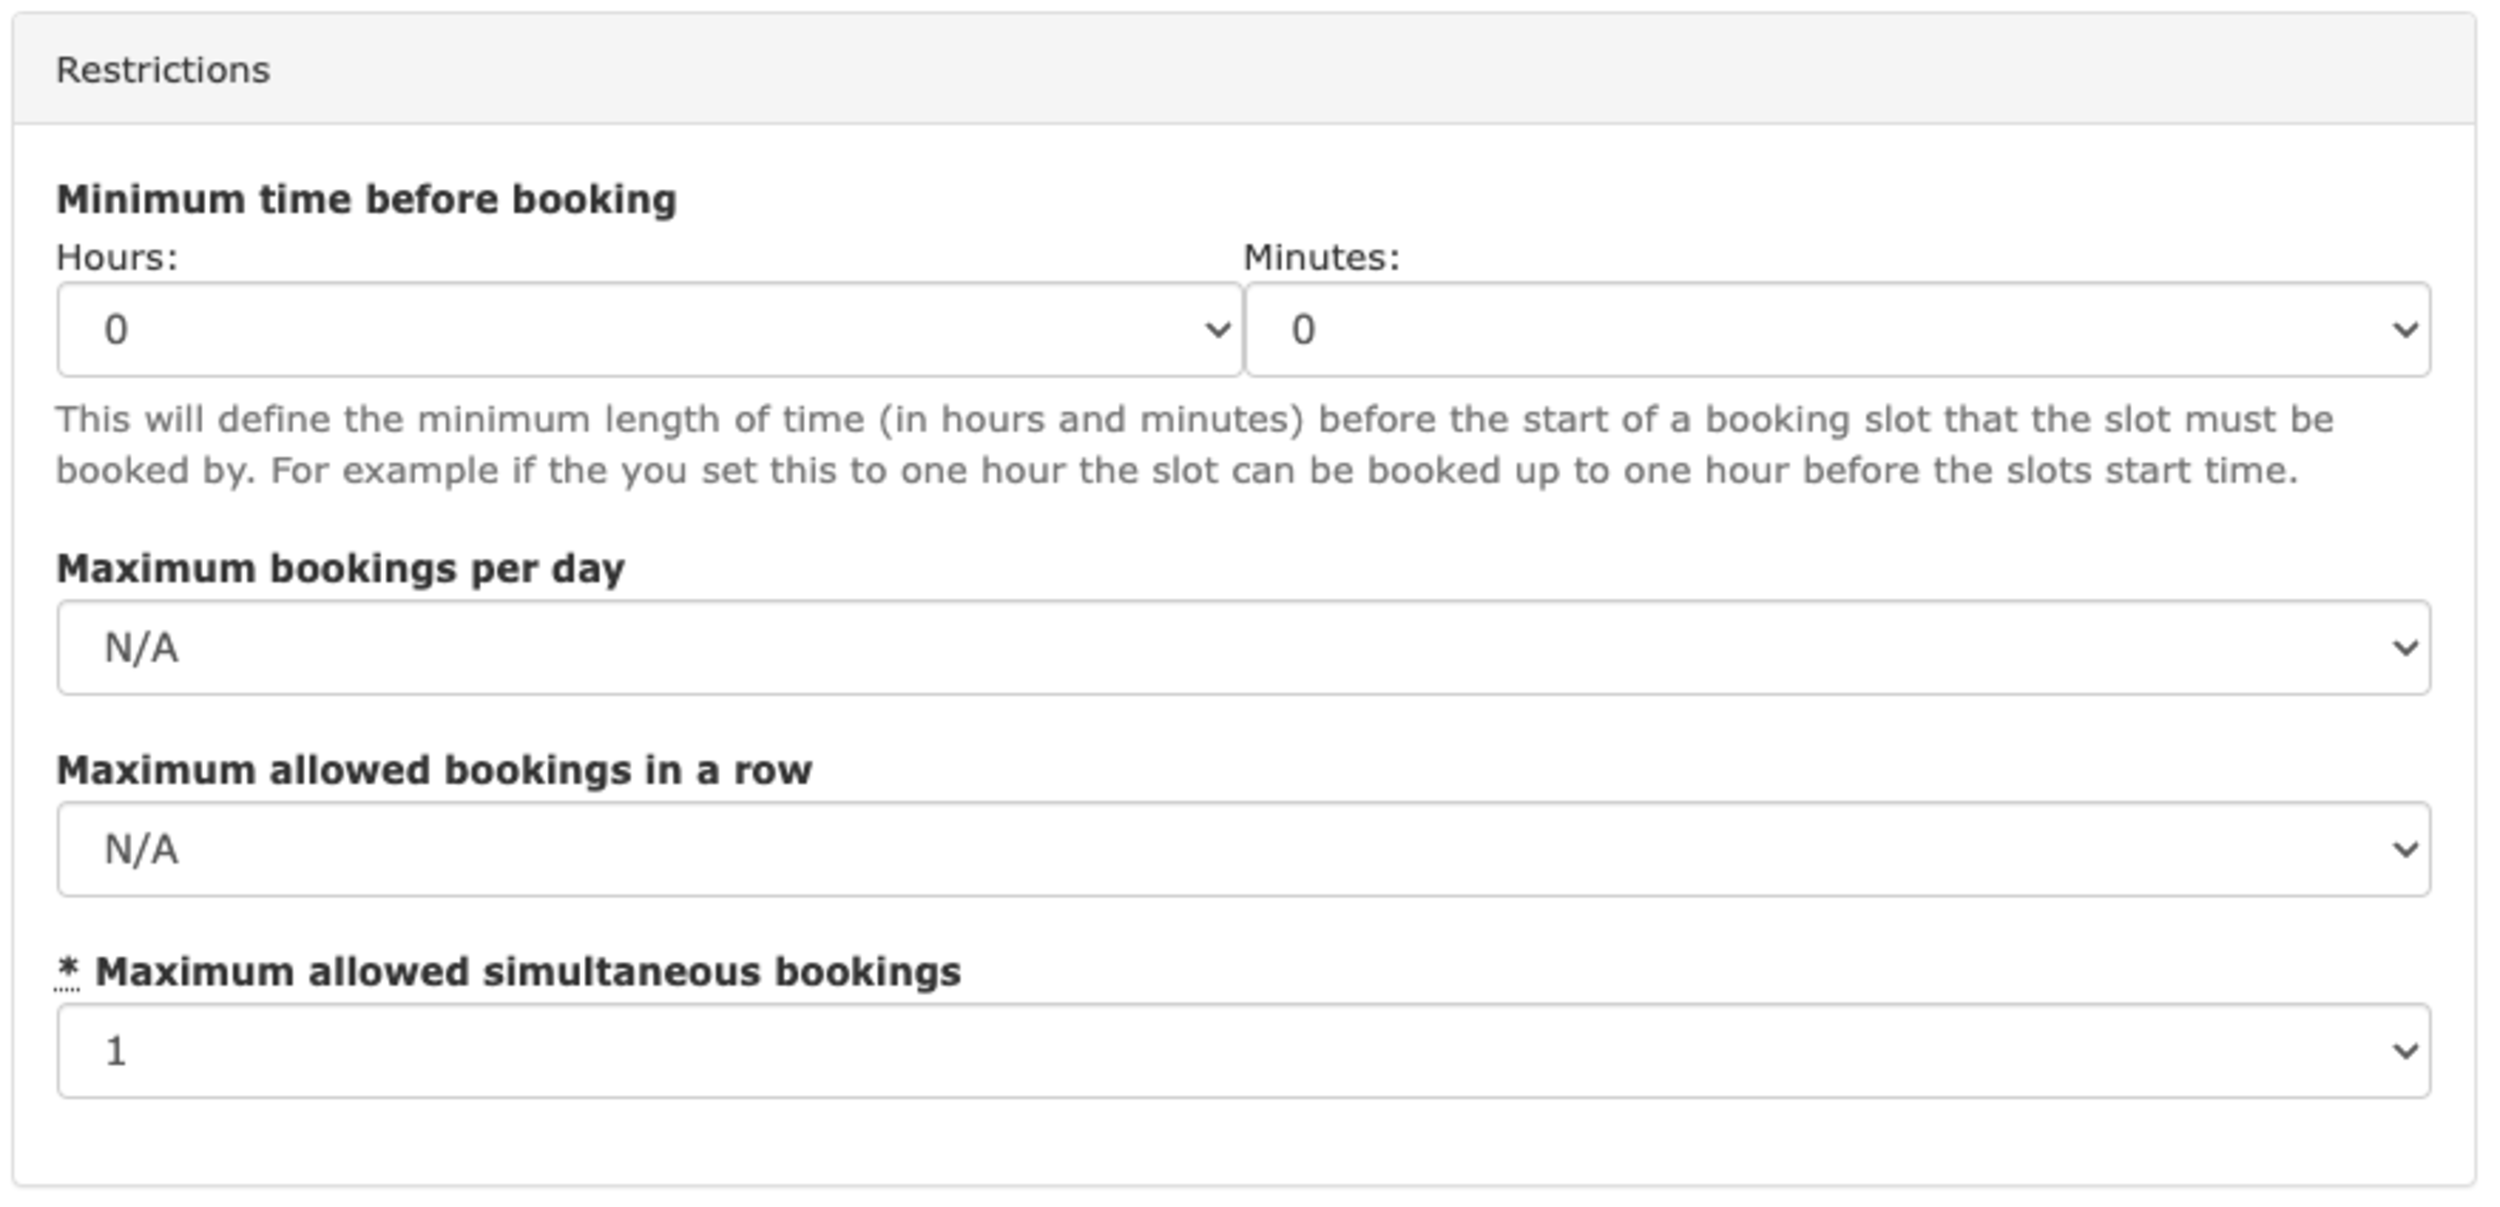
Minimum time before booking
Whatever time set here will stop users from booking (and cancelling) a slot in the facility in the defined period before a slot. By setting a sensible value here (e.g. 1 hour) it allows your customers to use an empty school without a booking (should you allow this) safe in the knowledge that no one can run in and book it when they’ve already started.
Maximum bookings per day
This is the maximum number of bookings per day across all your customers. For the majority of facilities this will be set to N/A.
Two examples as to when this can be used are:
1) To restrict uses of a certain facility to extend it’s serviceable life.
2) To only allow a certain number of bookings to be made a day whilst allowing the rest of the time to be left free for unbooked visits.
Maximum allowed bookings in a row
This sets how many slots an individual customer can book in a row. As above, if you combine this option with a short booking length you can allow customers to have flexibility to make longer booking whilst still stoping them from abusing it and booking a facility for the entire day.
Maximum allowed simultaneous bookings
This sets the maximum number of customers who can book a facility at the same time. (e.g. how many horses you’re allowed in a facility at once). This is great for increasing the utilisation of your facility and when combined with the social features (discussed next) can be an effective solution to allow multiple horses to use a facility at the same time.
This is a simple dropdown called ‘Enable Social Features?’. When enabled all login users (essentially everyone apart from guests booking via the shop feature) will be able to see who is in a particular slot and what they’re doing.
Defined uses allow you to predefine a set of uses for customers to choose from when making a booking. For example, you can predefine uses such as Schooling or Jumping. Then, when a booking is being made, people can choose from one of these predefined options to make it clear to others what they’re doing.
On top of this there are a few extra options for each defined use:
Exclusive Booking
If set, on selection of the defined use by a user an exclusive booking will be made for them (and will only be available to them if the slot is entirely free).
This can be useful, for example, when setting up a defined use for an external lesson where it would be necessary to have sole use of the facility.
Include Question This allows for a question to be added to a defined use. Following on with our example from above (an external lesson) we could ask at the time of booking for the name of the instructor they’re using.

This section allows you to define the facilities on which this facility depends. This allows for the creation of simple through to complex dependency structures - for more information on this read this article for more information on how to set it up.
The final section includes a number of additional options you can choose to check or not check depending on your needs.
As you can see facilities in At The Yard have a huge range of options to customise and tweak to allow you to match the way you work. With that said if you’re looking for a simple facility you can stick with the default options and get up and running straight away.
If you’re setting up a facility in your yard and want some help in getting it to work the way you want get in touch with our support who’ll be happy to help.
In March we released the shop feature for At The Yard after more than a year of testing. It’s allowed our customers to reach a wider audience and create more opportunities for their customers to use and benefit from the facilities and services they offer.
But we didn’t want to stop there, we had more ideas to add new features and improvements which we’re highlighting over the next few posts.
This is one post of multi a part series:
Today we’re highlighting the second update, Image Galleries. Our customers have some of the best facilities around and rightly so they want to show them off! We’re delighted to help them do so by allowing them to post as many pictures of their facilities as they want.
Let’s start by taking a look at how your customers will see these galleries.
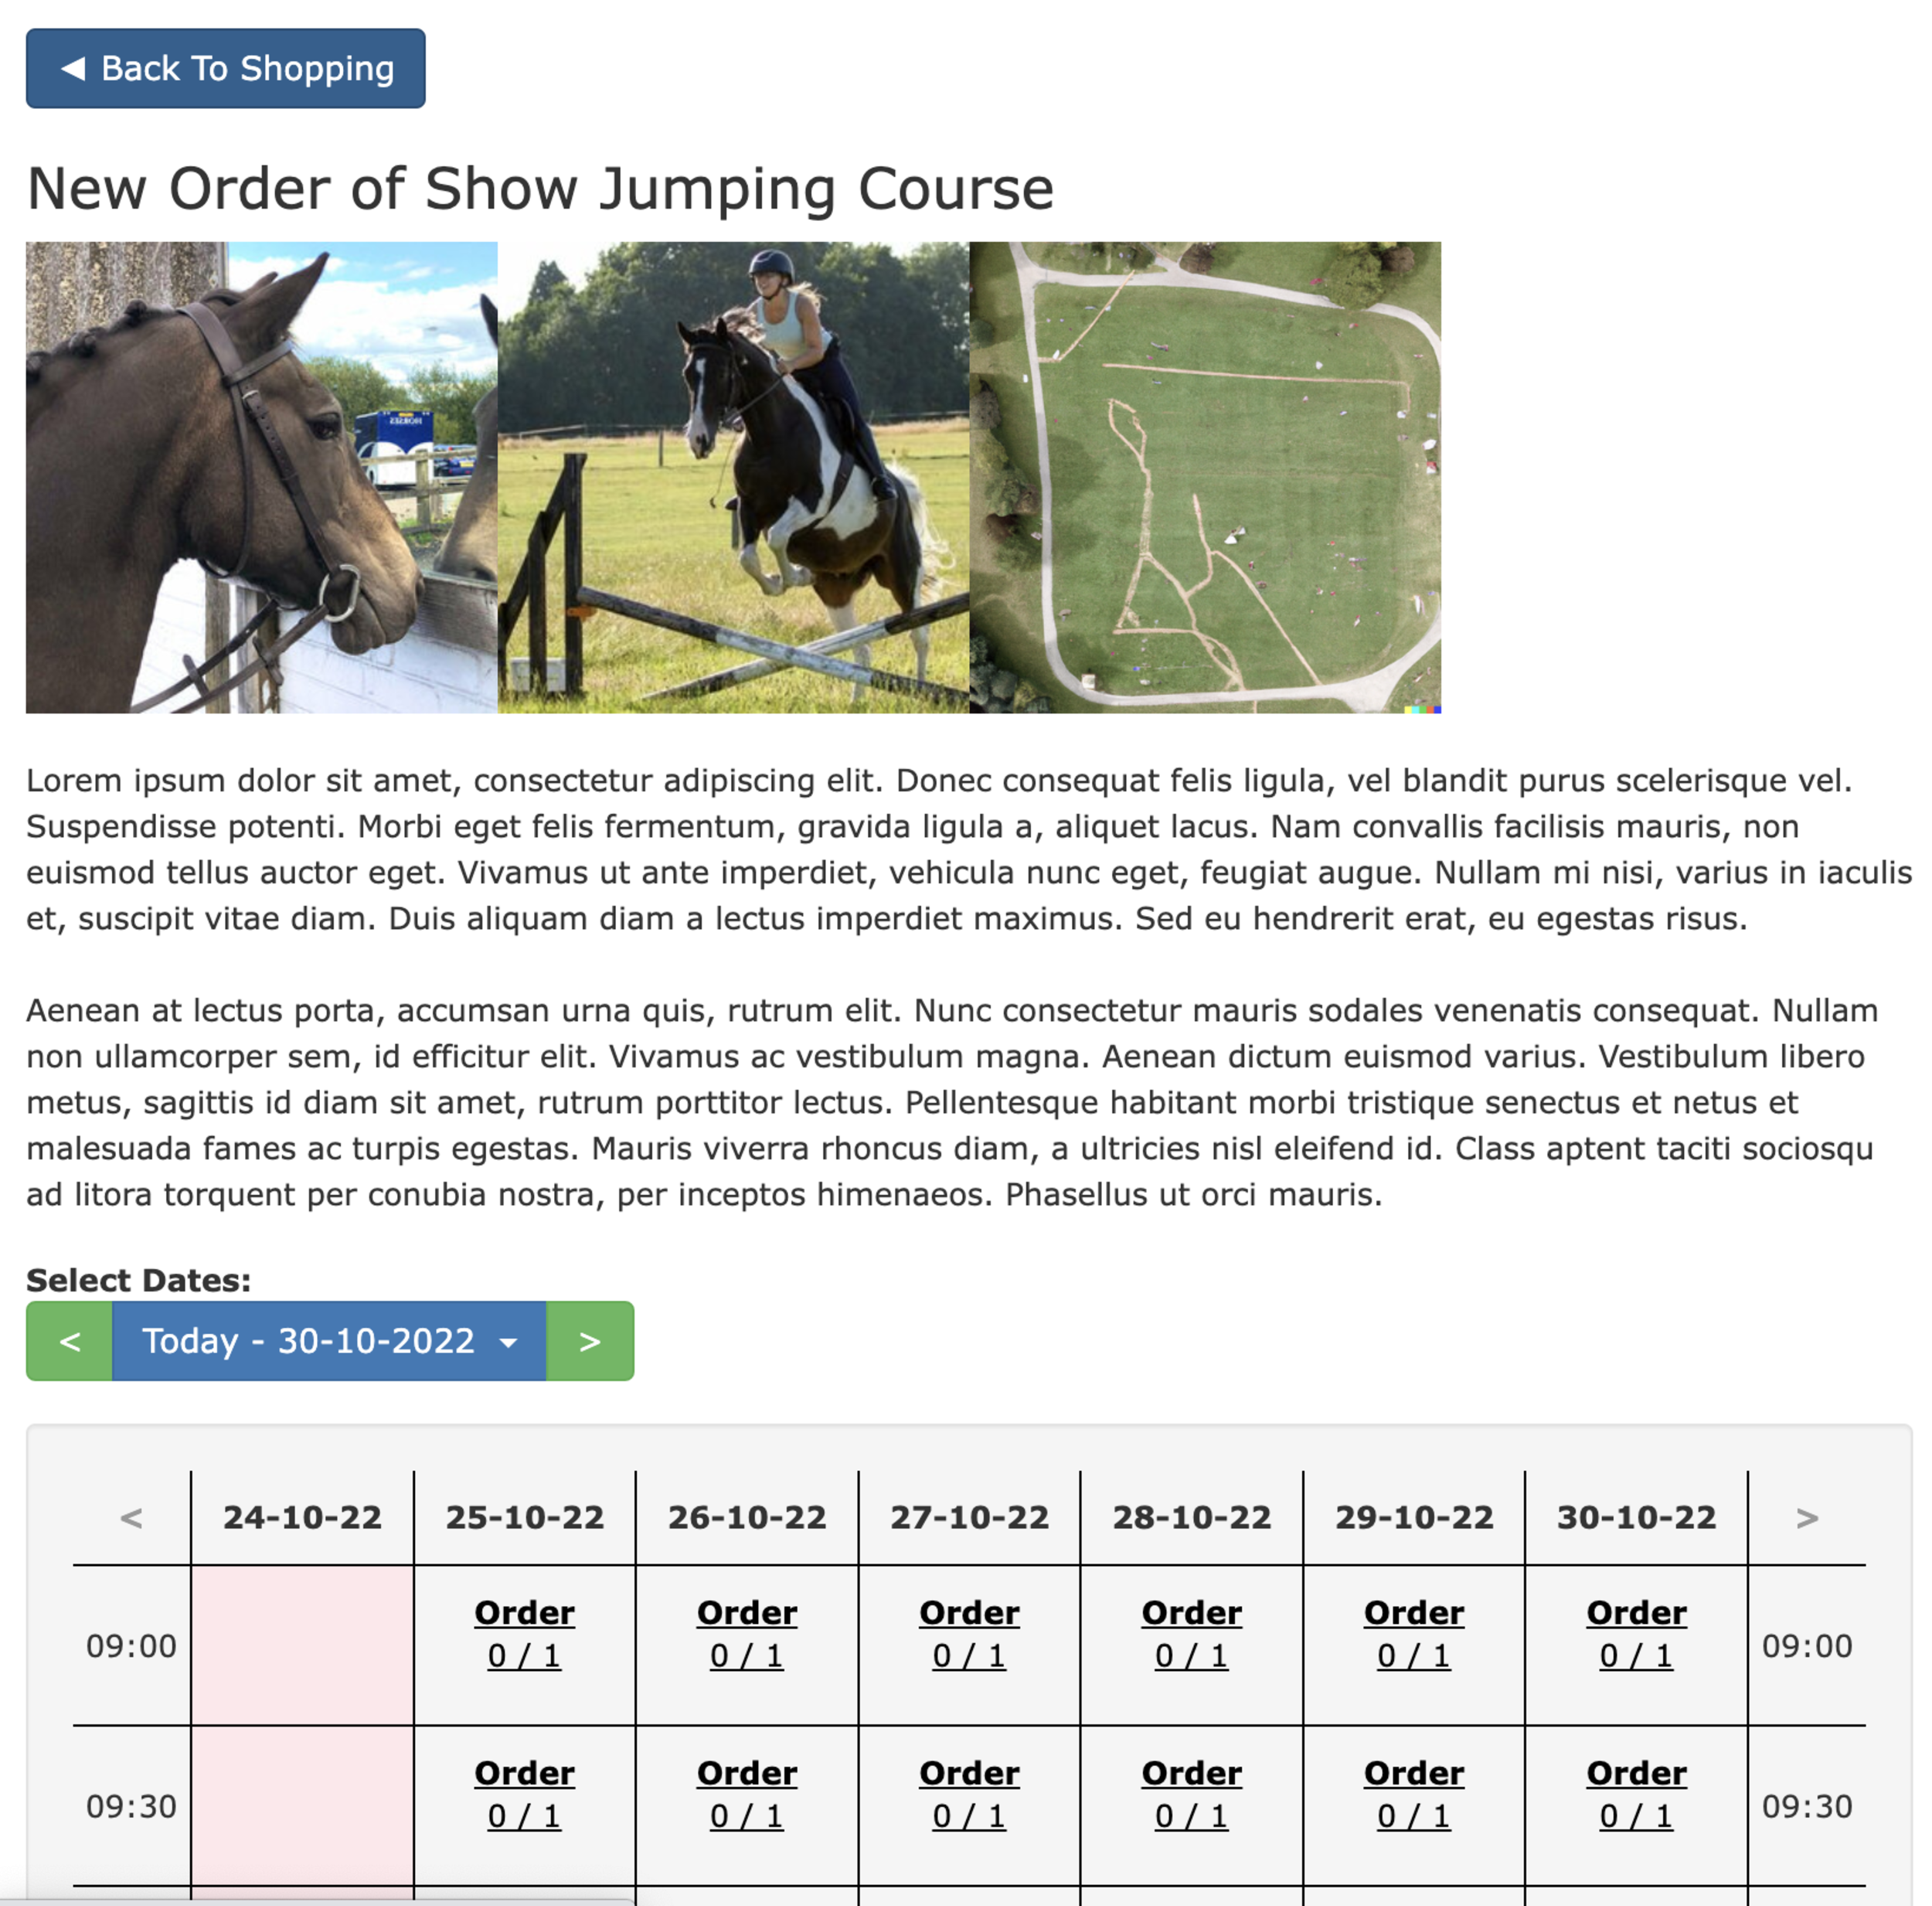
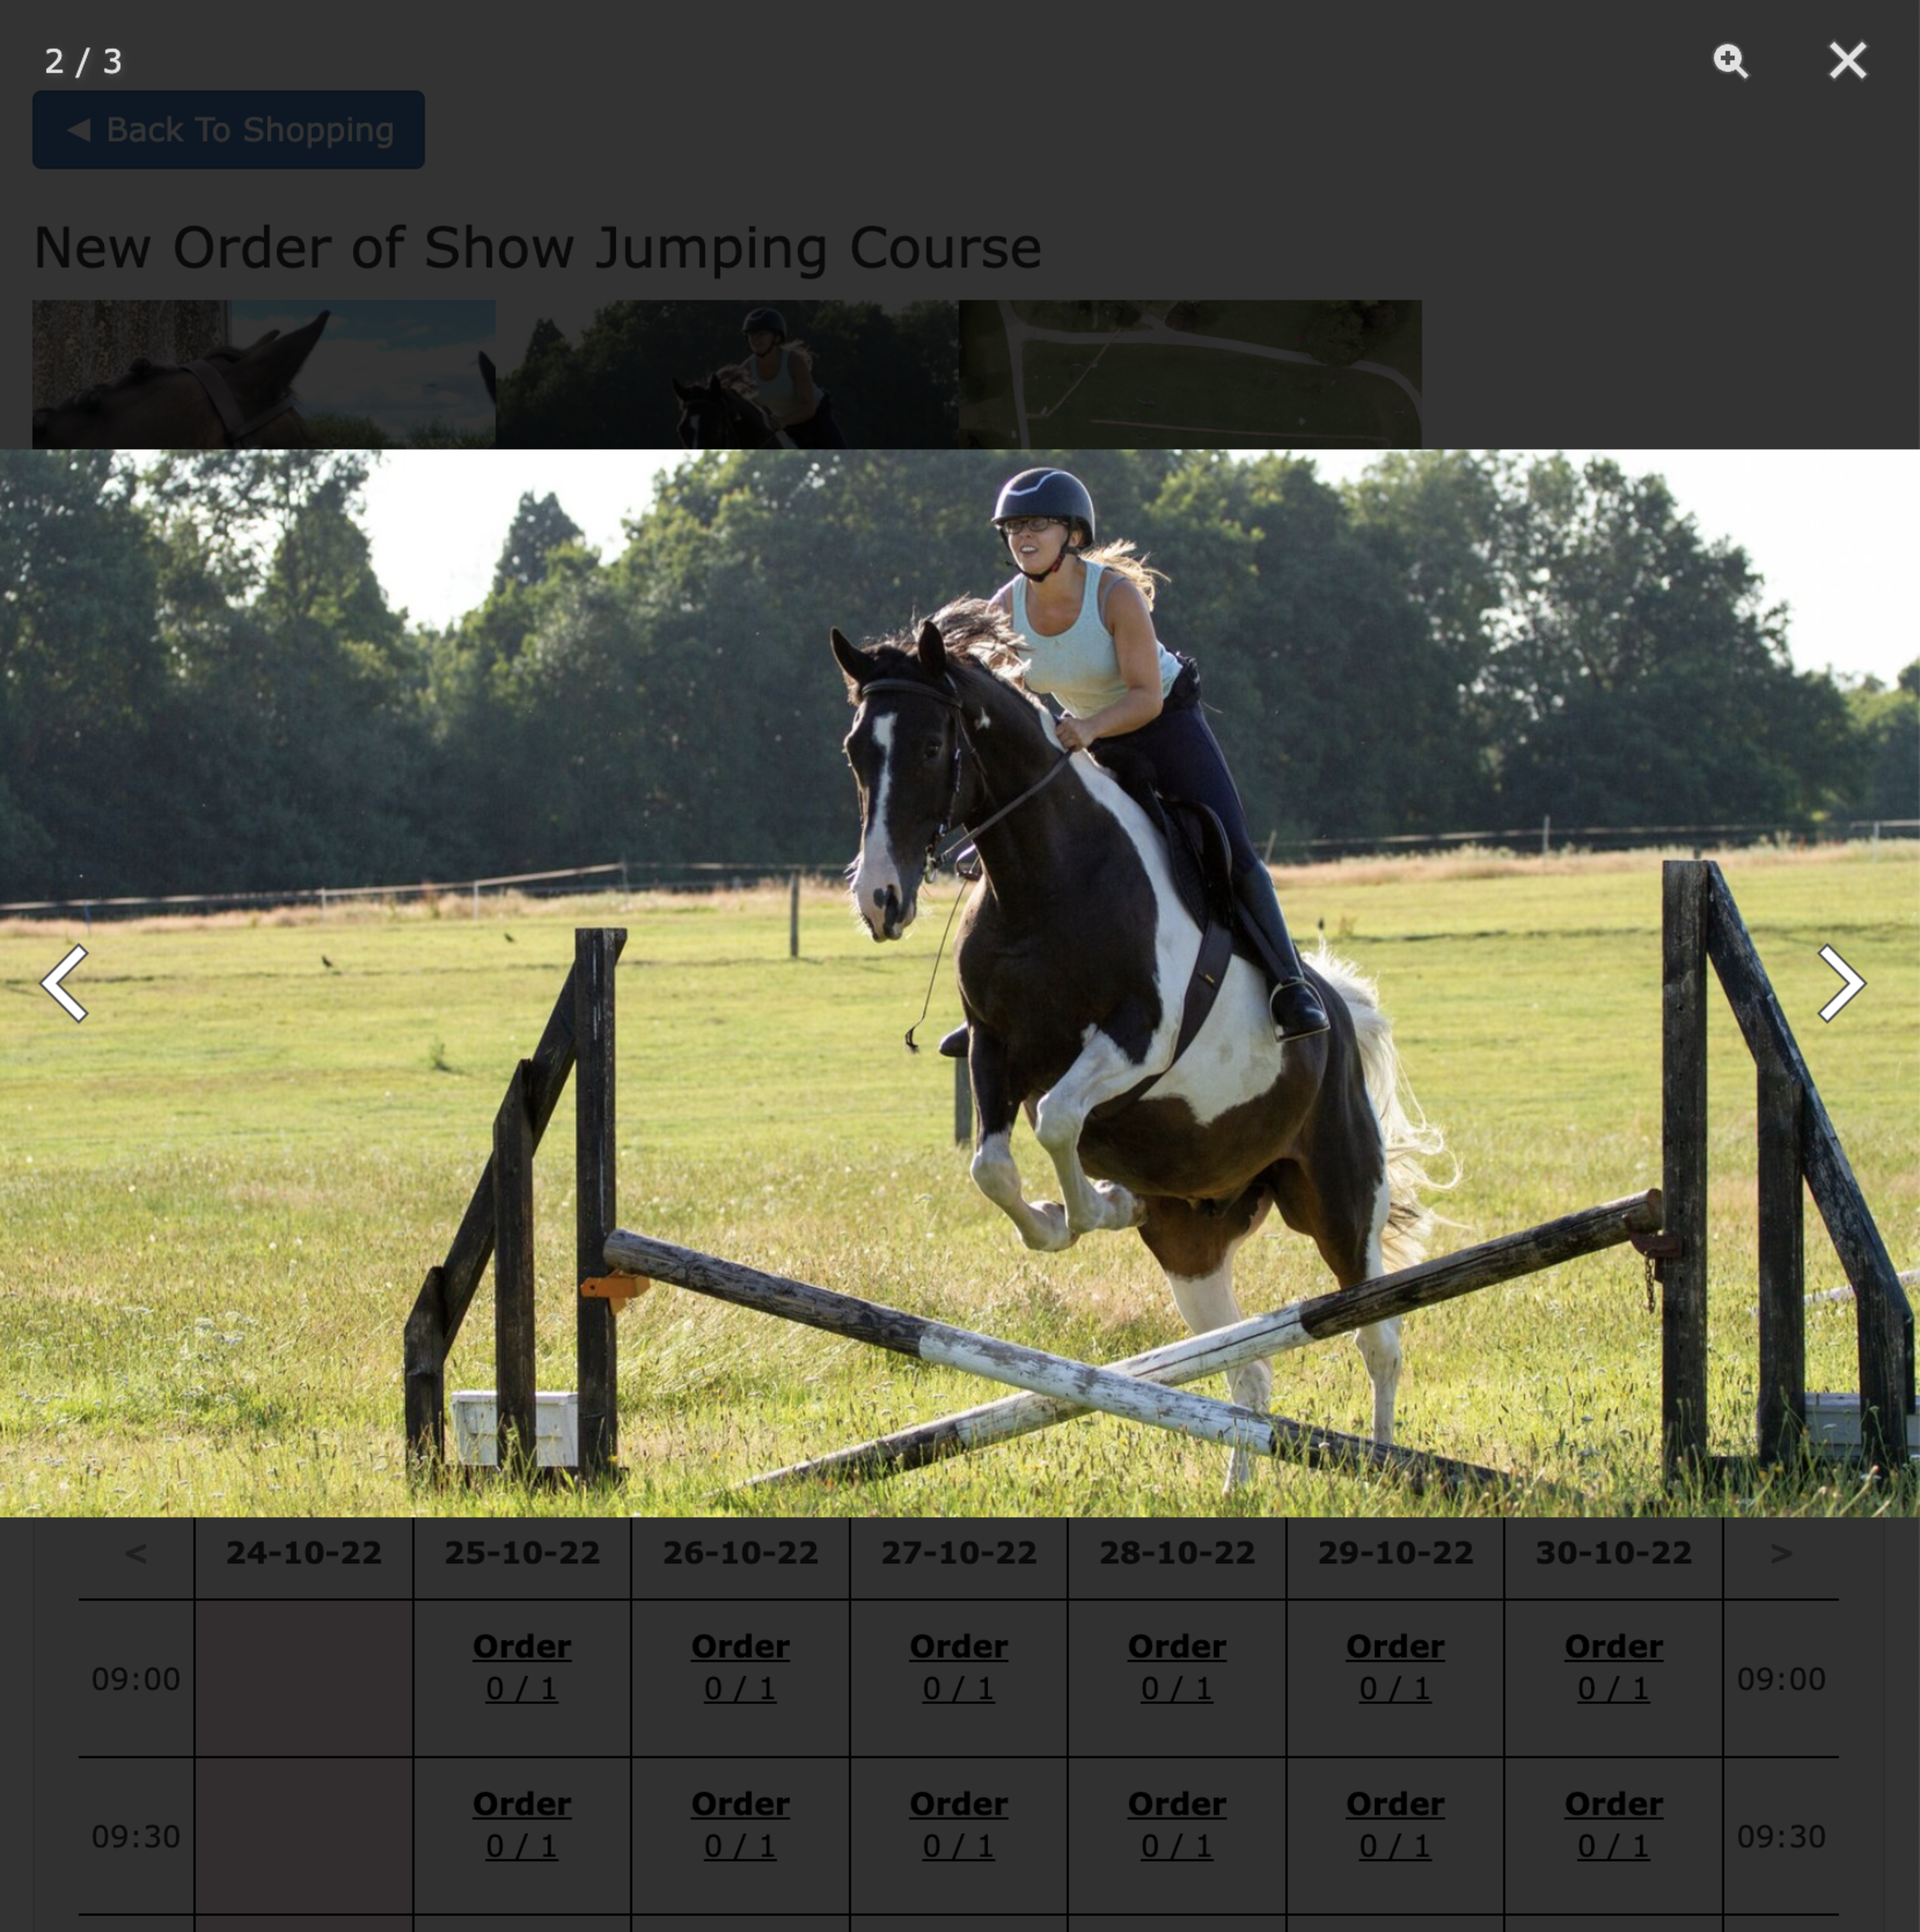
A service overview page showing the 3 images of the facility, a description and the available bookings.
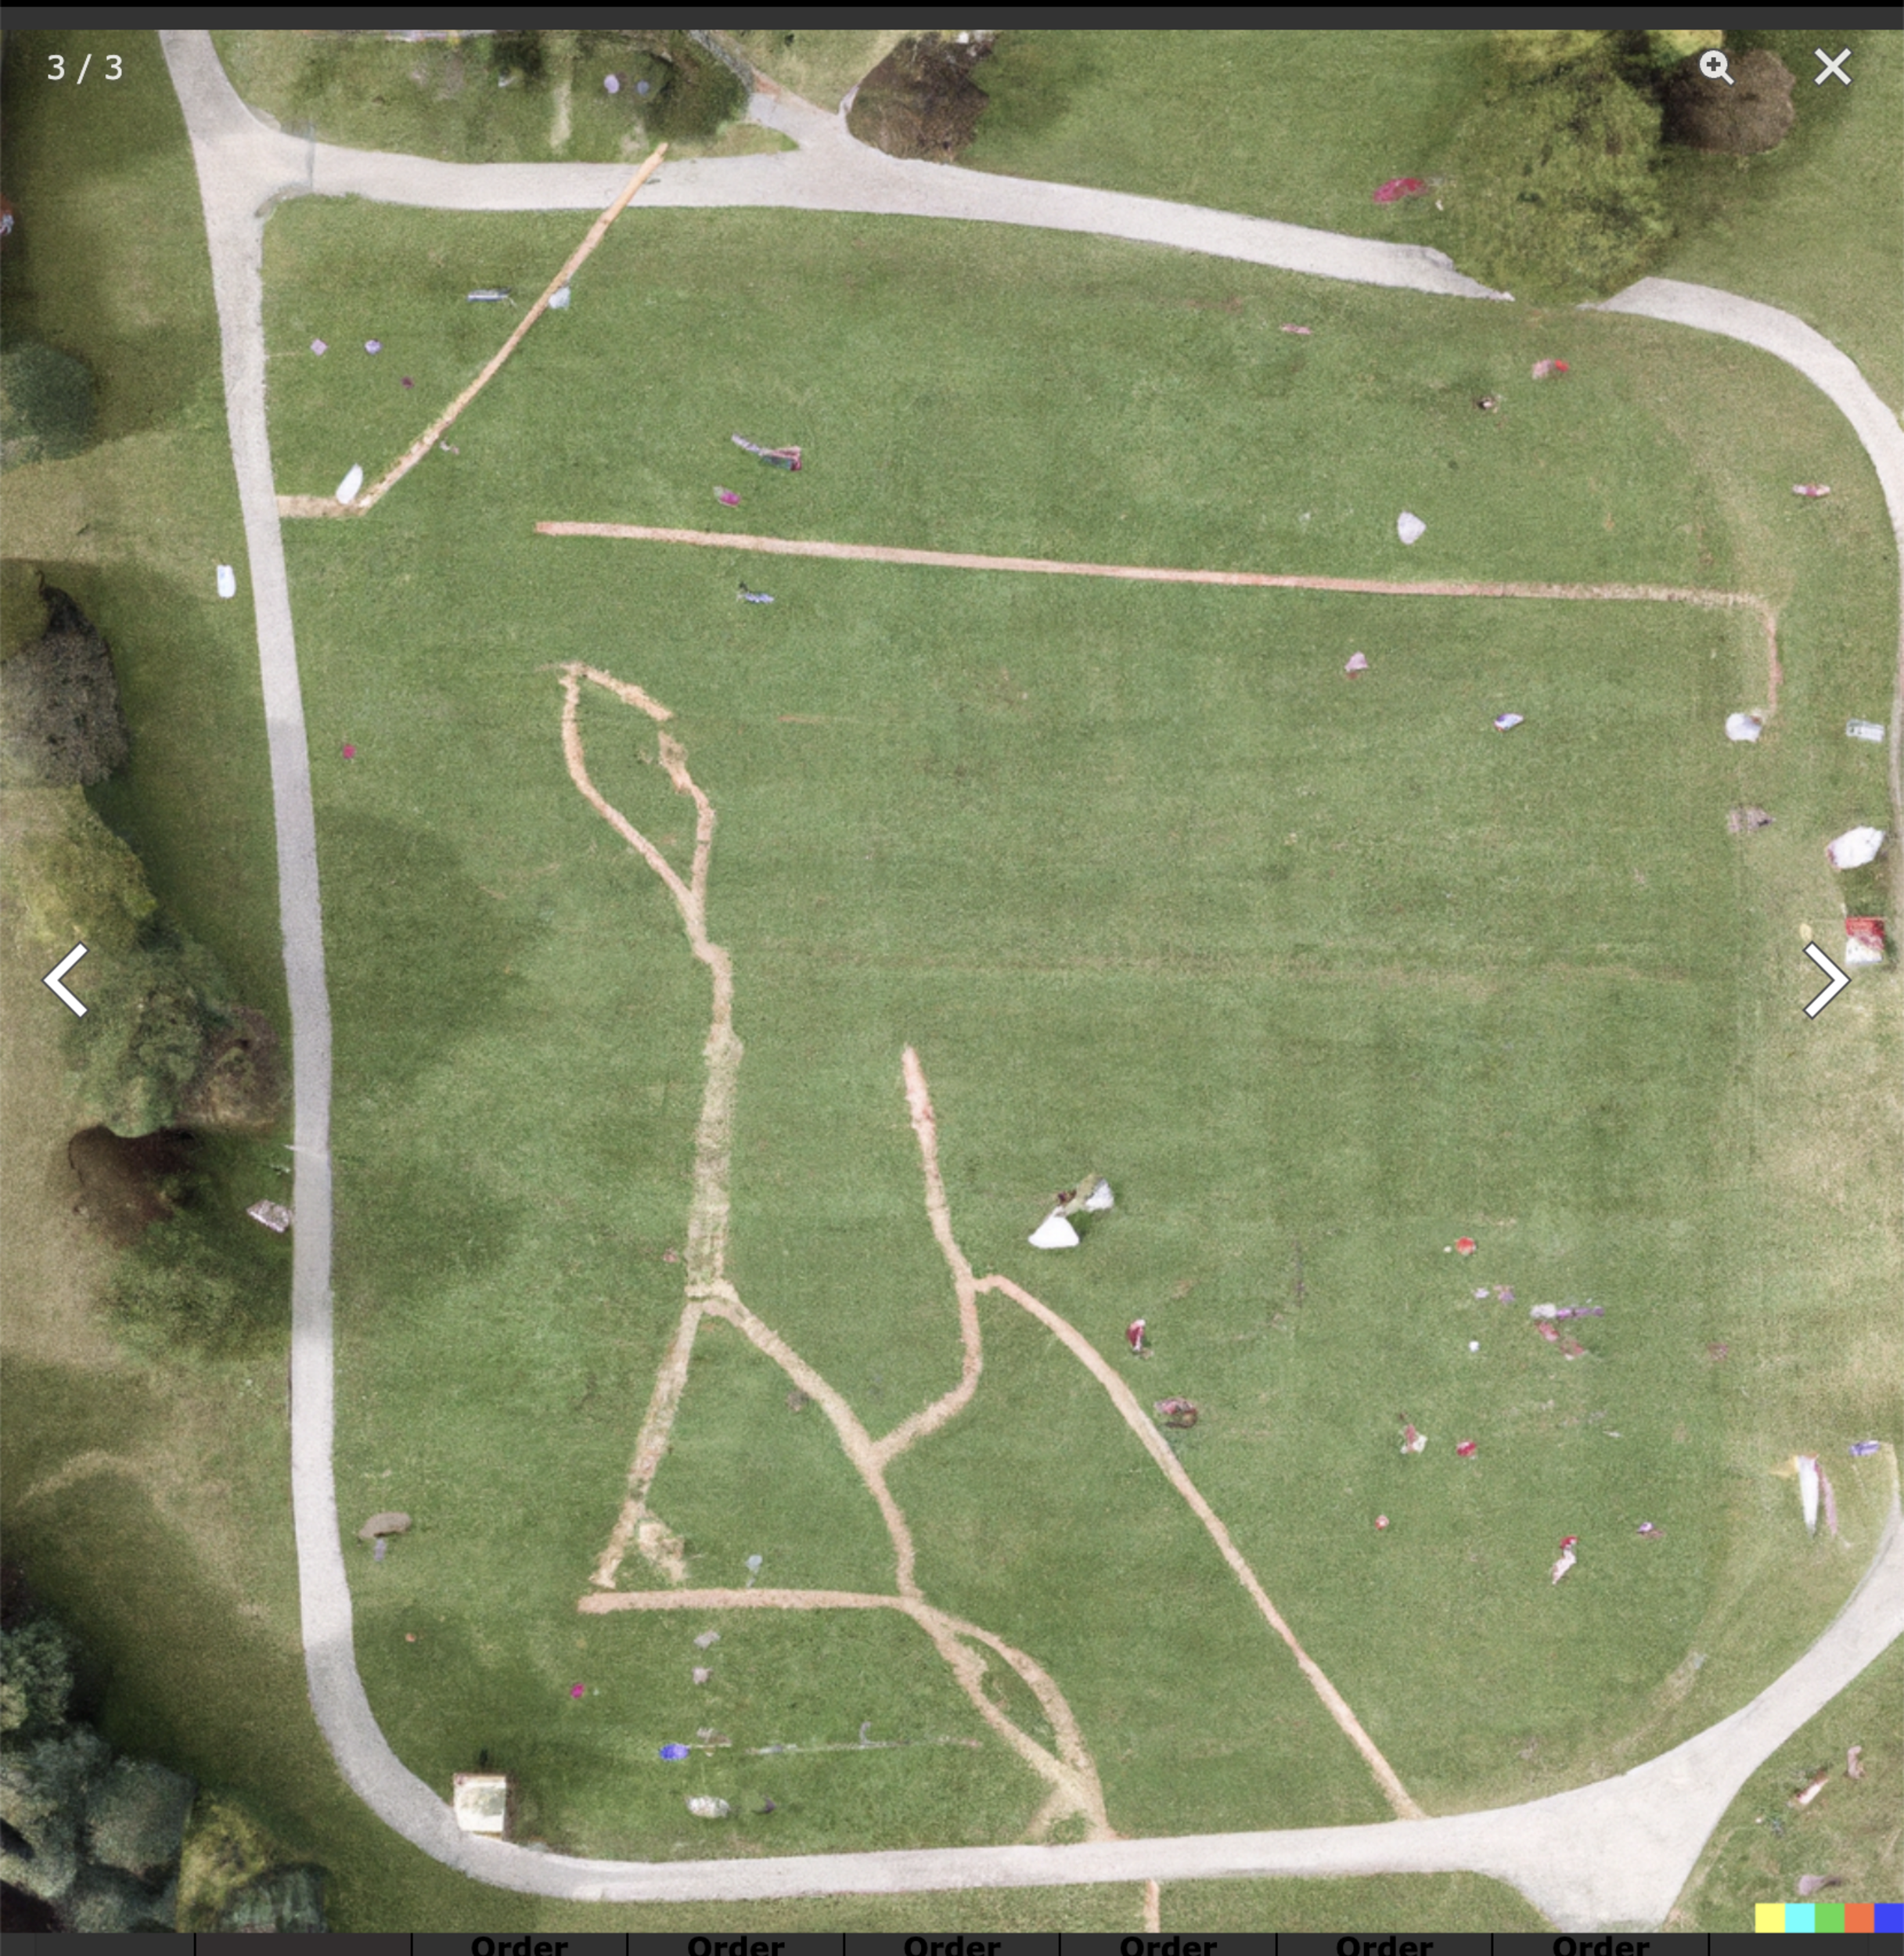
Clicking on any of the images allows people to take a look at the image in a bigger form. This is great for showing an a aerial overview of a course as shown in one of the images below.
Setup is quick and easy. Go to the Manage Shop page via the admin menu and click on Edit Publication. Scroll down to the Extra Information section and you’ll now see a new option for Gallery Images (shown below).
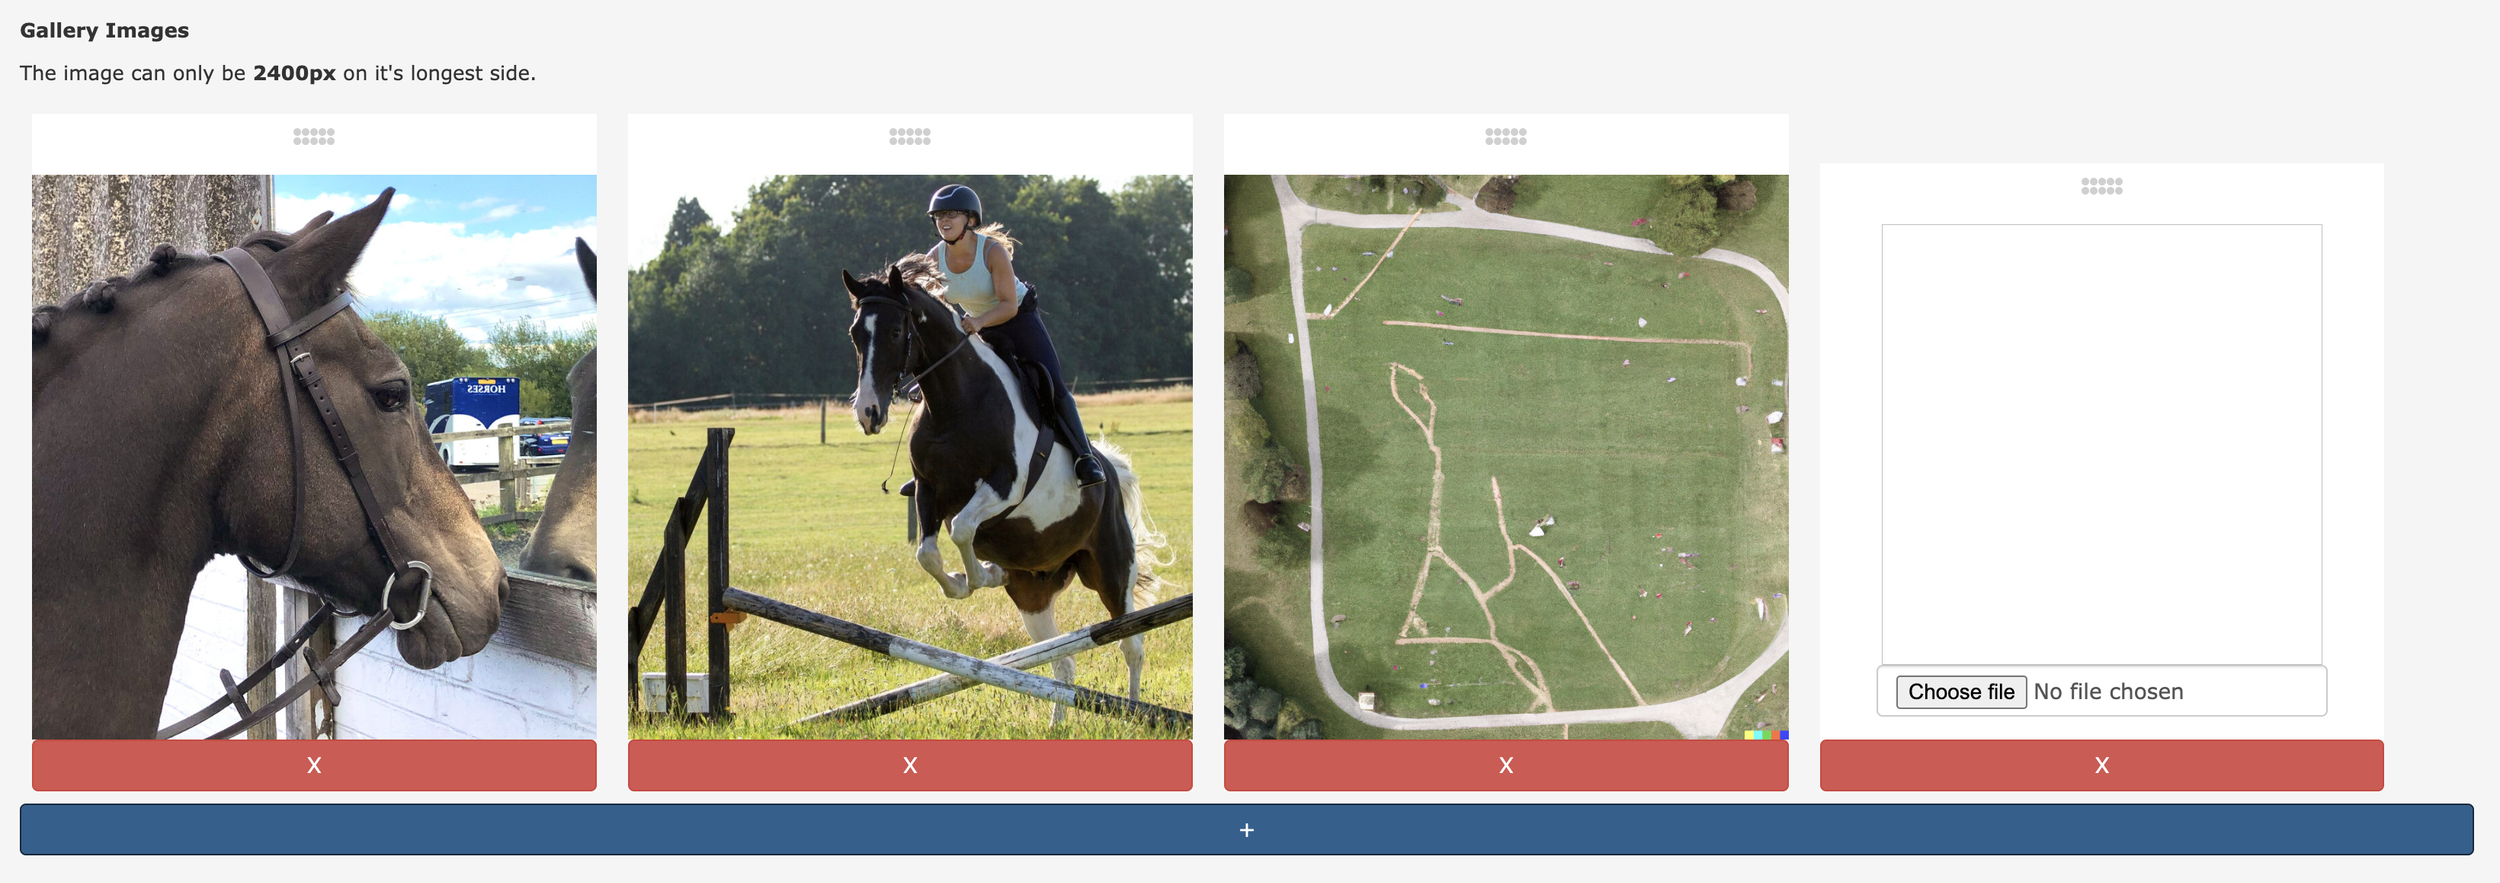
From here you can see your existing images (if you’ve already set some up) and have the option to add more by clicking on the blue + button at the bottom. When you click on the button a new blank option (shown on the far right) will be created allowing you to upload a new image.
You can then use the drag handles located at the top of the images to move everything around into the order you want.
When you’re ready, simply click submit and everything will be updated and ready to go!
Images are a fundamental way we make choices when shopping and with this update we’re excited to have expanded the pre-sales experience you can offer your customers. As we mentioned at the top of the post this is part of a multi-part series highlighting updates that we’ve brought to the shop since it’s launch, so check back soon for the next update.

In March we released the shop feature for At The Yard after more than a year of testing. It’s allowed our customers to reach a wider audience and create more opportunities for their customers to use and benefit from the facilities and services they offer.
But we didn’t want to stop there, we had more ideas to add new features and improvements which we are excited to be highlighting over the next few weeks.
This is one post of multi a part series:
The first of these is Pricing Options. Pricing Options streamlines and improves support for Multi Horse Bookings.
In the initial release of the shop you had to create and publish multiple services to be able to offer multi horse discounts when booking in a single slot (e.g. a service with 1 horse = £20, a service with 2 horses = £35). Not only was this time consuming to create and maintain for the yard but it could make for a cluttered looking shop (shown below).
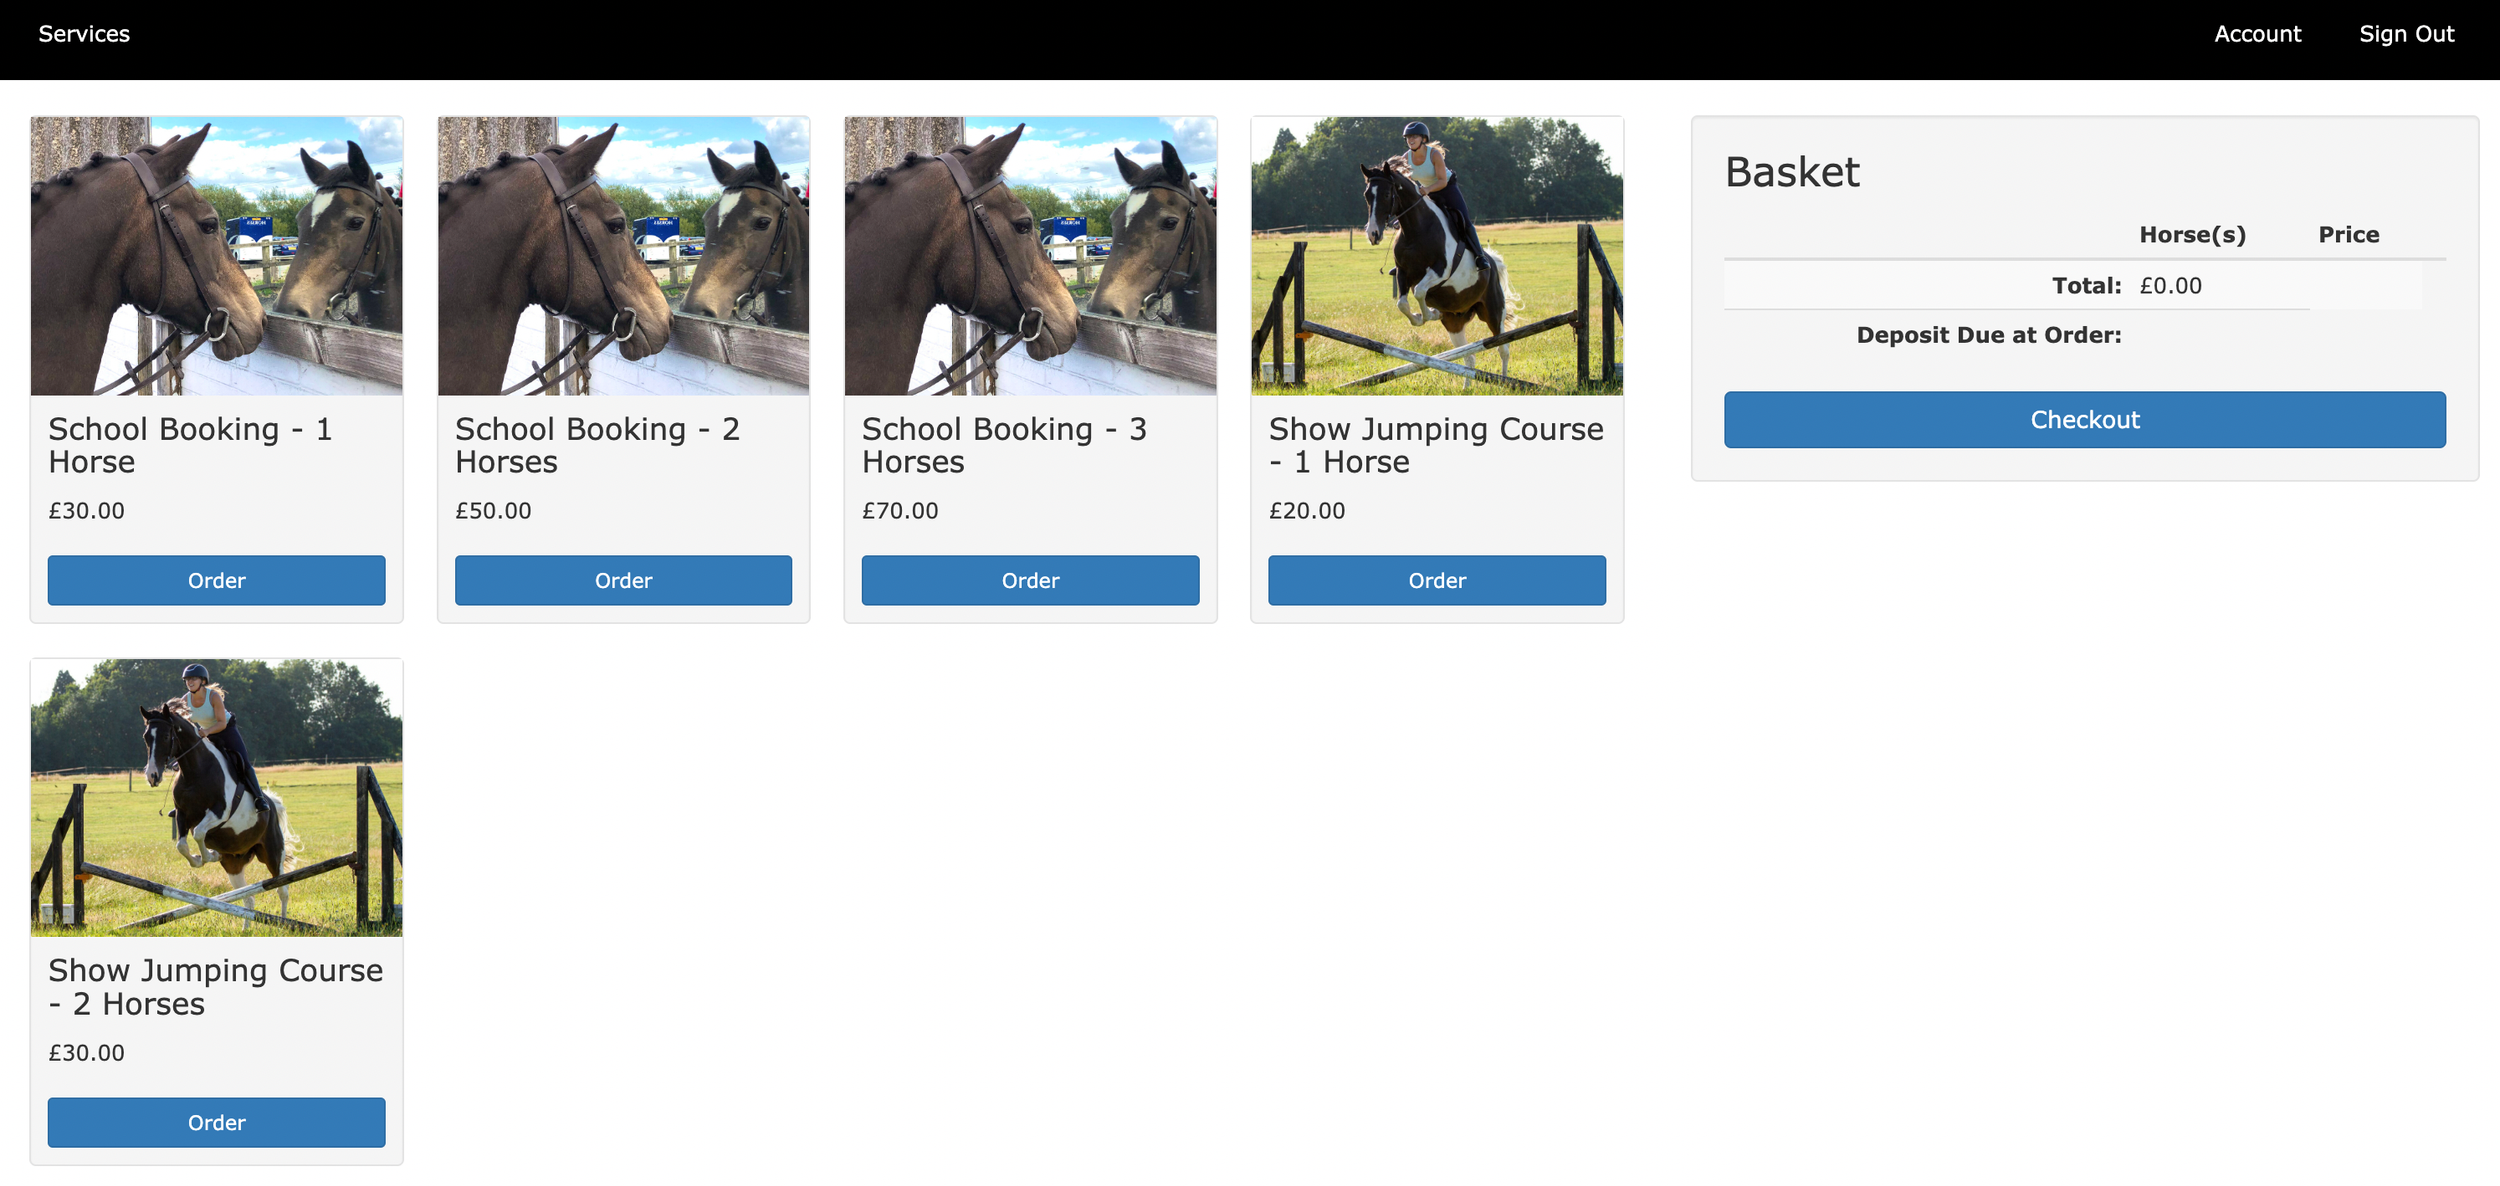
This new feature, Pricing Options changes this by allowing you to publish a single service that has the multiple pricing options setup within. Once setup it results in a much cleaner looking shop (shown below) and makes for an easier booking experience for your customers.
Renting The Arena
Pricing Options
1 Horse - £30.00
2 Horses - £50.00
3 Horses - £70.00
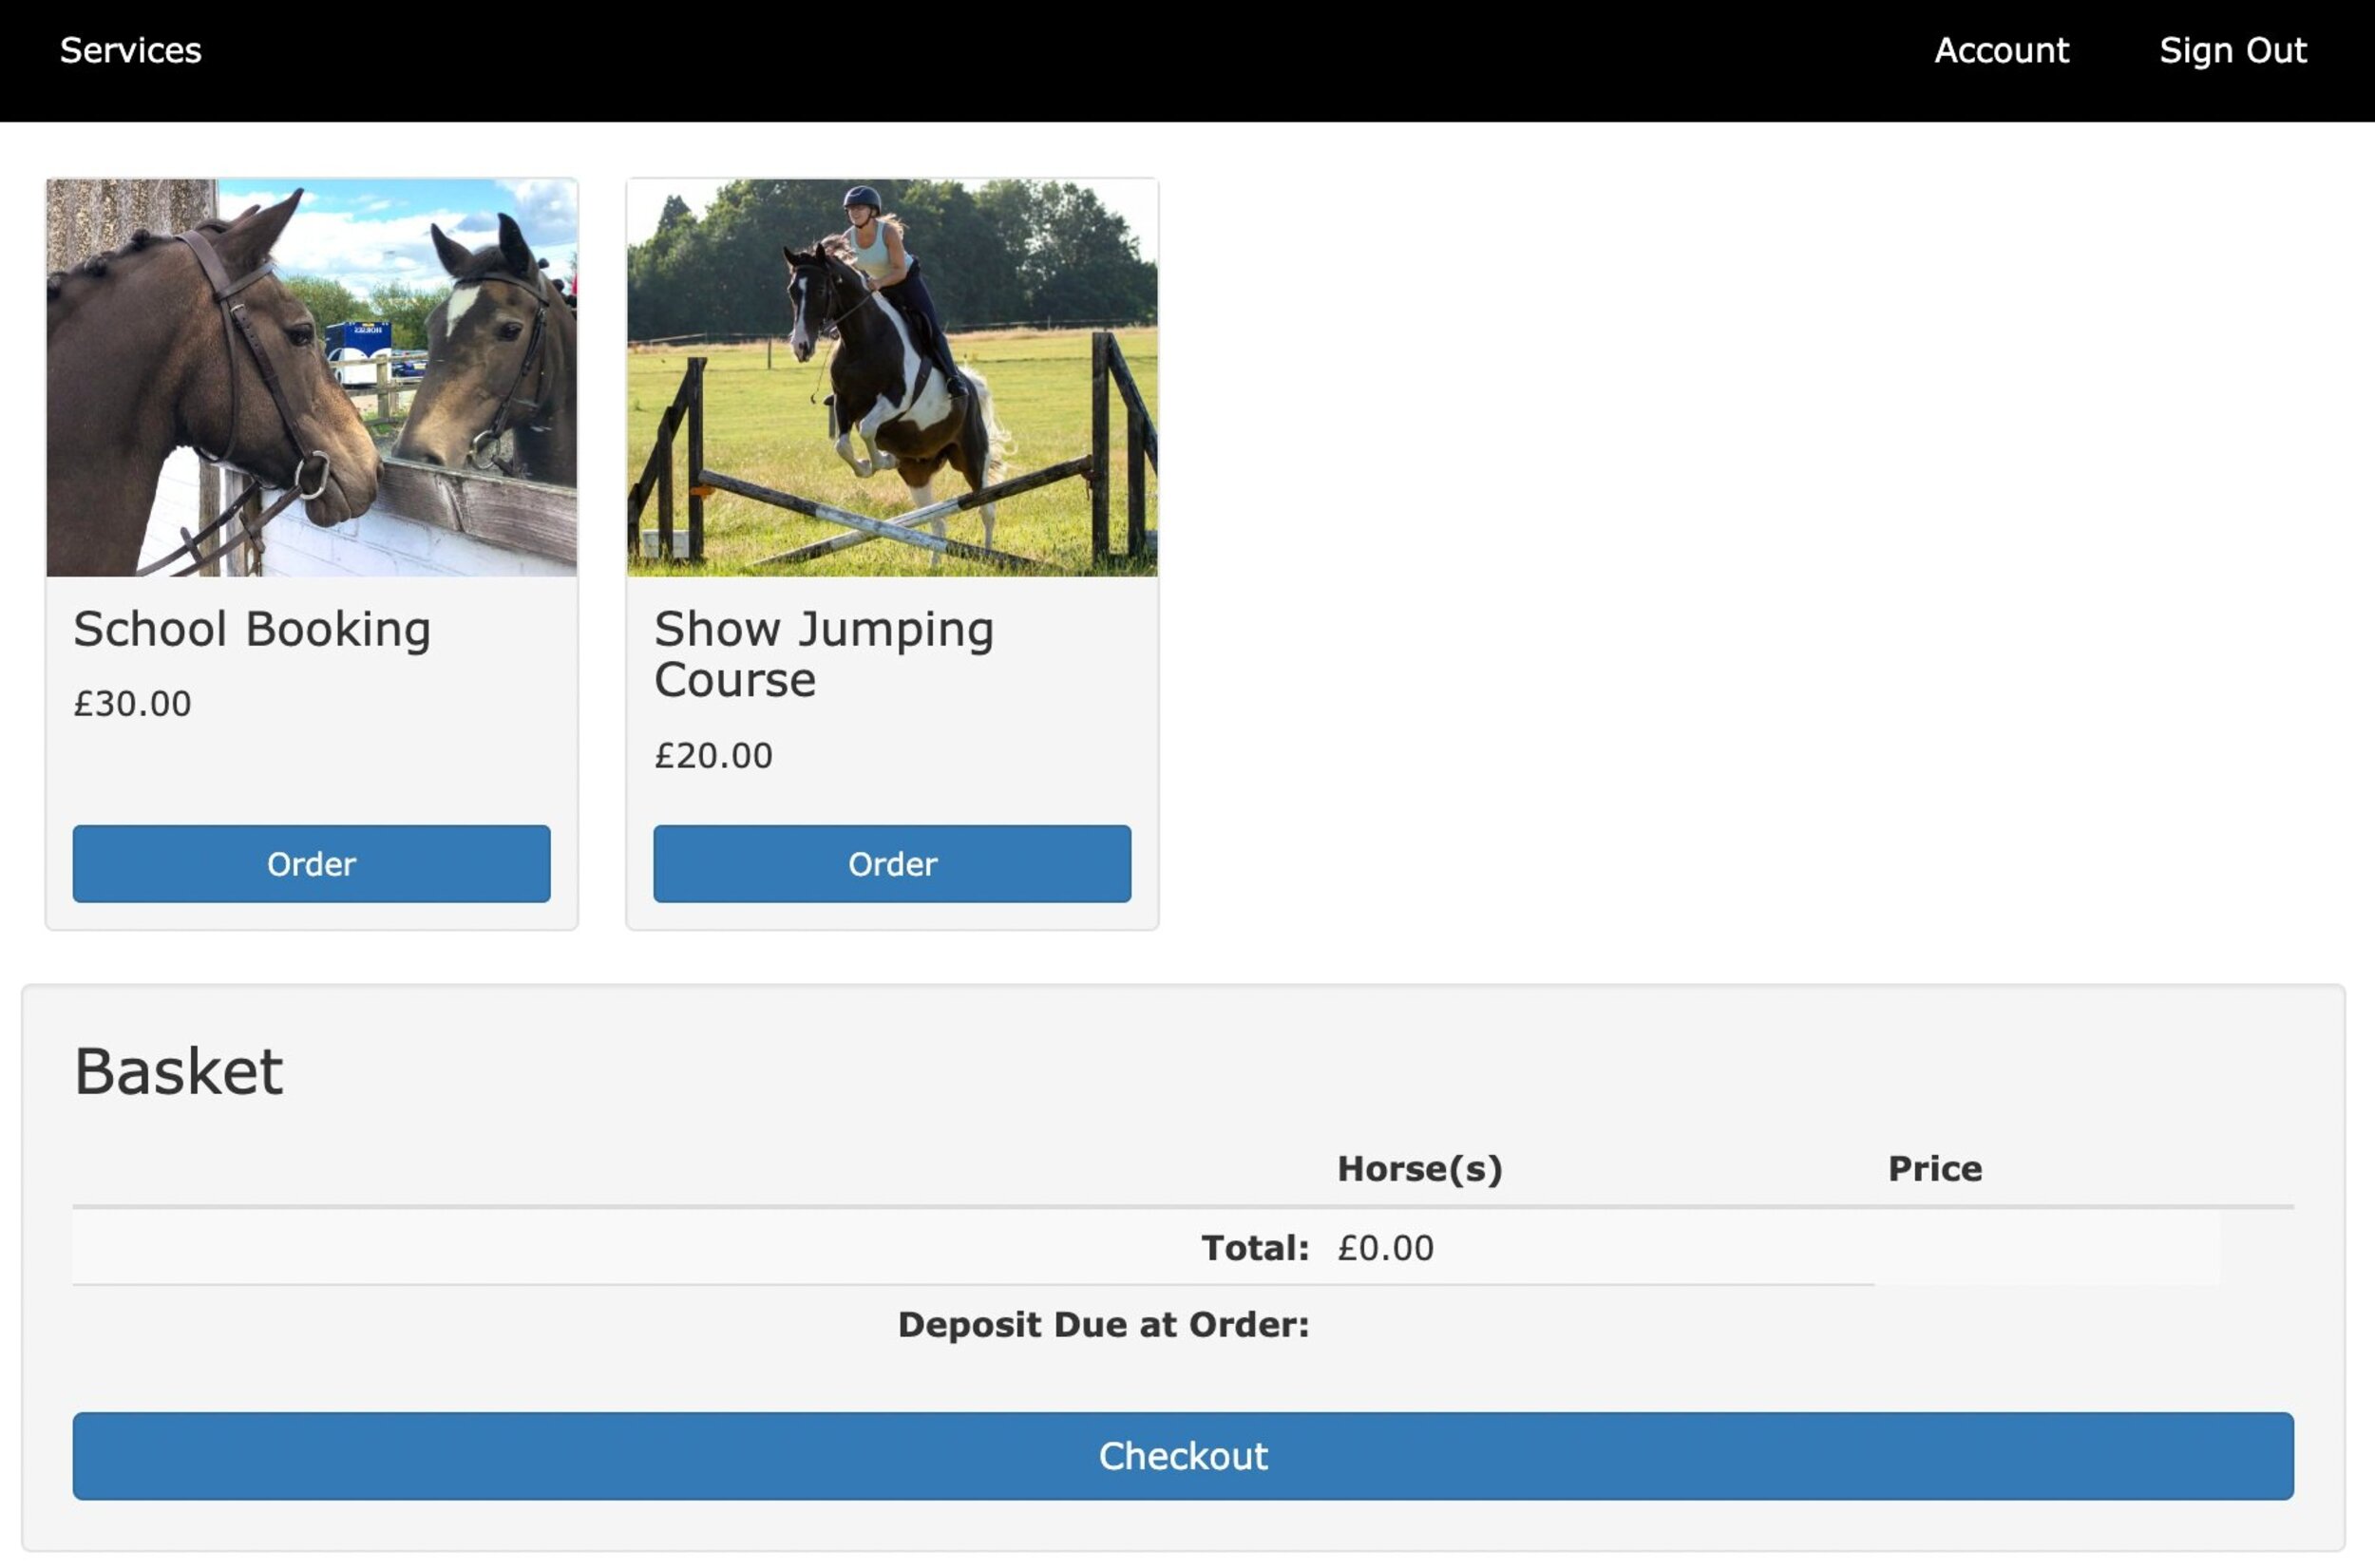
From a customer perspective not much has changed. As shown above, the service page is now much cleaner and it is much easier to find what you want.
Once the customer has chosen the service they want (and when they want it) they’ll be asked to select the quantity of horses for the booking. This is done using a simple drop down box, from which the customer can select the number of horses (and at the same time see the different price for each option).
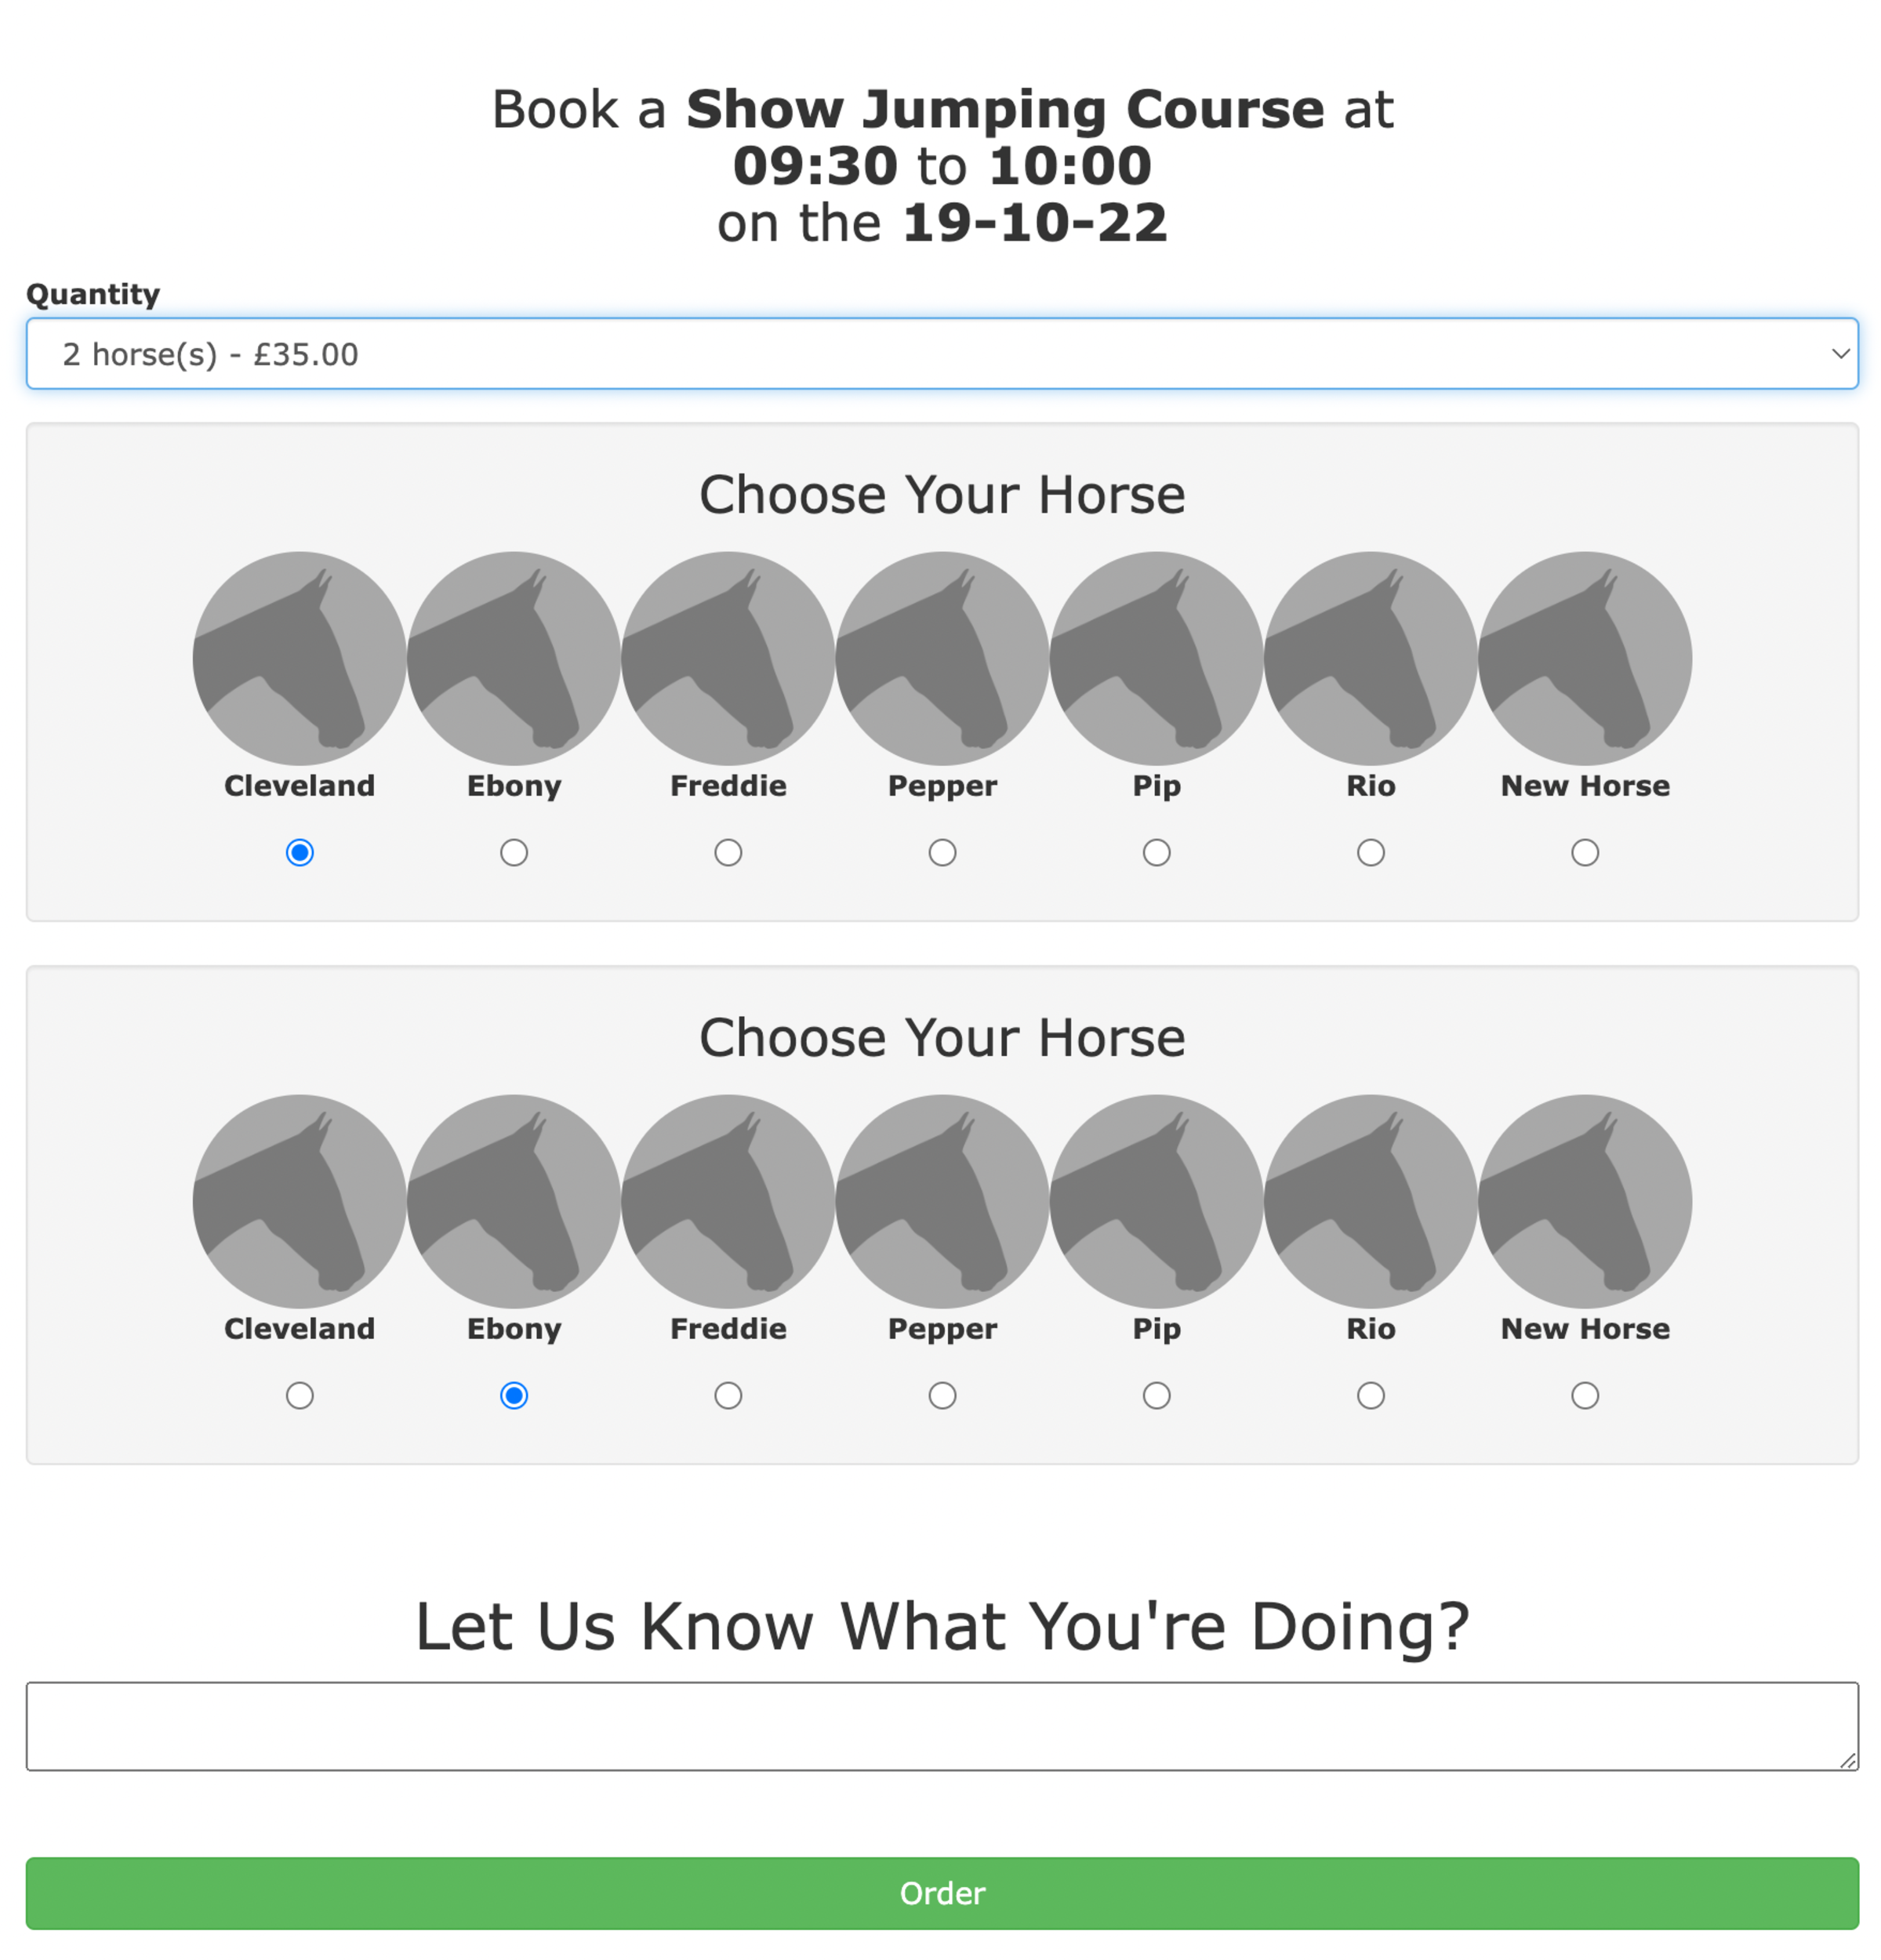
Once they’ve made their choice they’ll get to select the name and details for each of the horses they’re bringing with them to the booking. Finally, when they’re ready, they can add it to the basket and they’ll be ready to go to the checkout (or order more services).
Setting up pricing options is done from the service publication view within the shop management page in At The Yard. To get started find your existing service and click on Edit or Publish a New Service.
As before the base price (for one horse) needs to be set first. But now a new section, Pricing Options, has been added. By default this section will be empty but you can add as many options as you want by clicking on the blue + button at the bottom of the section.
Within each option you need to select the required number of orders (the number of horses) along with the associated price and deposit.
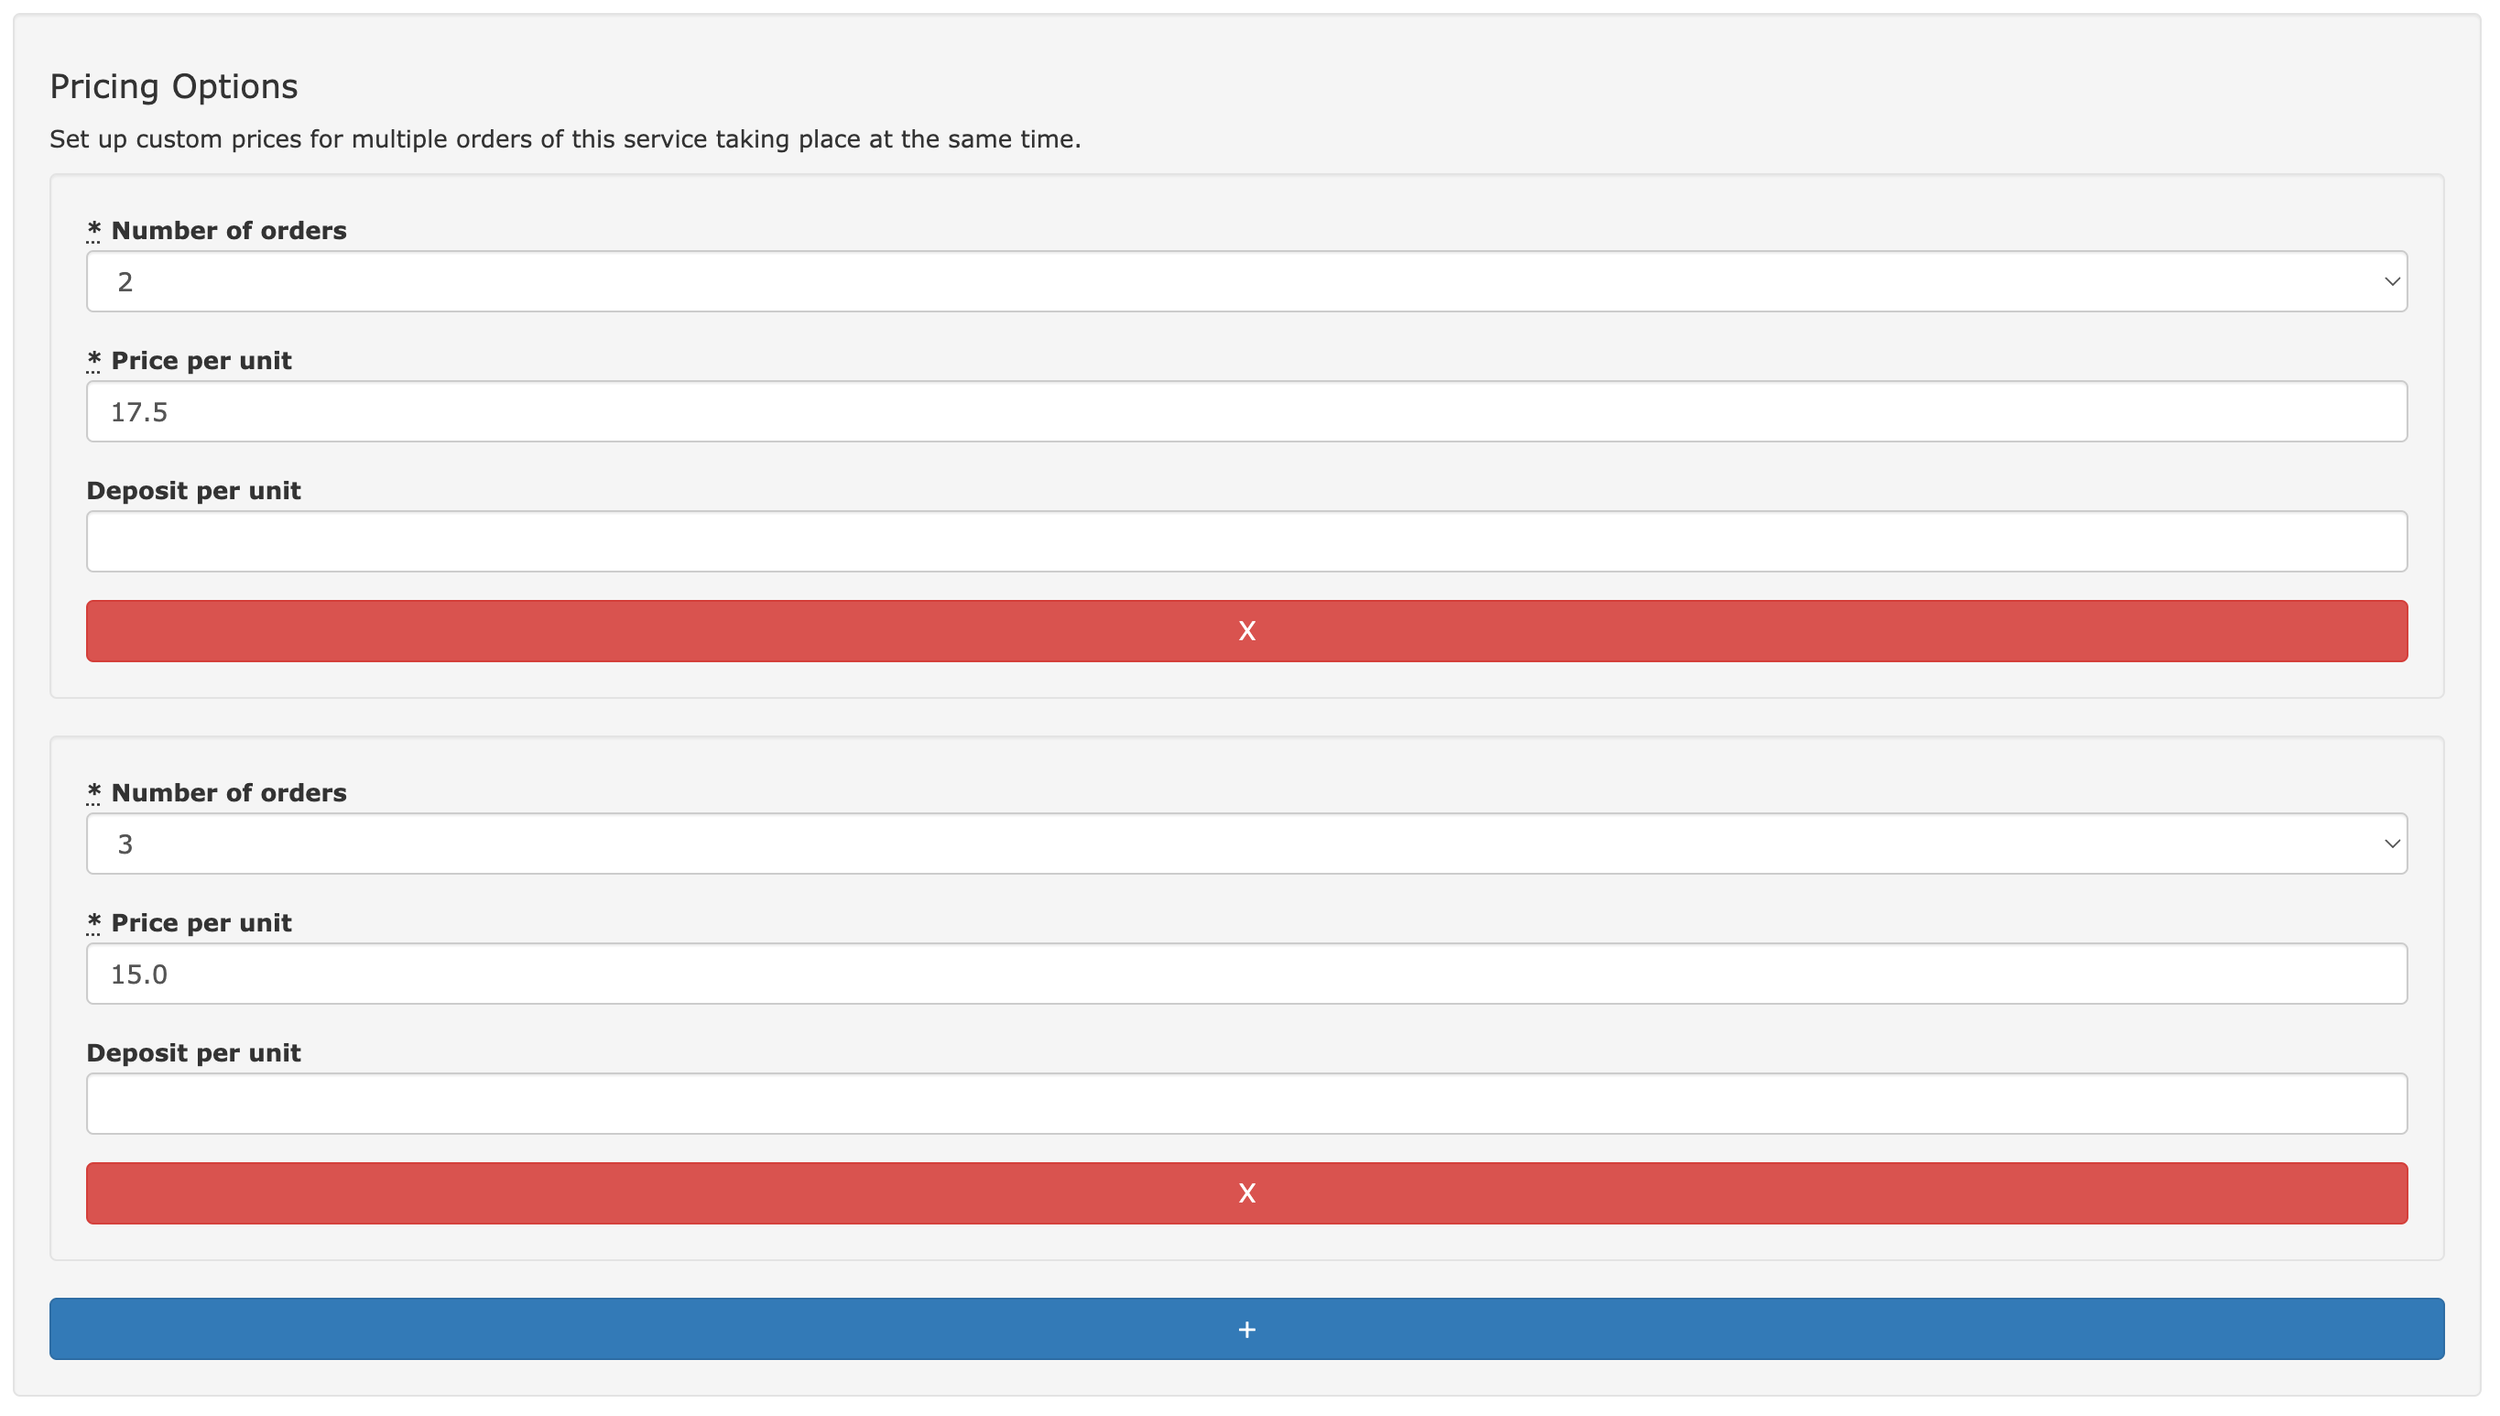
When you’re finished, click save and these will be ready for your customers to use. You’ll also be able to see an overview of your pricing options in the published service list under shop management.
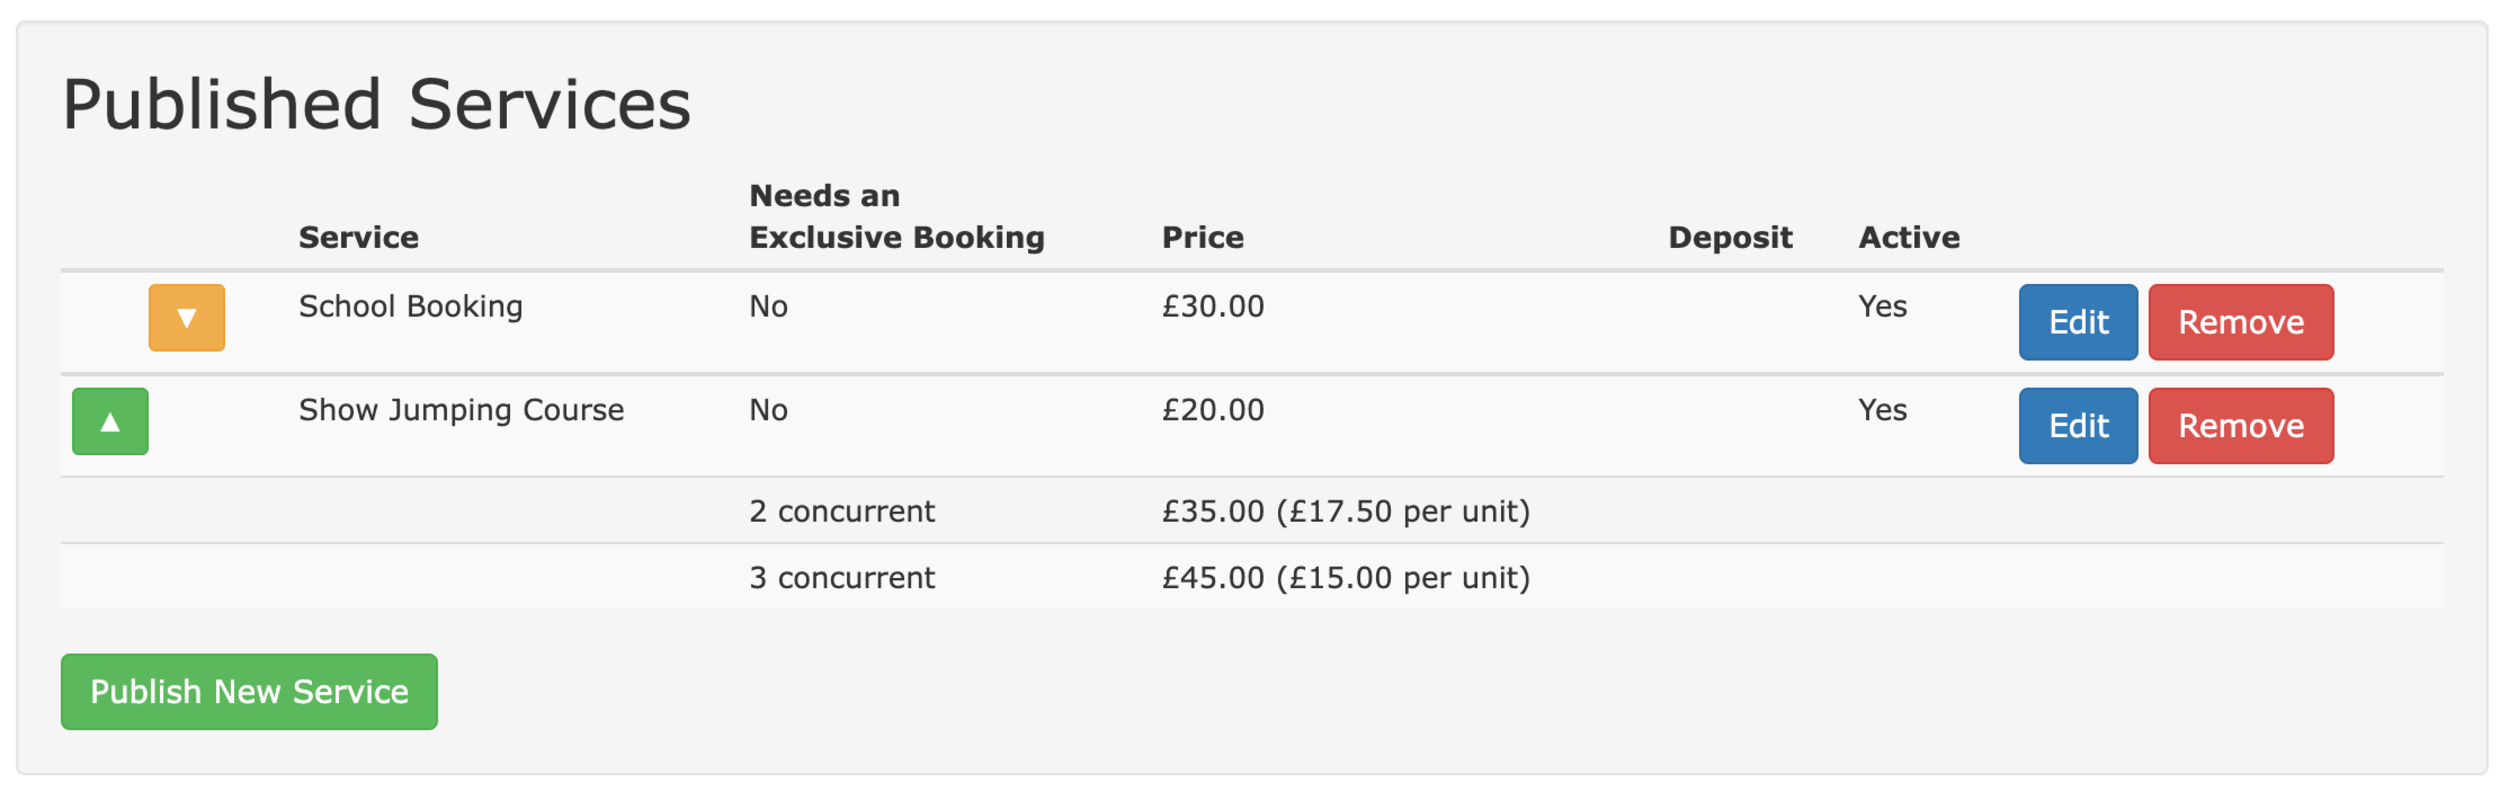
Pricing Options are an example of an update we love in At The Yard - one that improves and refines the experience for your customers!
As we mentioned at the start of this post this is part of a multi-part series highlighting updates that we’ve brought to the shop since it’s launch, so check back soon for the next update.

When someone in At The Yard makes a request, subscribes to a service or books a facility it’s important to inform staff so they can act accordingly. Until now we only offered one option to configure this for your yard - to turn the notifications on or off for all staff…
This worked, it made sure that everyone got the information they needed, but what if you wanted to stop notifications going to certain staff members. For example when:
Well today we’re making this possible. We’ve added a whole bunch of configuration options so you can use notifications the way you want to. From so granular that a single staff member can be assigned to a particular service through to the existing ‘message every member of staff’ that we’ve had until now.
Lets look at the options now available:
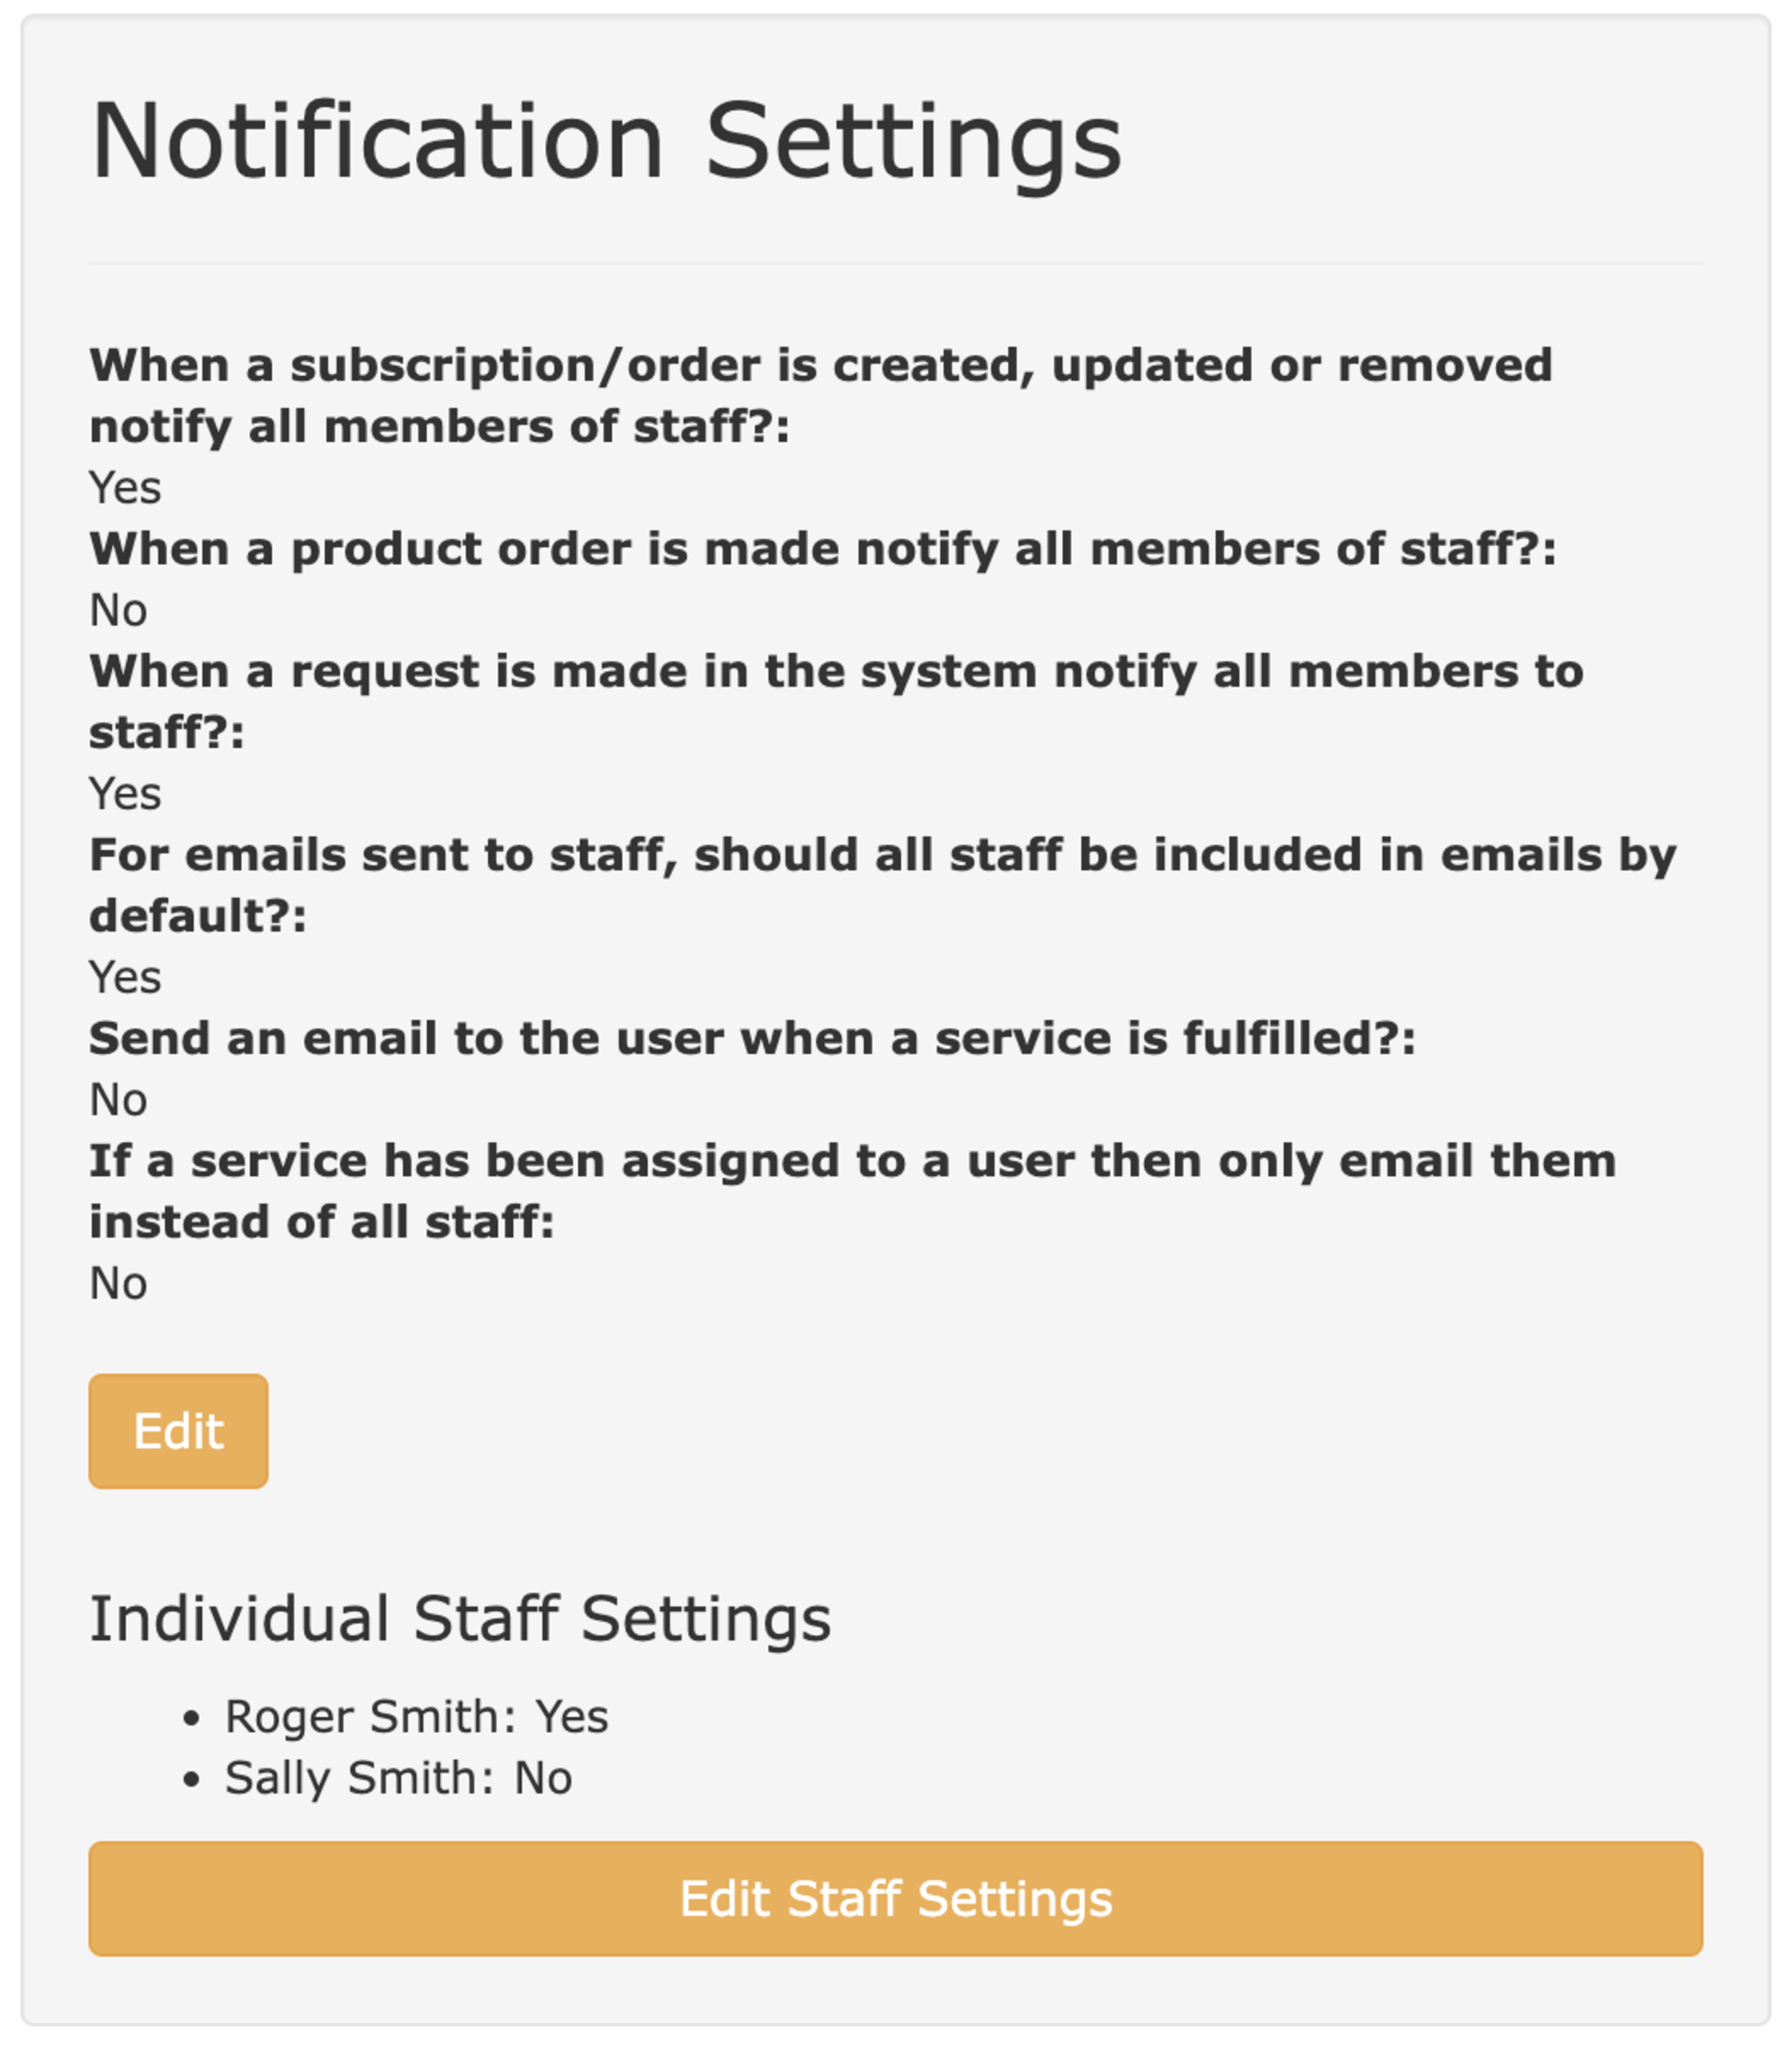
All these configuration options are done on the Yard Configuration screen under the Notification Settings section.
This is still the default option. So if this is what you want you’re already done!
Click on the Edit button. Tick the box “When a request is made in the system notify all members of staff?”
This option must be turned on for any staff to receive notifications with the other options.
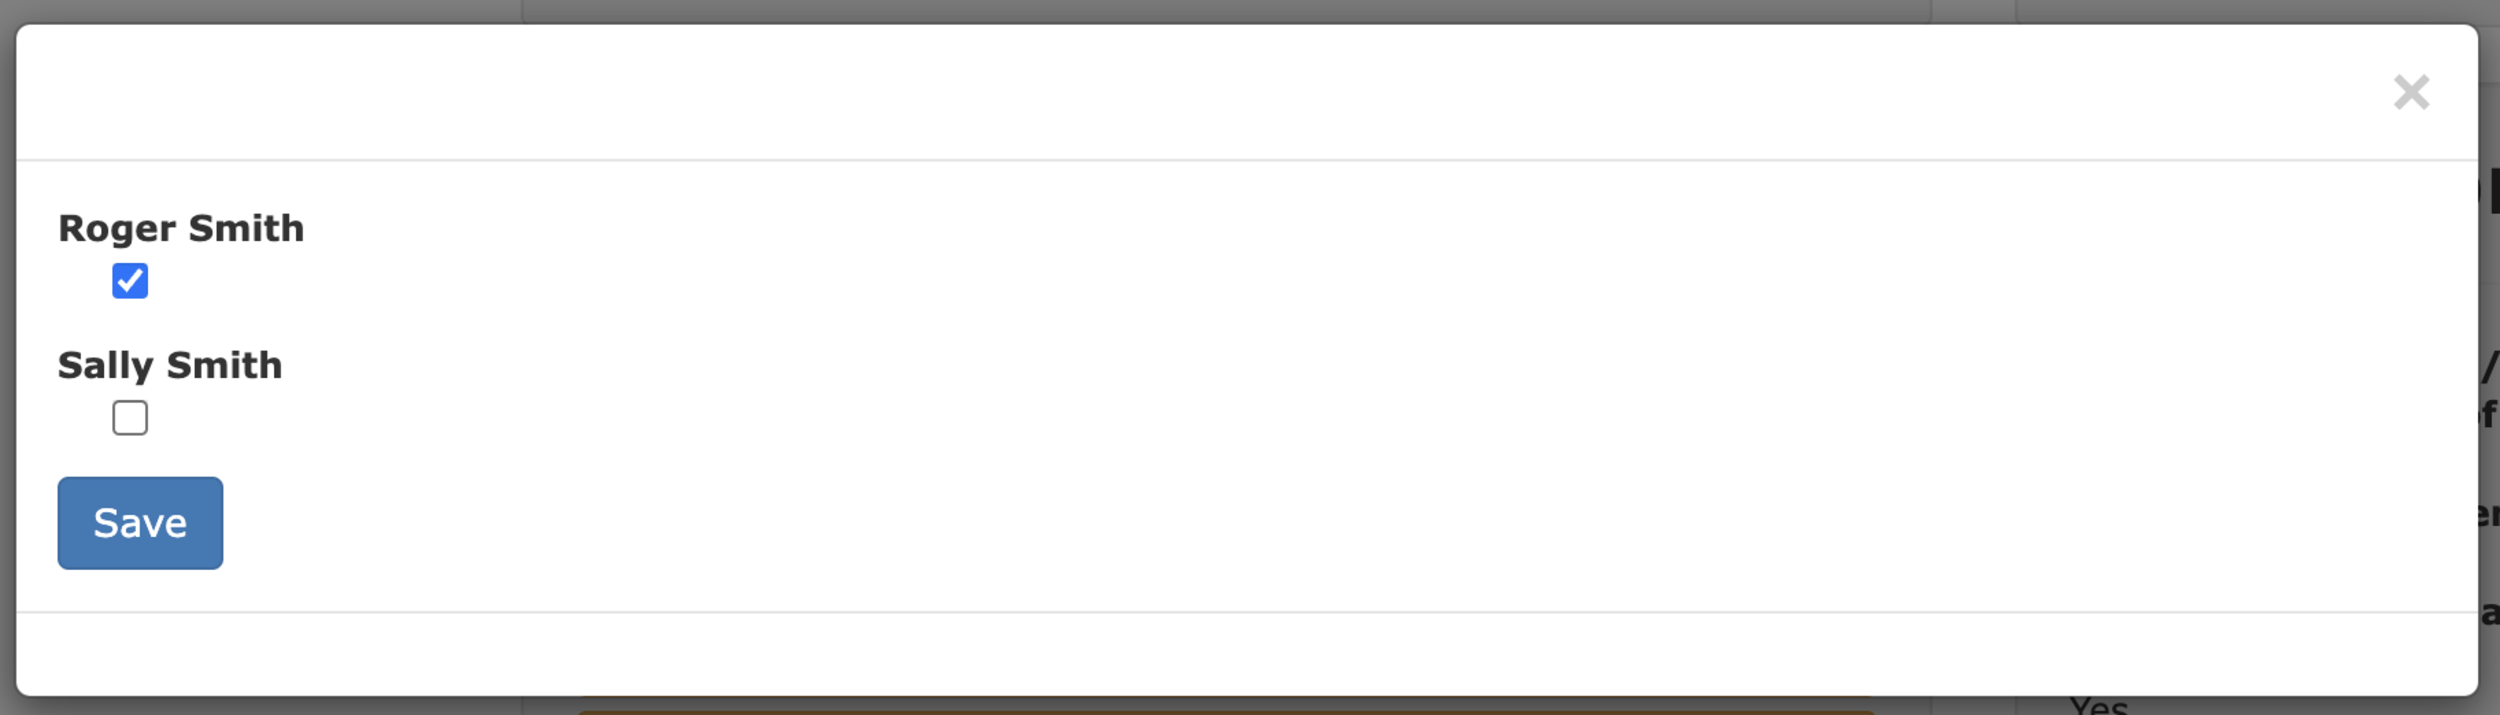
This sets which staff will receive the staff notifications.
The existing options are shown in the Notification Settings pane and to make changes you can click on the Edit Staff Settings button. Simply tick/untick the appropriate staff members and click save.
This option works in combination with the previous option. It sets the defaults for new members of staff to ensure that they automatically receive the correct settings (one less thing to remember when onboarding new staff).
The final option gives you the finest control over who receives the notification, allowing only the user assigned to a service to receive the notification.
This is perfect for situations when a single member of staff is responsible for a particular service (for example Rug Washing or a Lesson with a particular member of staff). They can be set to receive all requests, manage approvals and confirm fulfilment whilst not adding additional clutter to the inboxes of users who are not involved.
To set this up simply enable the ‘If a service has been assigned to a user then only email them instead of all staff’ in the notification settings panel. Then existing assignments will automatically be used or you can create new ones via the Forecast panel or by going to Admin, Services and clicking the new option under the edit drop down called ‘Assign User to Service’.
To check on or remove existing assignments, these can be seen under the management menu tab by clicking on the assignments button.