
Blog
Within the invoicing side of At The Yard you have long been able to track payments for your invoices. This means, at a glance, you can always see how much you’re owed and which clients owe it to you!
Today we’re making this tracking more flexible by introducing Prepayments.
Prepayments allows a customer to pay a lump sum upfront and for you to apply this payment to invoices going forwards. There are numerous use cases for this. for example:
Getting started with prepayments is simple, at the top of the admin invoices page there is now a button called Record Prepayment.

Simply click on it to bring up the new Prepayment screen.
(Note: You can also click the dropdown which will allow you to see all existing payments and their status)
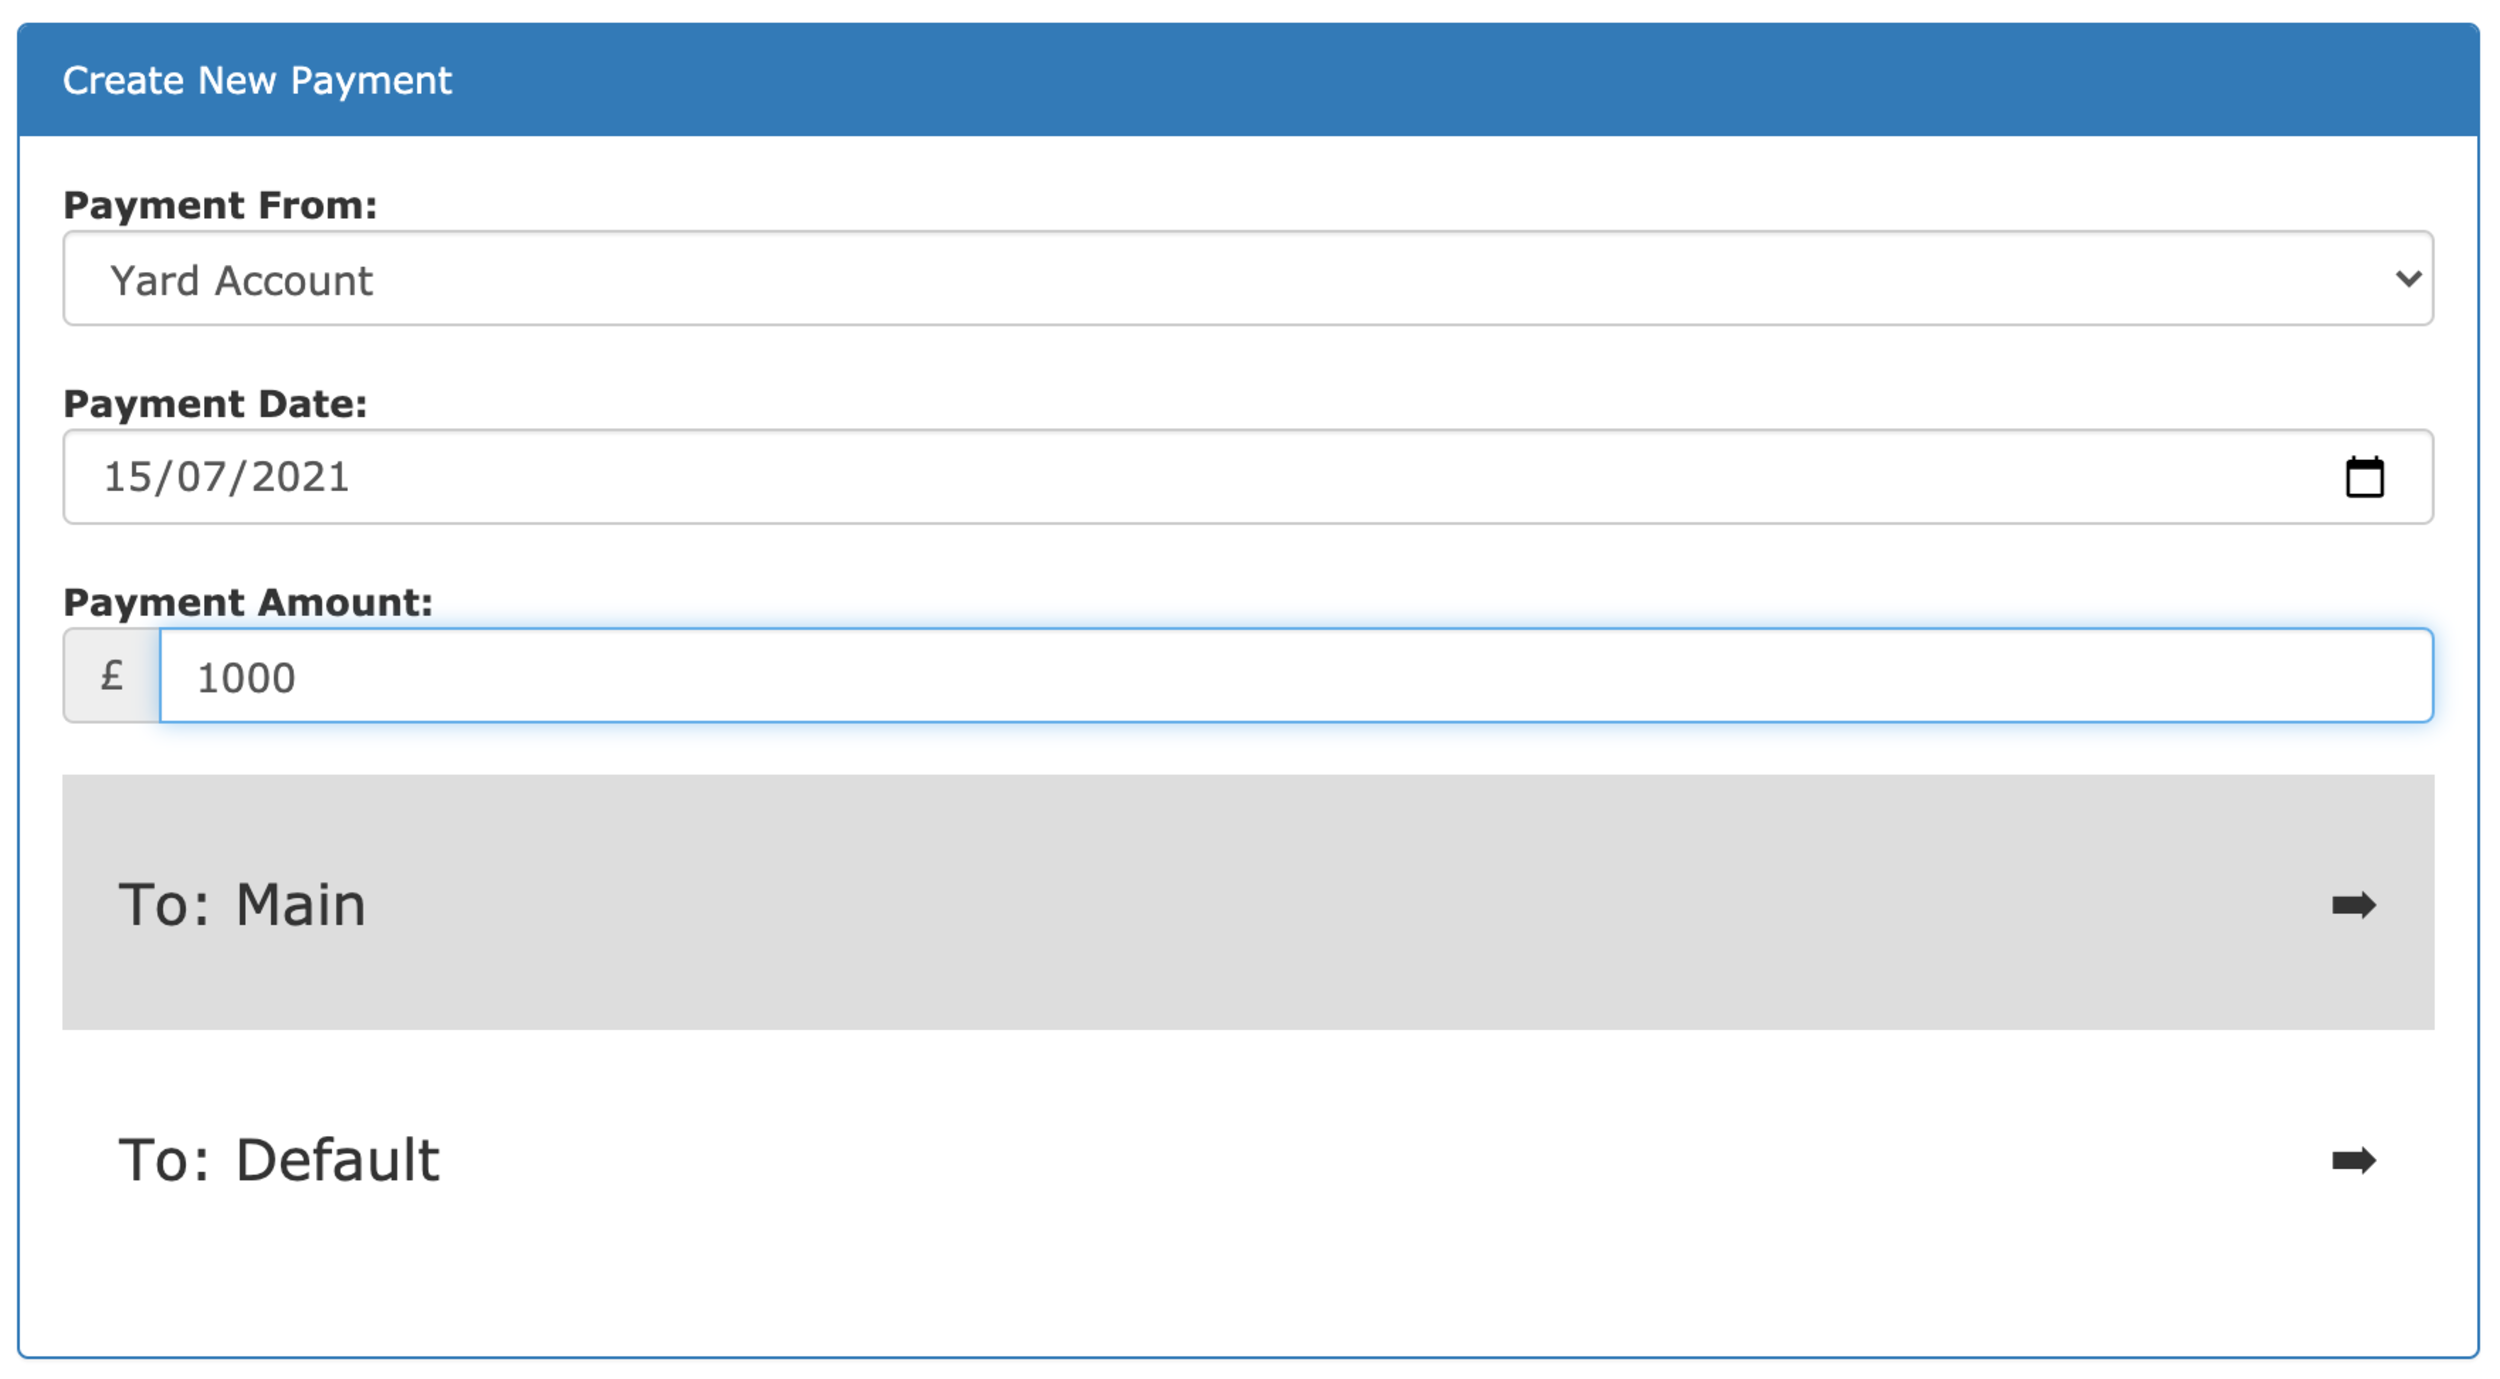
As you’ll see it’s the same as the payment form you’ll be used to seeing when recording payments for invoices. Similarly when recording a payment for an invoice you can record to which account the prepayment was made and by which method it was paid.
That’s all it takes to record the prepayment and have it ready to apply at a later date.
When it comes to invoicing time you simply go to Record Payment on an invoice as usual but now you’ll see a new option to Assign Existing Payment.
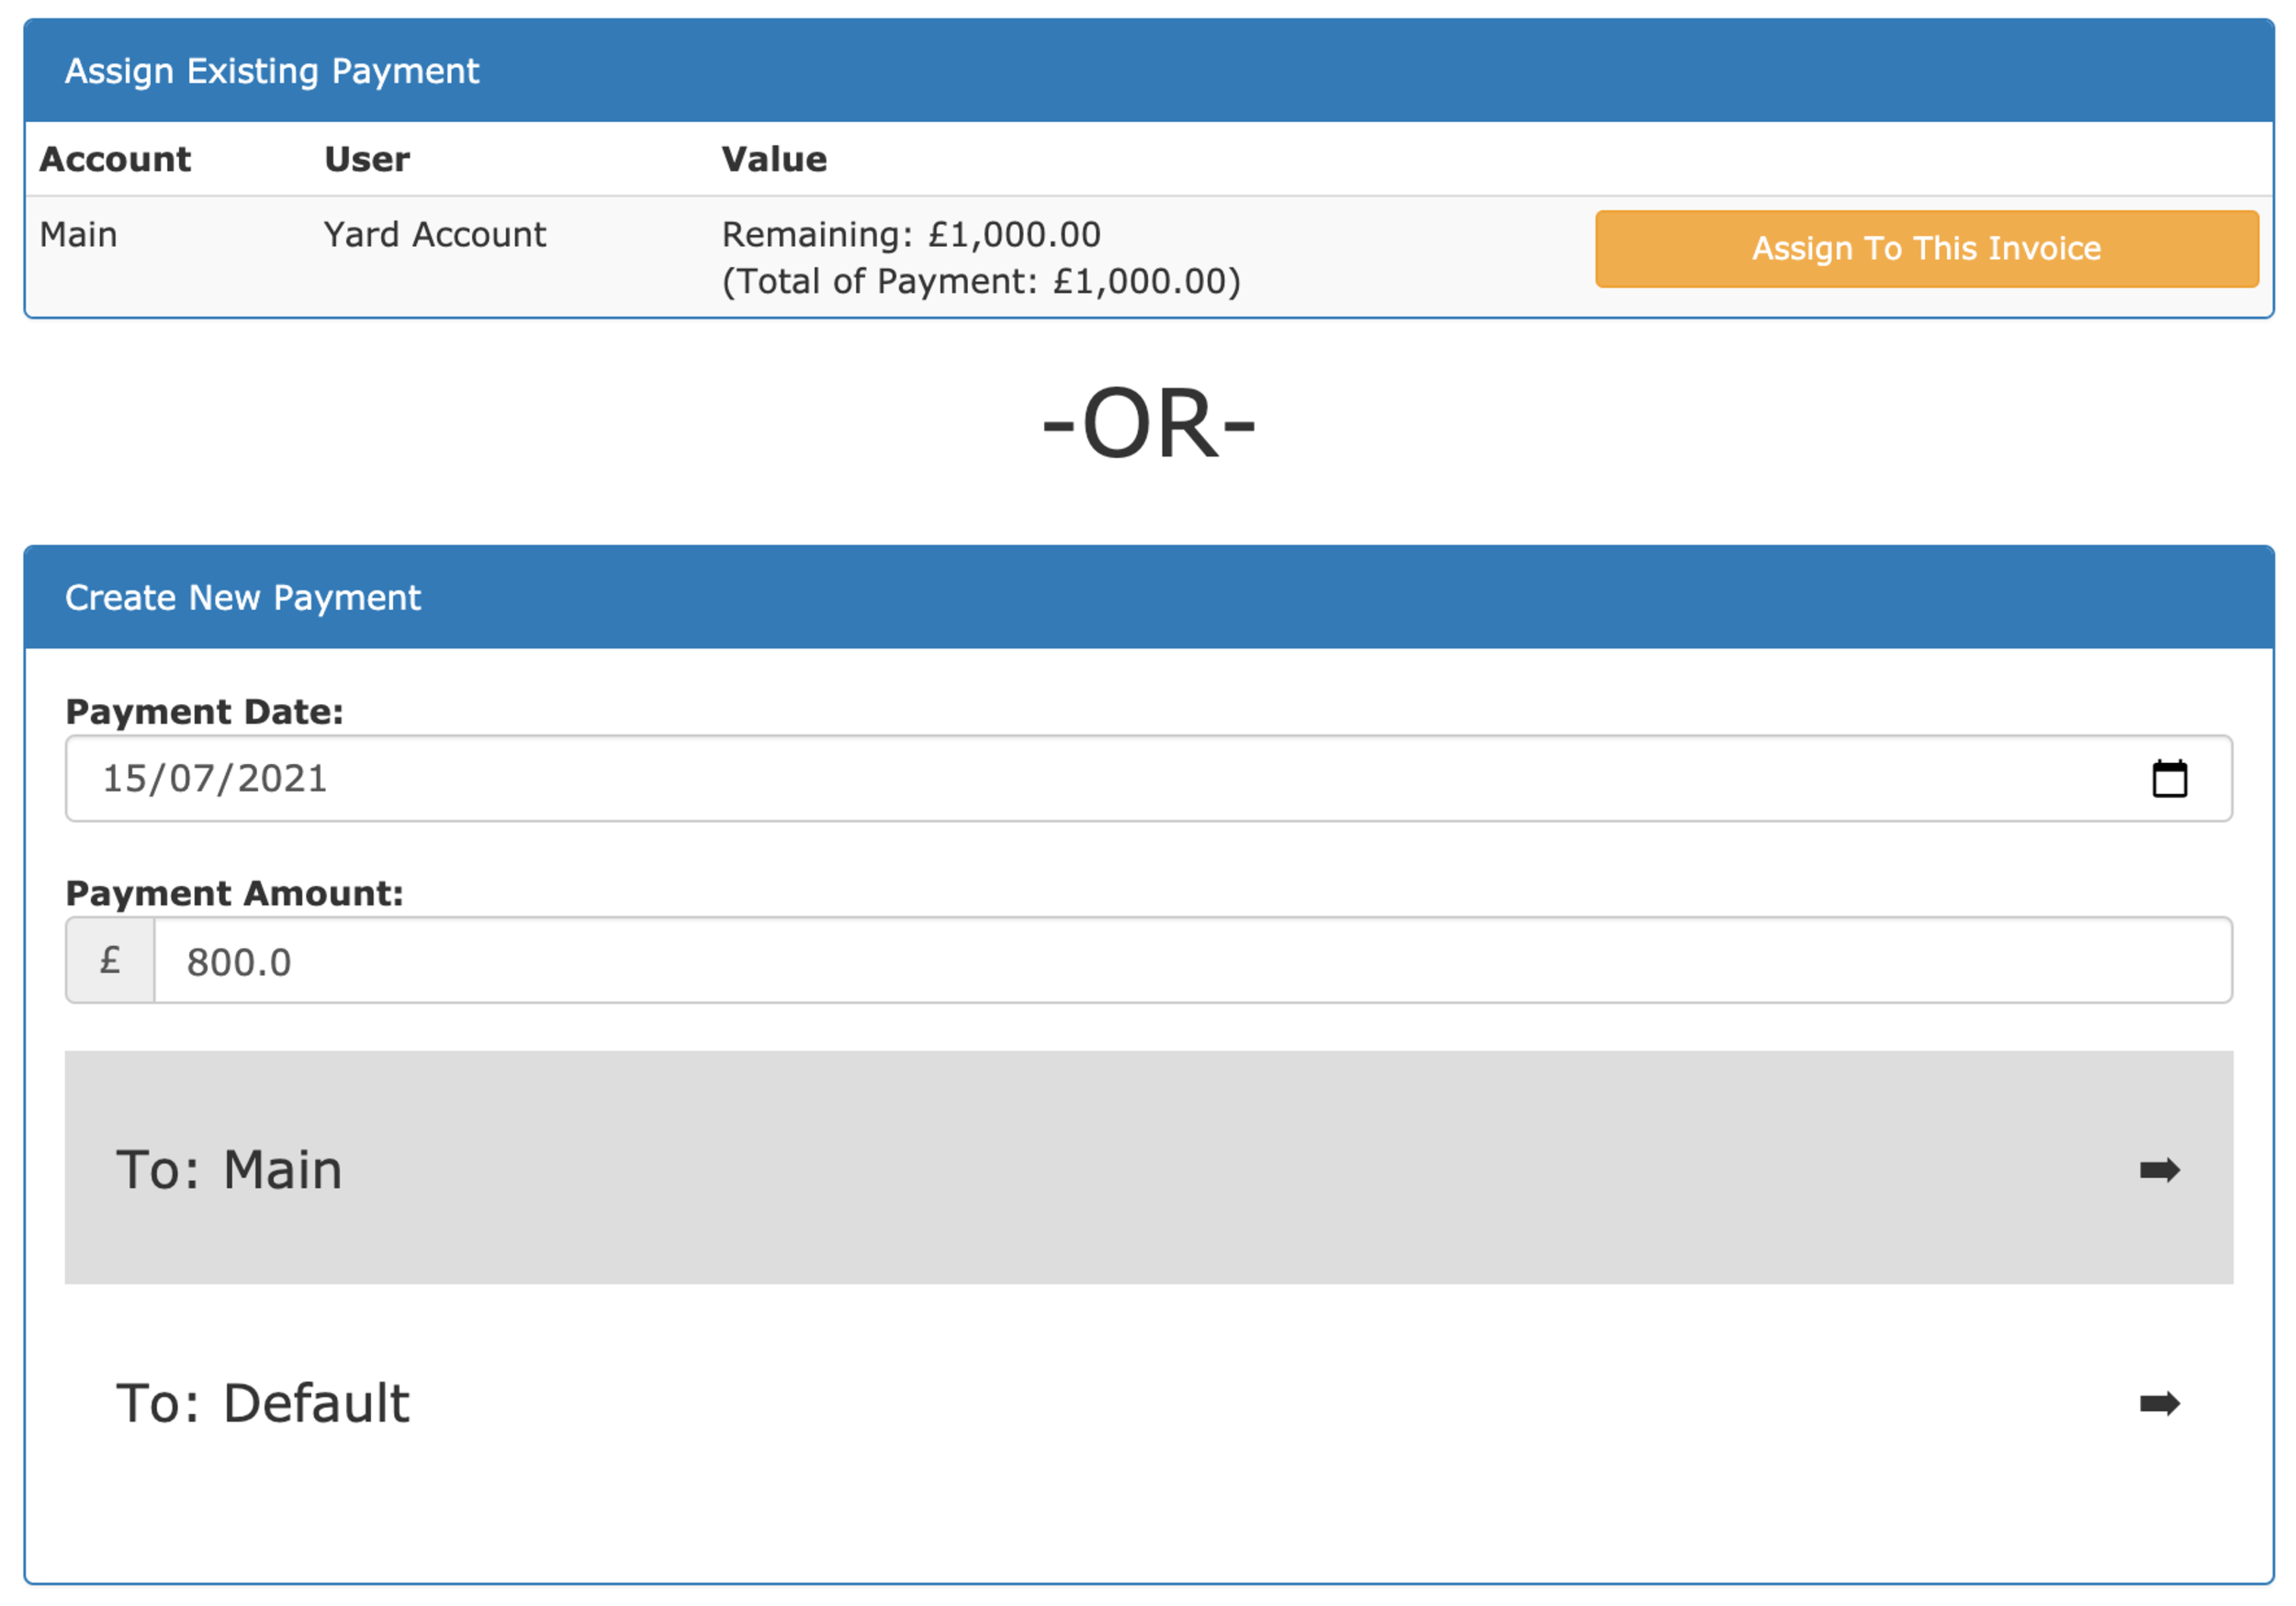
From this screen all you need to do is click on Assign To This Invoice and choose how much of the prepayment you want to apply.
As with our entire invoice and payment tracking system we support syncing these payments and allocations to both Xero and Quickbooks, meaning you can keep your accounts as organised as your yard.
Due to our commitment to sync data within At The Yard to various accounting packages there are a few limitations with prepayments at this time. We are, in general, dependant on the integration options provided to us by the 3rd party packages we sync with and so whilst we are looking into working around these limitations we wanted to make you aware of them for now:

The cloud has revolutionised the way we all work. It lets us access our data and work wherever we are in the world and of course, the last year has shown this to be more true than ever!
Beyond just flexibility there a many other advantages to the cloud. Our favourite is the ability to integrate different packages together and have your data flow seamlessly between them. With integrations it means that instead of choosing a single product which is a ‘Jack of All Trades, Master of None’ you can choose from a number of bespoke packages, picking the best suited to your needs in each area of your business.
At The Yard is built on this idea - build a product with equestrians for equestrians. By focusing on this we made a system that was easy to use and focussed enough on the needs of livery yards to meet all their needs. Then with integrations we could hook into other software that has taken the same approach be it accounting or marketing or whatever you need. Together building a toolkit to help you run your business.
So back in 2018 we built the first of our integrations (for another accounting system). Since then our customers have been using this constantly to great effect - keeping the two systems in sync, quickly and easily managing their yards whilst also managing their accounts.
Today we’re excited to announce the BETA test for our Quickbooks integration. This integration is built on top of our in house flexible accounting sync system that’s been developed over the last 3 years and will bring the same convenience to our customers who use Quickbooks as their accounting solution.
We’ve already started testing with our users but are now looking to expand the number of testers in the system. So if you are a customer of Quickbooks and run/own a livery yard we’d love to hear from you. It doesn’t matter if you’re a current subscriber to At The yard or not get in touch. We can help get you setup in your existing At The Yard account or set you up with a free (special extended as a thank you for your help) trial of At The Yard to test the integration.
Last November we released a major upgrade for the Dashboard (which was known as the Control Panel back then). The update introduced the Today View which meant that users and liveries could see at a glance everything happening on the yard that day and allowed them to book the school (or other facilities) all from the front page.
The changes to the dashboard received a great response and we also received some great feedback on how to make it even better. Today we’re announcing two small updates to the dashboard as a result of this feedback.
Forecast View has been available for staff since the early days of At The Yard. It’s a great tool for a busy yard, helping them manage their day to day schedule and plan for the days and weeks ahead - giving them a quick and easy way of seeing everything that’s happening and everything that needs to be done on the yard.
However throughout the day staff, like normal users, are often looking at their dashboard view in At The Yard. To make this view more useful for them we’ve introduced a Staff View option in the main dashboard. This means along side their own services and bookings staff can choose to get an overview of the entire yard.
The today view offers an accessible and quick way to access todays information in more detail as it is focussed on short term bookings and information. If you are a user who prefers to book further ahead you may find a larger week view may be more useful to you.
Because of this we’ve introduced a simple toggle switch. By clicking on the Hide/Show Today View button you can choose the view that works best for you and because you might have different needs depending if you’re on your phone, tablet or computer you can set a different choice for each device.
We hope you’ll enjoy these small tweaks and enhancements to the dashboard. If you have any suggestions to improve the dashboard or any features in At The Yard please feel free to get in touch.
Instead of one big feature to announce today we wanted to bring you an update on some of the small changes we’ve introduced recently.
Previously with bookings you’ve been able to have your users to choose from a range of predefined uses to let the yard and others know what they’ll be doing in that booking slot.
You can now add additional questions to the predefined uses you’ve setup for a facility. This can be used for whatever information you need e.g. to ask people when they’re making a booking for a riding lesson to list which instructor they’ll be using.
Facility policies allow you to control how far in advance your customers can book a facility for. This is great for enforcing yard policy and cutting down on missed bookings.
With this said there are cases where you want to allow people to book further ahead than your standard policy allows. For example when they want to book the school to correspond with a riding lesson with an external instructor.
To support this we’ve added a new type of Facility Policy - Open With Restricted Use. This allows the facility to be open for bookings for longer than your base policy but then restrict these bookings to only the uses you want to allow (e.g. a riding lesson).
Composite bookings are great for encapsulating the multiple individual bookings required for a complex service (e.g when an instructor, school and everything must be available to order the service).
These by default take into account the ‘Facility Exceptions’ on each dependant facility. This is in general a good thing but there are cases when it might not be wanted. To help with this you can now set the parent facility/service to ignore facility exceptions on the dependent facilities. This is set in the admin panel for the facility/service.
As time has passed and At The Yard has grown the Control Panel has evolved. As such after consultation with our yards we have renamed it to dashboard. We believe this better reflects the content contained within and will make it clearer to the users going forward.
We have just released two updates to the Booking system in At The Yard. The first, exclusive bookings which brings the ability for you and your users to exclusively book a facility for a horse. The second, multi slot bookings to make it quicker and easier for users to book extended sessions in a facility.
To make the most of the facilities you provide many yards allow multiple horses to use a facility at the same time. At The Yard’s social features means your customers cam see what others are doing with their horse, letting them decide if it’s a suitable time to join in or if the need to wait for another slot.
However there are times when a horse must have the facility to itself, an exclusive booking. The most common example of this being a riding lesson with an external instructor which typically requires the entire school so not to interrupt the lesson.
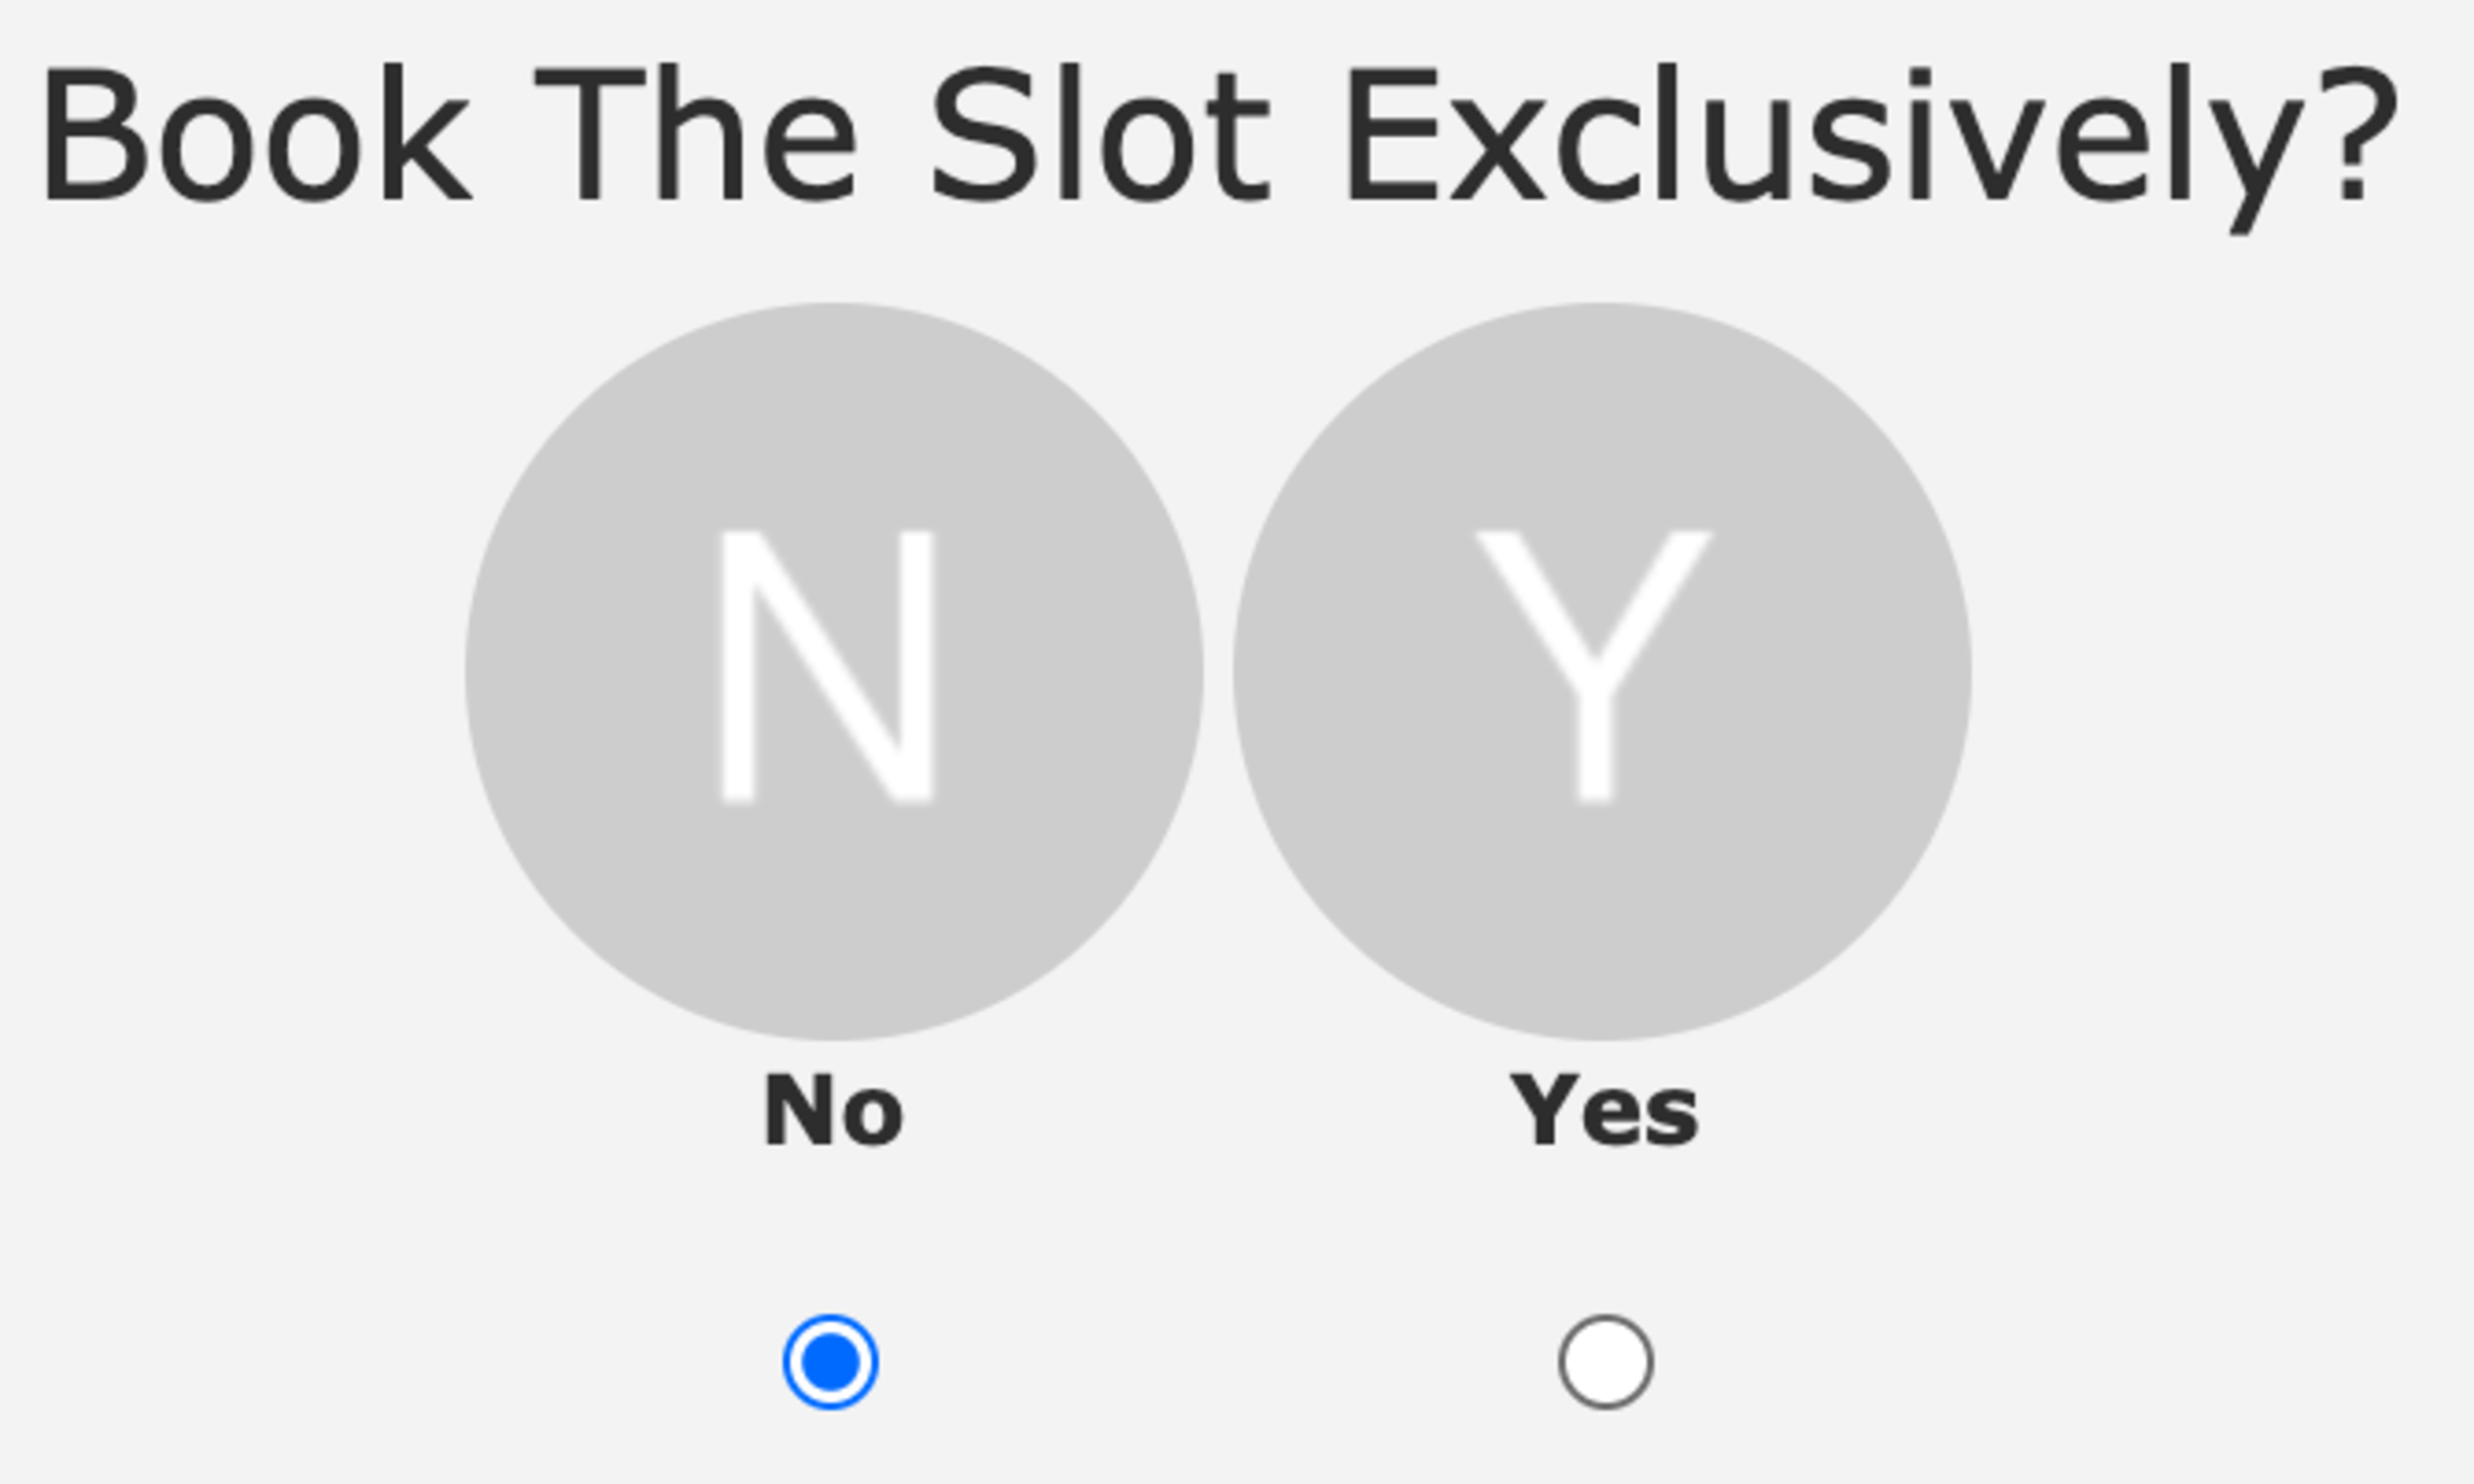
There are two different ways to set up exclusive bookings. The first is to simply allow users to choose when they want to make one. This can be done by going to the facility in the admin panel and checking the ‘Allow users to book exclusively’ checkbox.
Once setup the users will see a new option (shown above/to the side) when booking that will allow them to make it an exclusive booking.
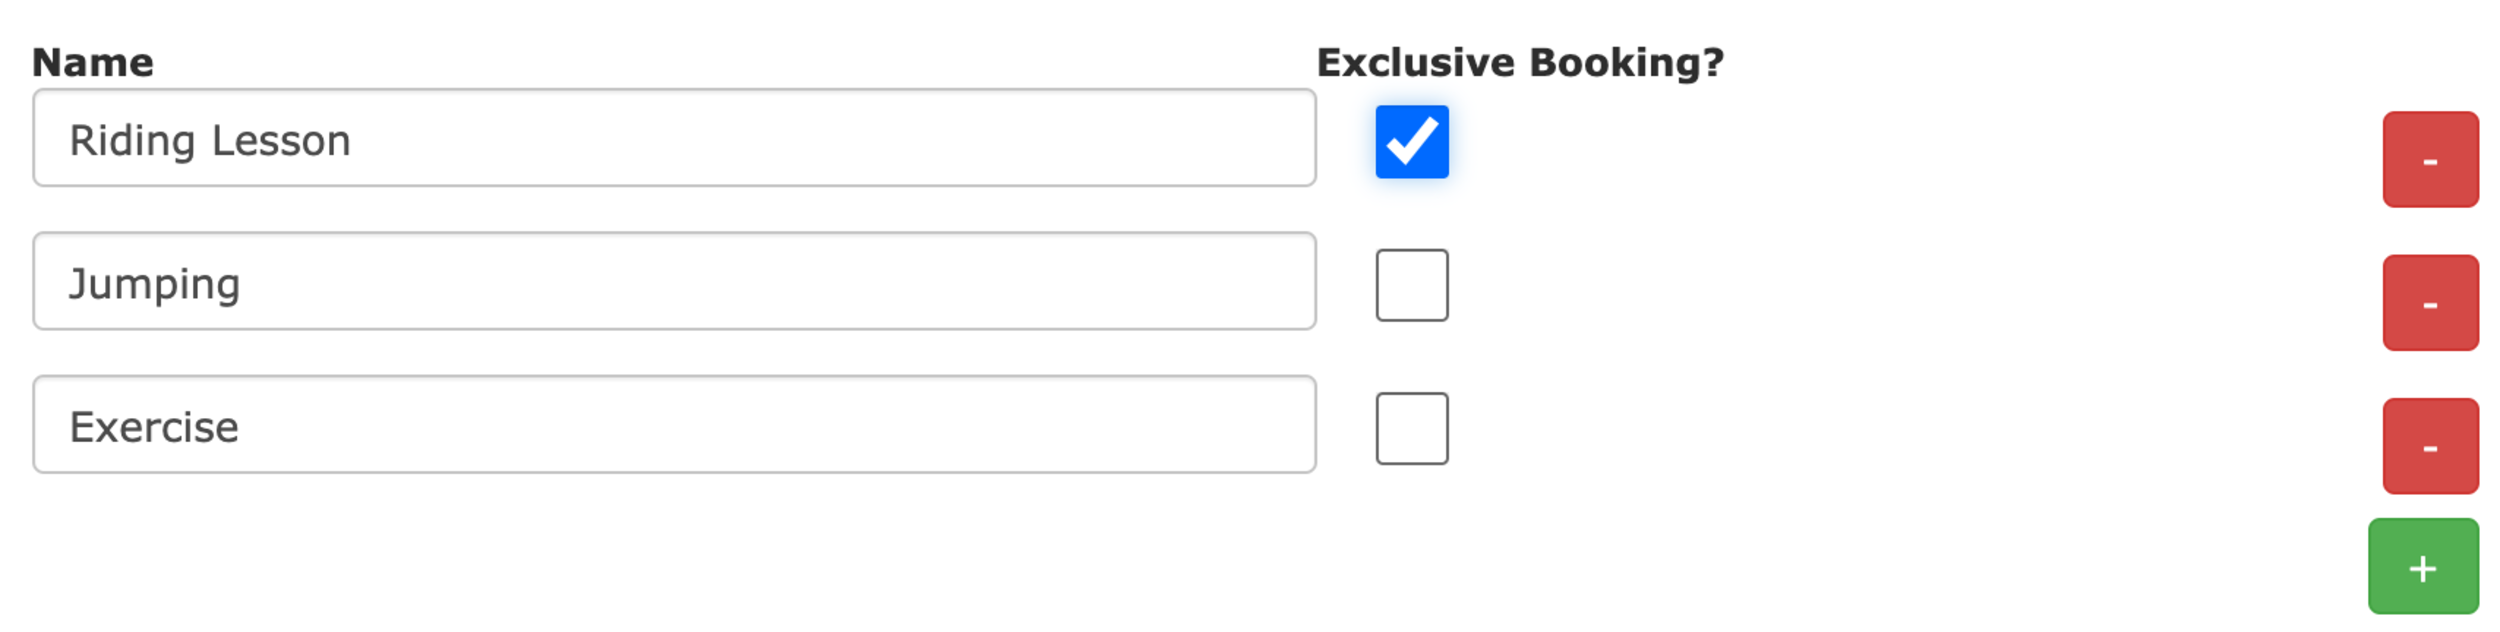
The second way of setting up exclusive bookings allows you as a yard owner/manager a bit more control. It works by integrating with the defined uses for a facility. A new option called Exclusive Booking? is now present when making/editing a defined use. By checking this option it will make any booking for that specific defined use automatically an exclusive booking, all without any extra user interaction.
This allows you to offer the facility exclusively when required whilst stopping users from just choosing to have exclusive use of a facility either excessively or unnecessarily.
The second new feature called Multi Slot Bookings allows for bookings to be easily made which span multiple booking slots. The maximum length of these bookings is defined by the Maximum allowed bookings in a row value set for the facility in the admin panel.
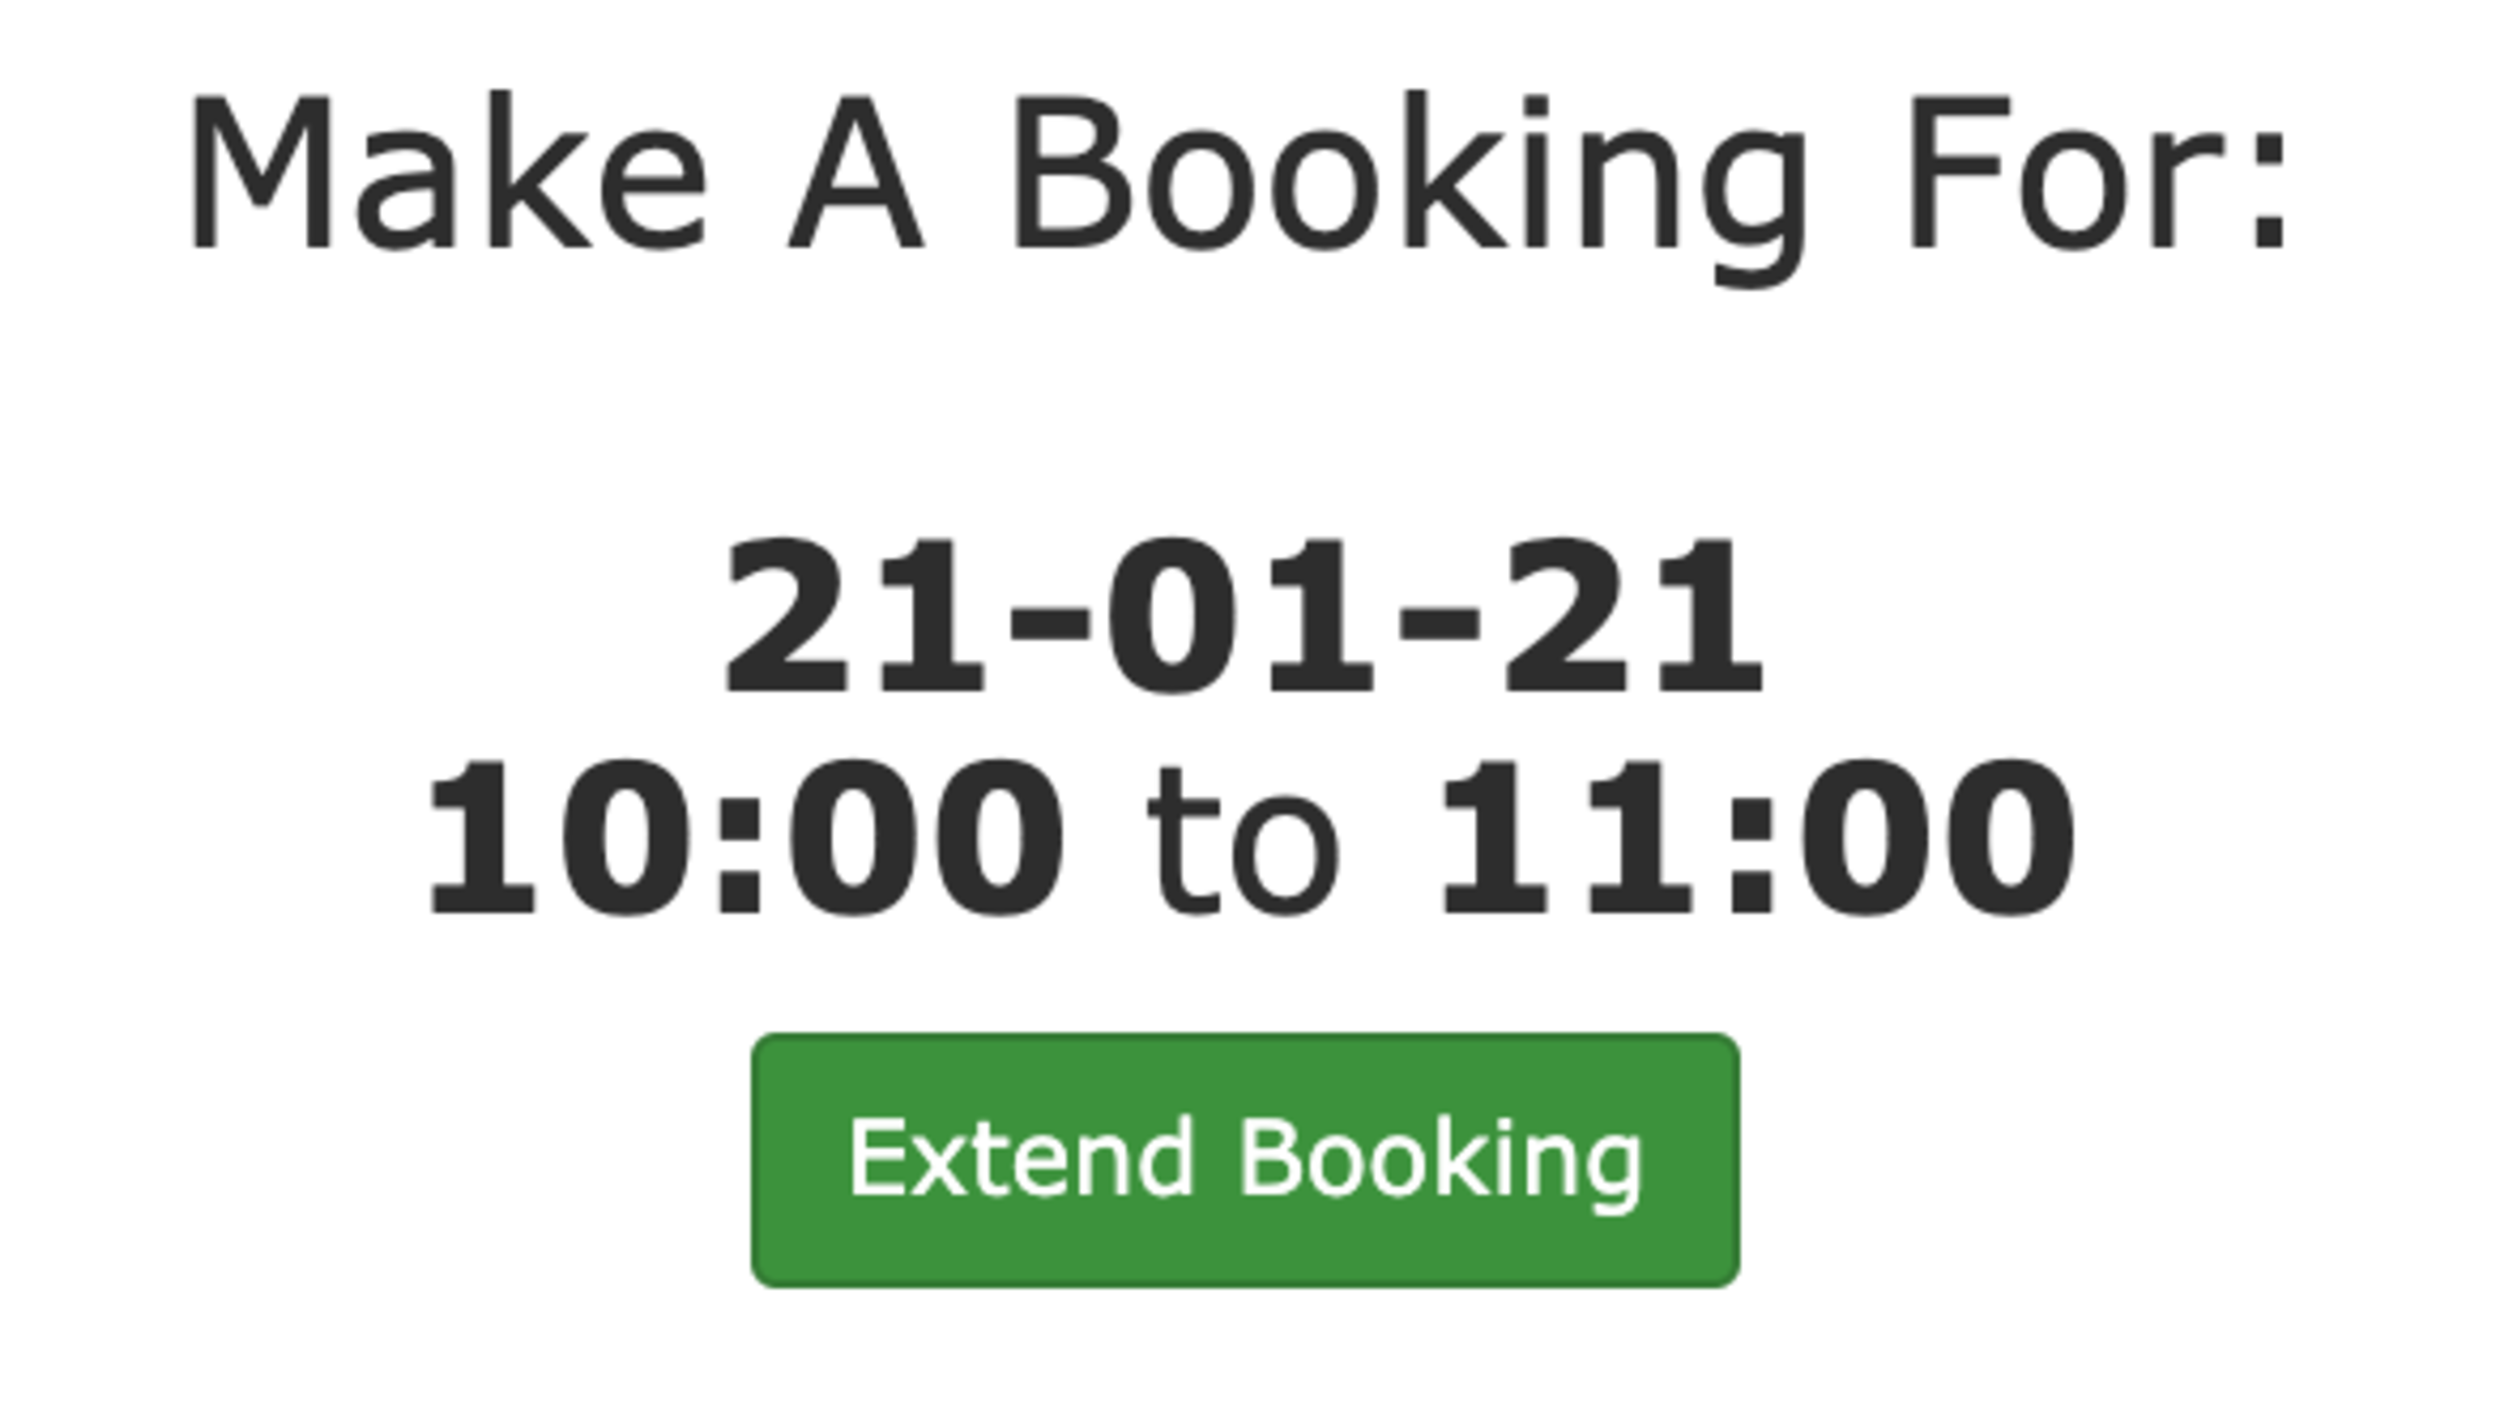
When a multi slot booking is available to a user they’ll see an Extend Booking button whilst making a booking, When clicked it extends the length of the booking by one slot length. It automatically checks the availability before offering the extension and if it’s possible it’ll allow to user to extend the booking more than once (up to the allowed number of bookings in a row).
This is also available for members of staff when making bookings on behalf of the users and will be coming to the kiosk view soon.