
Blog
At At The Yard, we’re always striving to make your shop easier to manage while increasing its flexibility. That’s why we’re excited to introduce Pricing Matrices, a new feature that allows you to customise pricing on both the number of simultaneous orders and the number orders in a row. With this you’ll be able to simplify your shop setup while offering more dynamic pricing options for your customers.
We understand that managing a shop can sometimes feel overwhelming, especially when it comes to setting up multiple pricing tiers for different scenarios. Our new Pricing Matrices feature addresses this by:
All whilst representing it in a simple 2D matrix so you can easily see and understand the pricing structure you’ve set up.
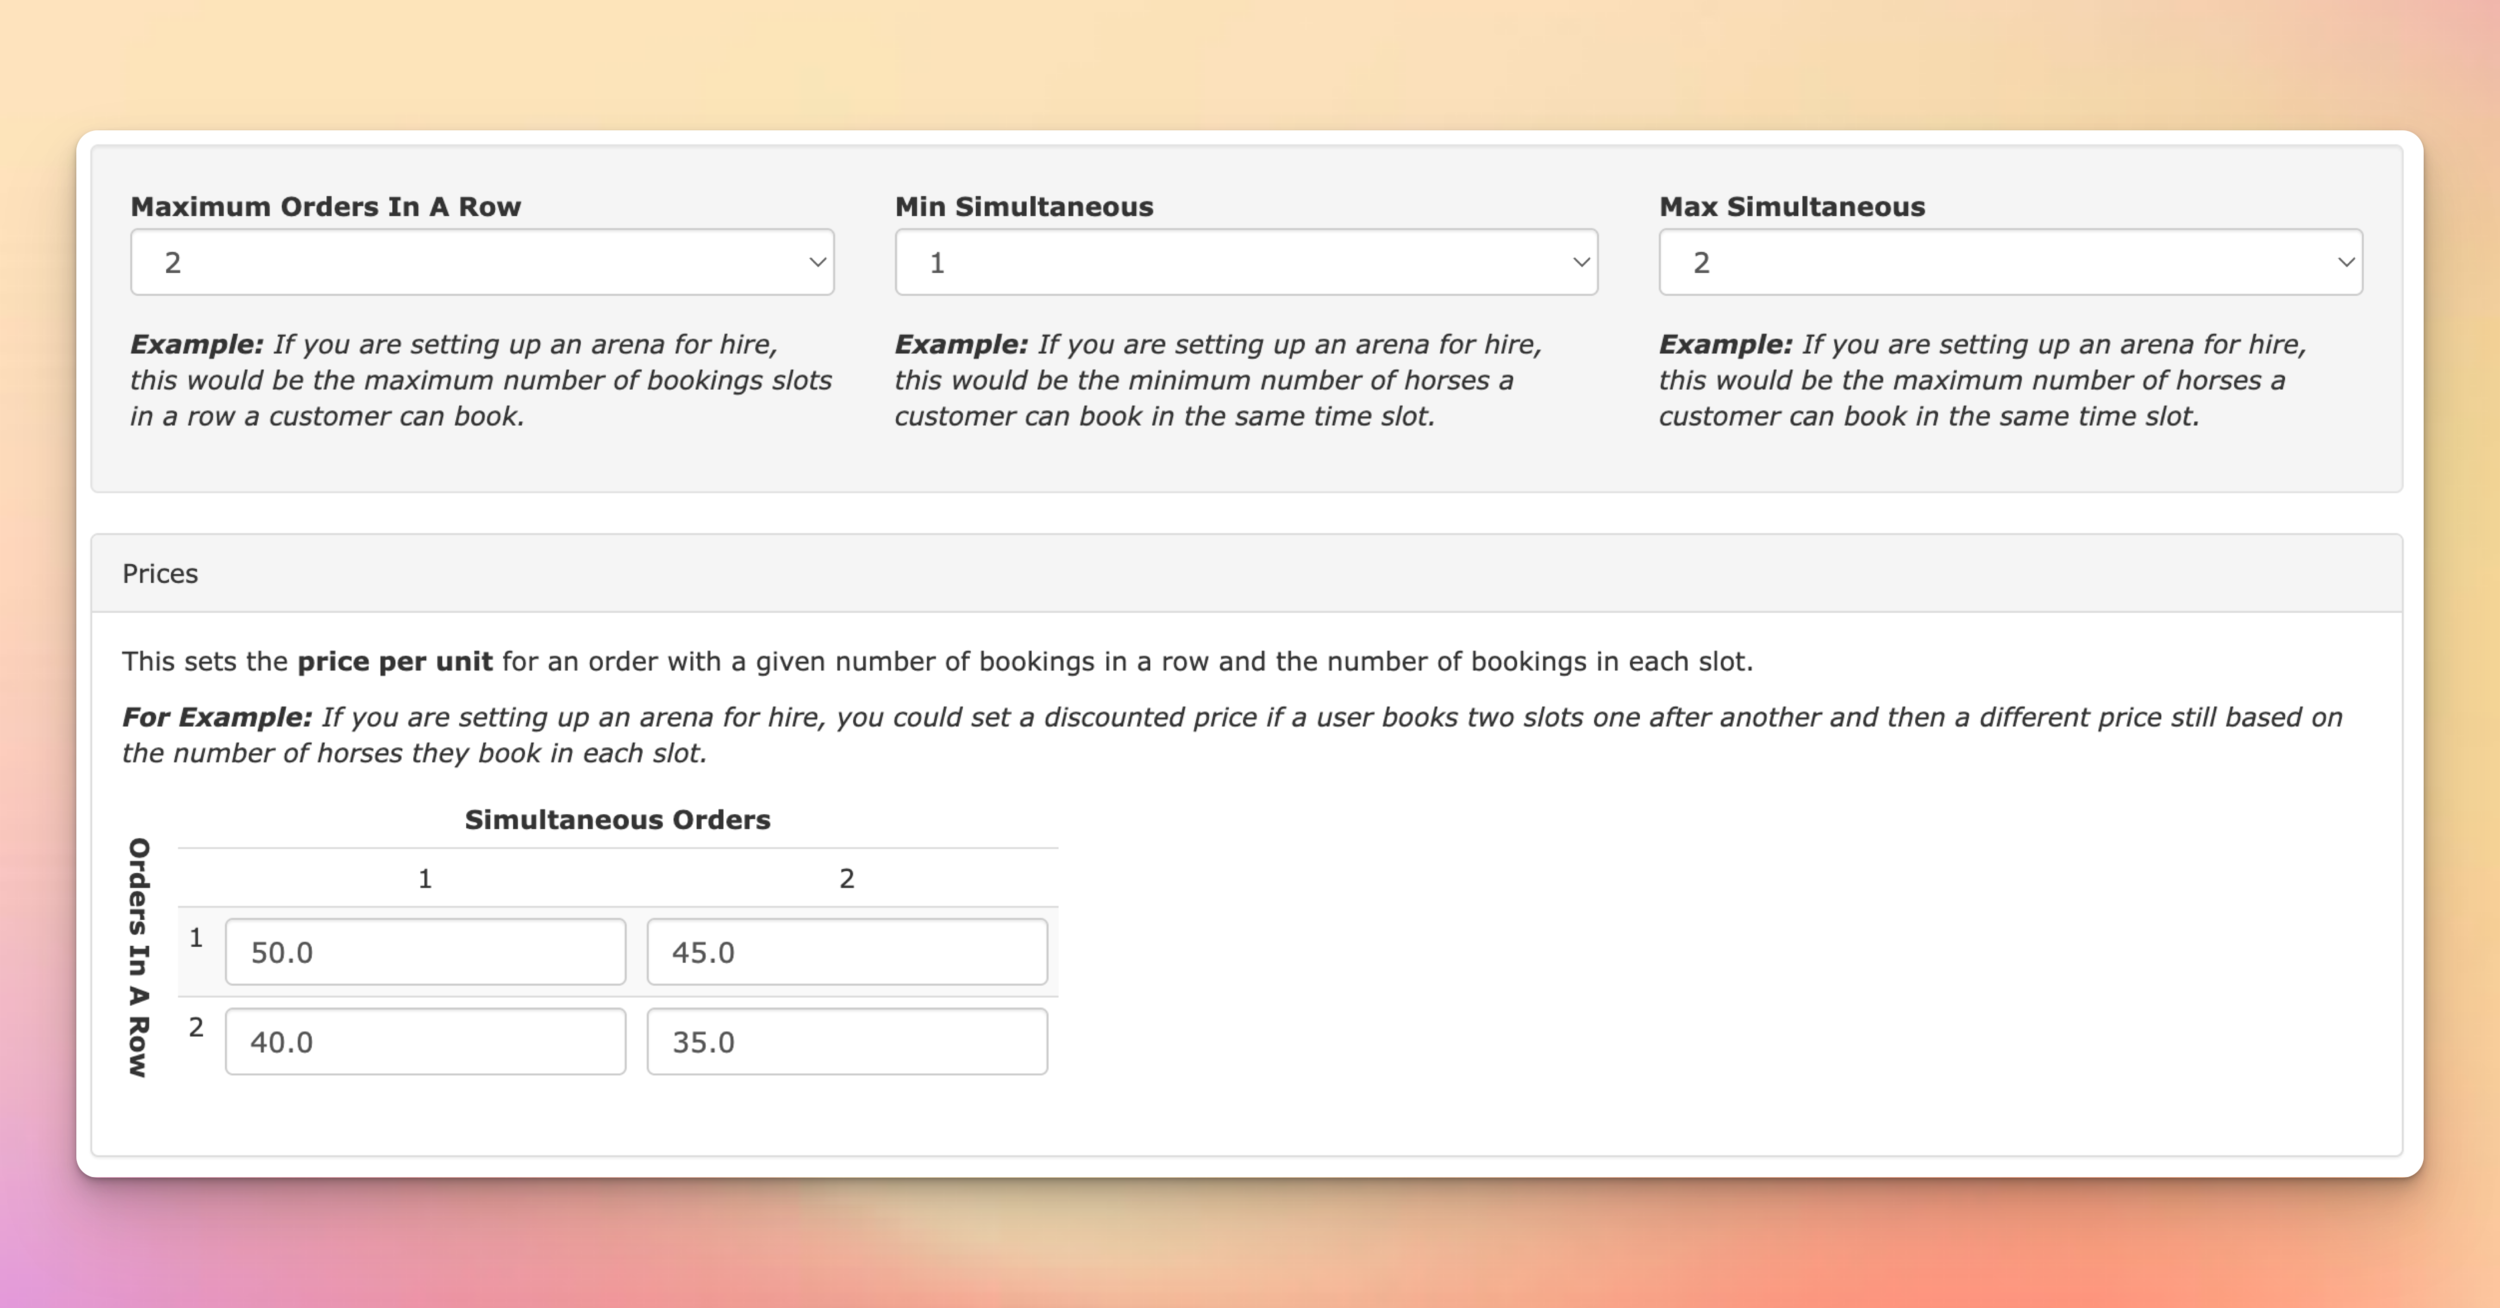
Setting up pricing matrices is simple and intuitive:
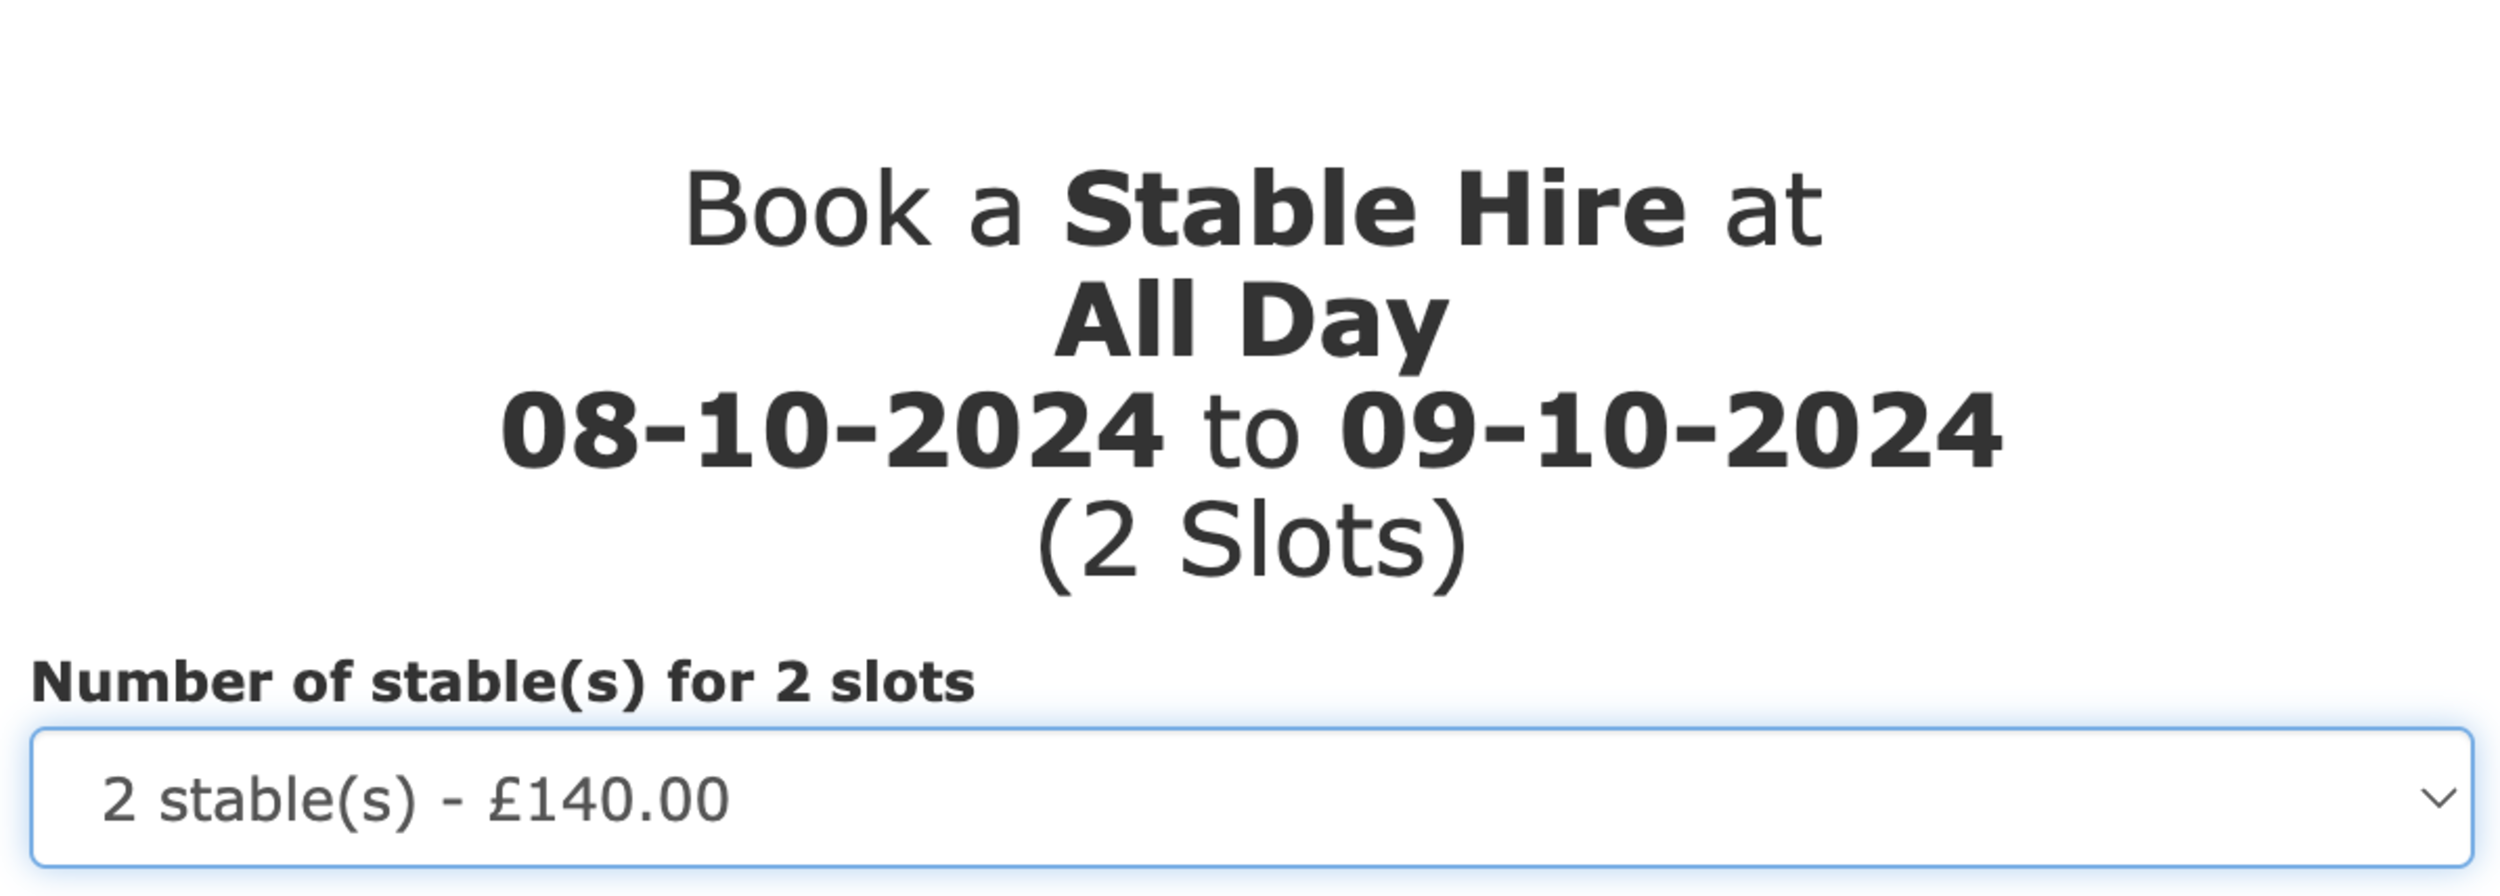
Here’s an example of how pricing matrices can work for you.
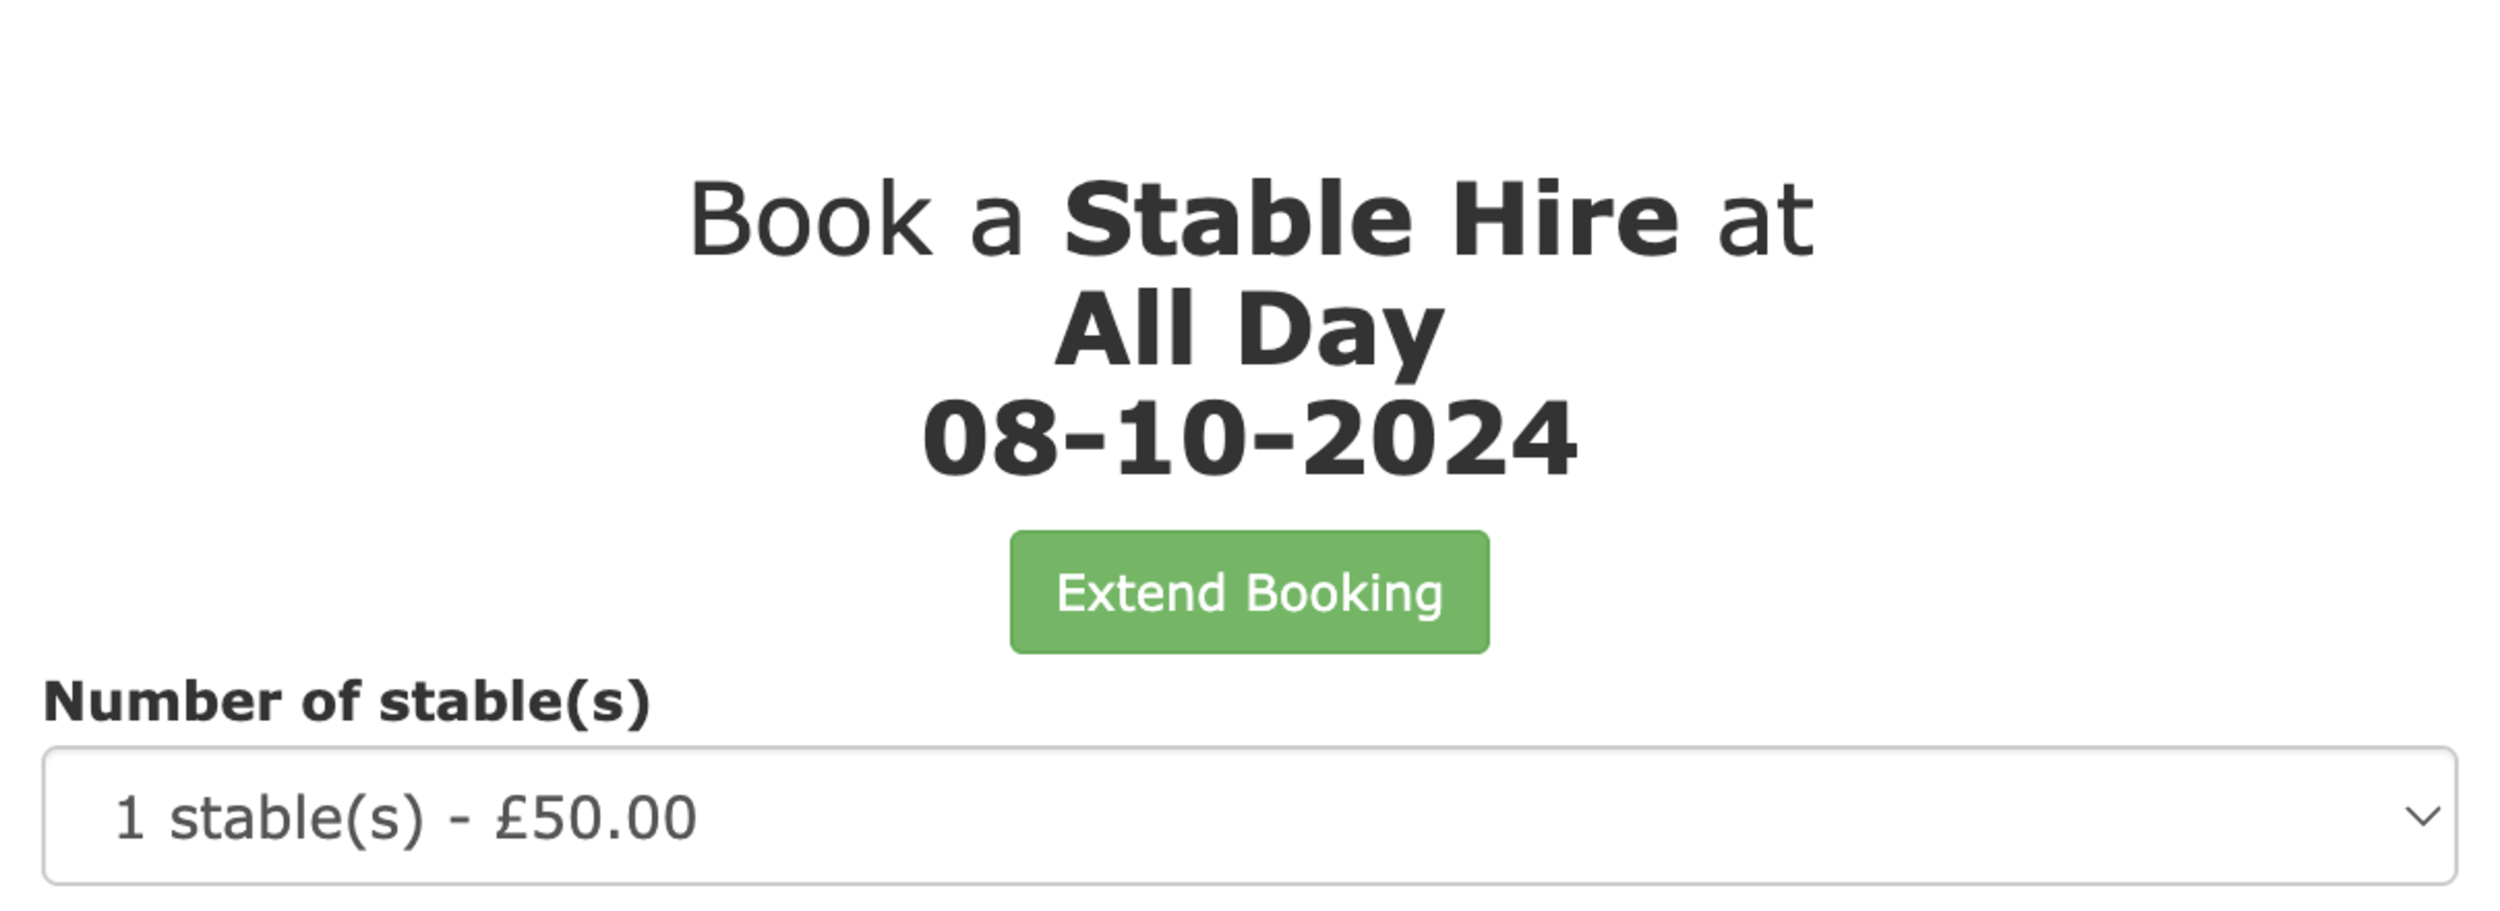
Imagine you're offering stable hire through your shop:
How it looks in the shop:
|
|
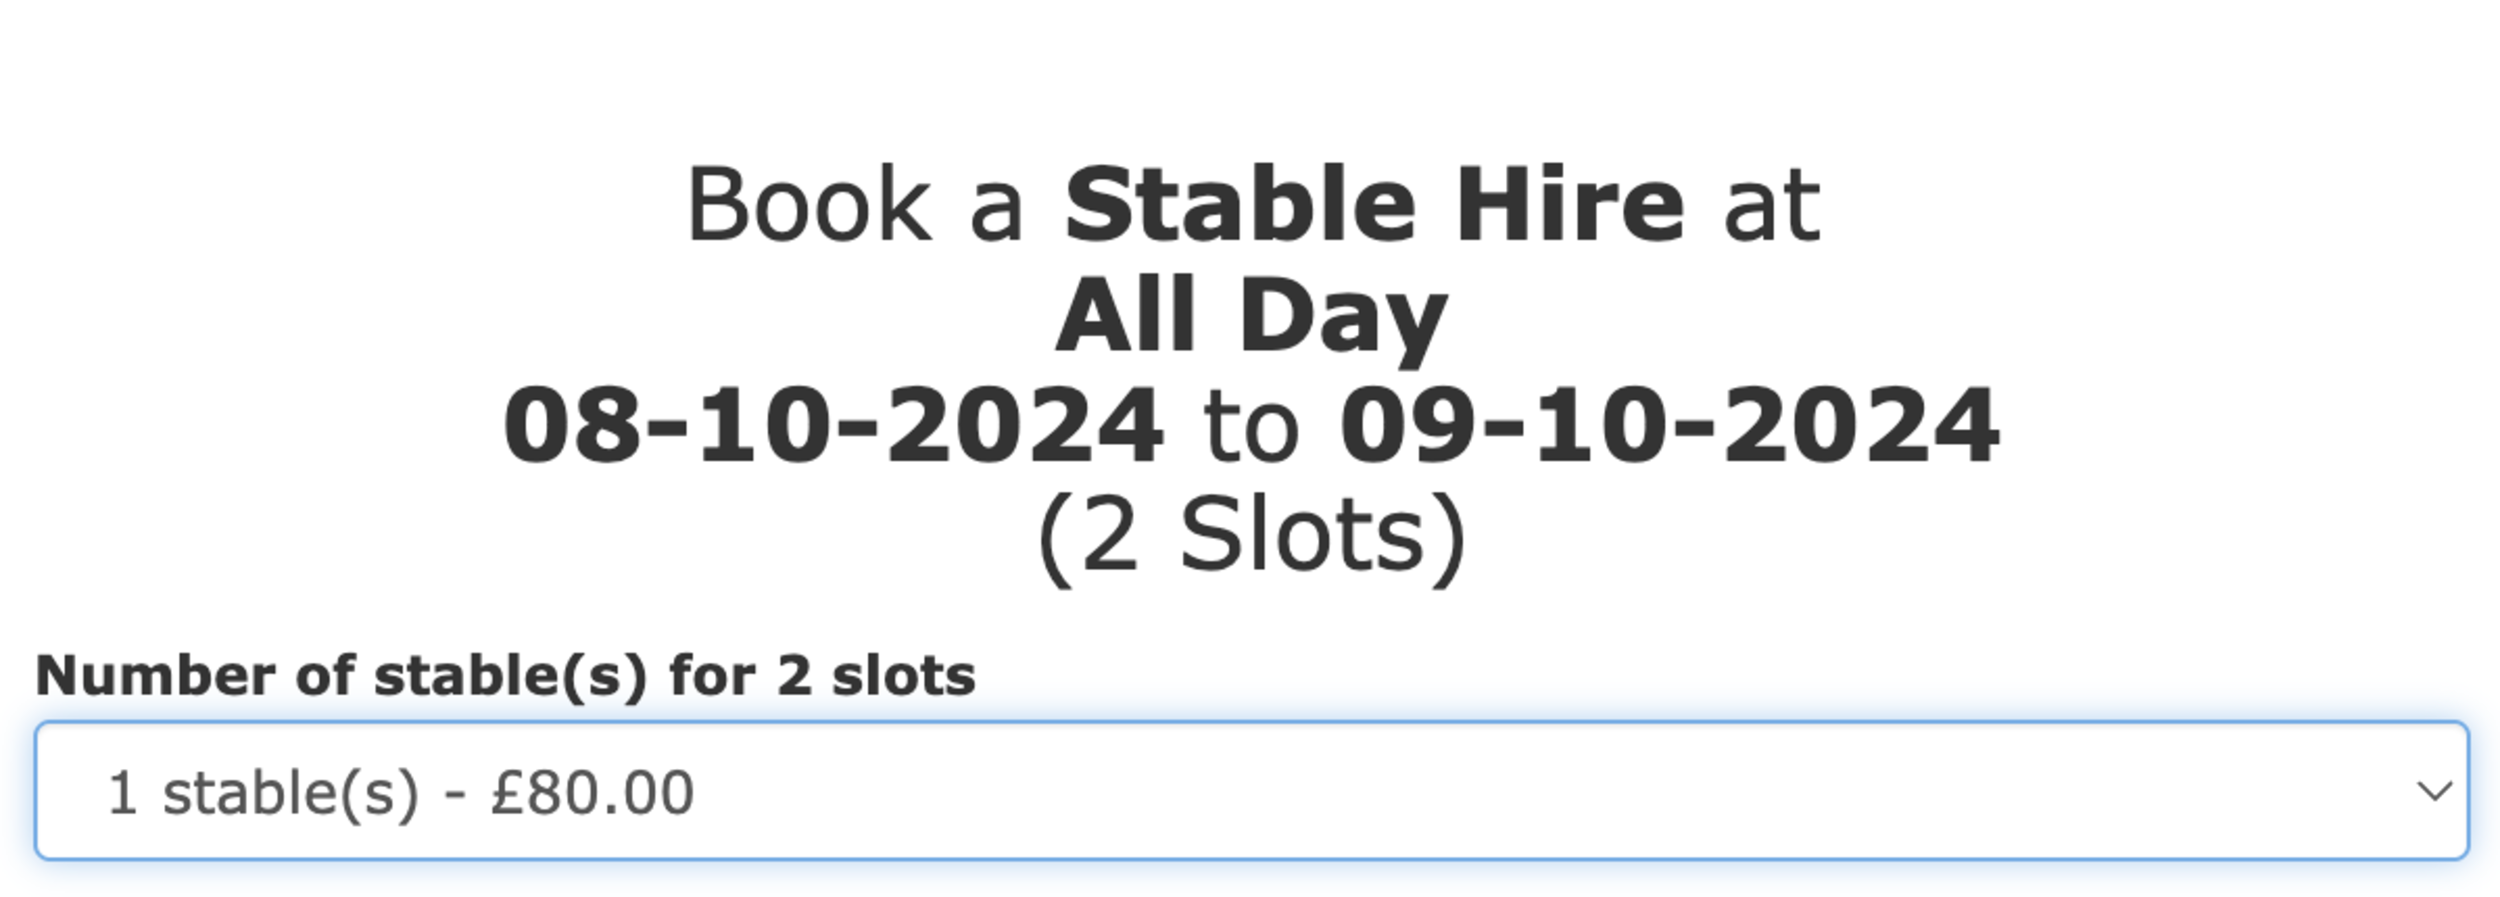
Instead of needing to create separate items for different durations, you can now consolidate everything into one item with flexible pricing based on the number of consecutive bookings.
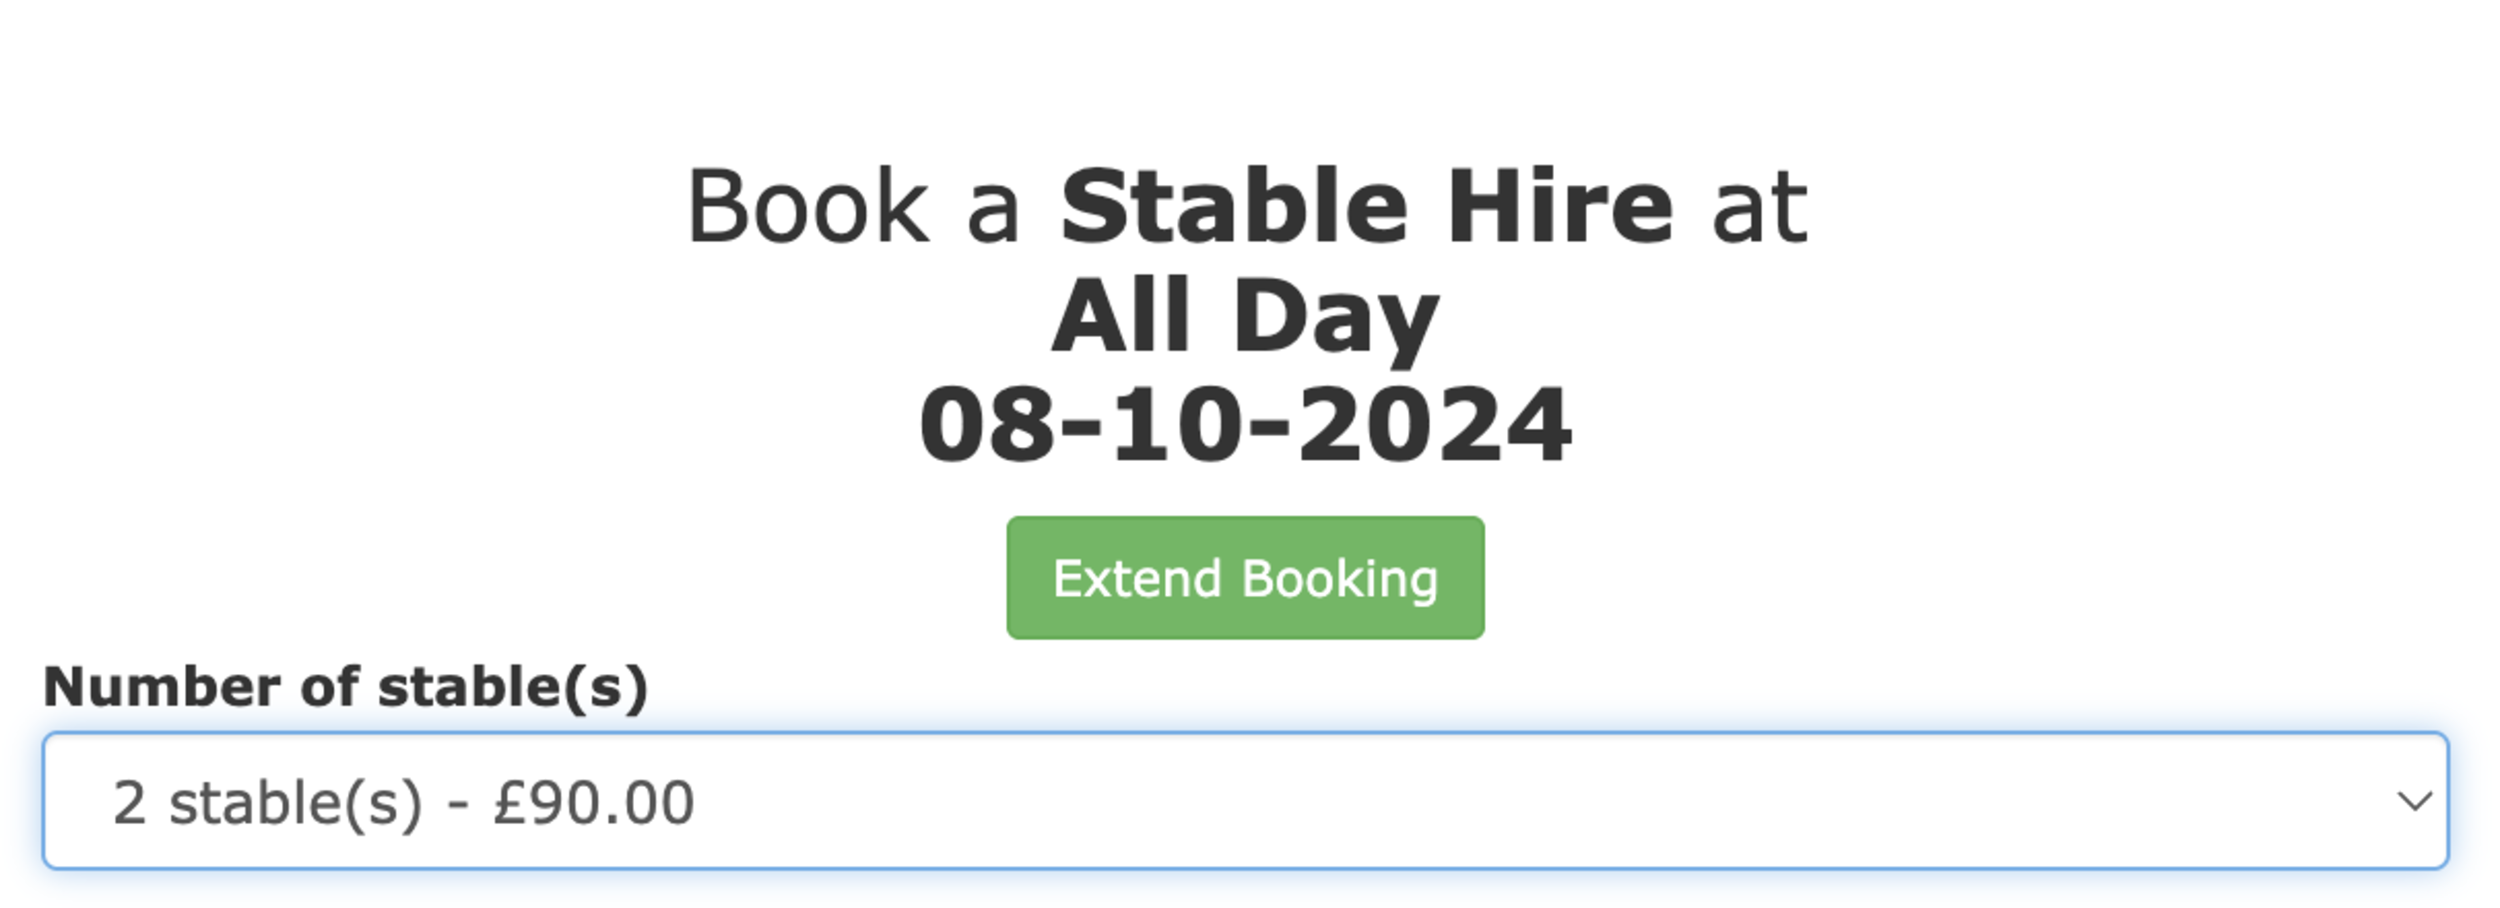
You can then extend this further such that you can offer a discount if someone is hiring two stables at the same time:
How it looks in the shop:
|
|
This feature is designed with both yard owners and customers in mind.
Our goal at At The Yard is to continuously improve our platform by making it more powerful while simplifying your experience. The Pricing Matrices feature is just another way we’re helping you run your shop more efficiently, ultimately helping you grow your business and increase your revenue.
The Pricing Matrices feature is available now! Head over to your shop and try it out today. If you have any questions or need assistance, don’t hesitate to reach out—we’re here to help.
The history of At The Yard started with one horse - a mare called Chance. It was because of her the idea for At The Yard came to be and she's since starred in many of the photo's we've used over the years. Last year we noticed a change in her behaviour and Amy, her owner, writes about her experience in supporting a blind horse.
In summer 2023, I noticed Chance wasn't quite right. She was eating well and moving well, but she was quiet. I would regularly find her stood in the corner of the field gazing off into the distance. Her spark seemed dulled, and there was an air of sadness about her.
I tried to find a medical explanation. I monitored her temperature (it was normal) I checked and rechecked her for digital pulses (she didn't have any) I looked at her gums (they were fine) and recorded her heart rate, her breathing rate and anything else I could think of. Everything showed as normal.
I called the vet and asked them to come out and give her a thorough MOT and run some blood tests. The vet checked her over, trotted her up, and listened to her heart. She told me how wonderful it was to see an older horse (Chance was 30 in the spring) so well and healthy. She told me she would take bloods but didn't expect to find anything abnormal. And then she asked me when Chance lost her sight.
I was (excuse the unintentional pun!) blindsided. I know my horse. I knew there was something wrong. But never in a million years did I consider the possibility that she no longer had sight. The vet demonstrated that when you slowly lift a finger to each of her eyes, she gave no reflex. In disbelief, I tried it myself. I could almost touch her eyeball and Chance didn't seem to notice. Flummoxed, I then tried this on several other horses, all of which instantly moved their heads away in alarm when my finger appeared.
The vet advised that because Chance had probably been losing her sight for over a year, and that the recent change was probably due to the very last of her sight disappearing. It would be an adjustment but in time it was likely that she would manage very well. I made it my business to find out all I could about how to support a blind horse, and I want to share the main points that have been helpful:
After a few weeks, Chance was more comfortable walking around her field again. She got her spark back and we even continued to go out on a few rides (always with other people, as I felt going alone was asking too much of her).
I try to think of what I can do to help her more, but the truth is, most of the time you'd never even know she has no sight. She still has a canter round the field when she feels like it and can always find the right shape branch to lean against and have a good scratch.
With that said, I have seen her walk headfirst into a wheelbarrow. I've now taught her that if I shout “wheelbarrow” at the top of my lungs, it's a really good idea to stand still.

A yard owner jokingly asked us a little while ago if we could we get At The Yard to turn the lights off in the barn.
Well… sadly no. But it got us thinking - what's the easiest (and most affordable) way to get the lights to turn themselves off?
After some research, we headed off to our favourite supplier of Swedish meatballs to find out. We've put together a kit needed to operate a single light in a barn style stable but the set up would work across multiple stables.
| Item | Cost |
|---|---|
| Wireless motion sensor | £7 |
| LED bulb | £7 |
| Total: | £14 |
Because of the horse being in the stable it was important to split the motion detection and the light itself. If we didn't, the motion sensor would be constantly triggered by the horse meaning the light would never turn off.
This is easily achieved using any one of the Smart Lighting systems available but the Ikea system has a few specific features that will help make this project a success.
Firstly the motion sensor is IP44 rated. This means that it should be resistant to splashes of water which means if we can find a sheltered place in the barn it should be fine.
The second key feature is that the Ikea's Trådfri system is based on a technology called ZigBee (rather than WiFi). Why is this important? For two reasons:
The bulb and motion sensor are able to operate as a pair allowing you to set these up anywhere you have a light fitting even if you don't have WiFi or other connectivity.
ZigBee is a mesh network. This doesn't really matter for our little setup (or even multiple of these paired devices) but should you wish to get more advanced in the future it can be very useful. This is because the devices themselves can work together to provide the network coverage across your property rather than relying on Wireless Access Points as you'd have to with WiFi based bulbs.
If you go with the Ikea motion sensor/bulb from our basket above they include the setup steps in the instruction manual (essentially you power on the bulb and press and hold the Pairing button on the motion sensor for 10 seconds). Once done it'll pulse and you'll be good to go.
As we mentioned earlier, the motion sensor can be synced to more than one bulb. This means you could have a single motion sensor on the walkway that covers multiple stables.
If you end up going with alternative bulbs/sensors the process will differ but they all follow a similar setup process.
So does this save you any money? To work this out we pulled some information from the data sheets and made a few assumptions to produce the following.
| Additional 'off' hours | 1 |
| Bulb wattage | 5.9 |
| kWh saved per day | 0.0295 |
| Average price per kWh | 0.29 |
| £ saved per day | 0.01 |
| £ saved per year | 3.08 |
| Purchase cost | 14.00 |
| Days to recoup cost | 1658 |
| Years to recoup cost | 4.5 |
We assumed a normal light bulb that didn't get turned off might be on for 6 hours a day (06:00-08:00 and 18:00-22:00) and has the same wattage as our smart bulb. With the automated system we think the time the light is on could be reduced to 1 hour (remember it'll automatically turn off after 3 minutes if someone, for example, takes a trip to the muck heap) which means we've got an additional 5 'Off' hours.
So the experiment was a success! We were able to automatically turn the lights on and off. And yes it will save you money, but realistically it's over such a long time period it's probably not sensible to do so if you're only looking to save money. However if you need to replace your bulb anyway (especially if you've got older less energy efficient bulbs) your time to break even may be greatly reduced.
With this said with the equipment we've chosen there are many opportunities to expand into a more extensive automation system that can offer other advantages beyond just controlling lights. For example with motion sensors in place you have the start of a monitoring system letting you know when people are at the yard. If you're interested in finding out more about using home automation in a livery yard environment leave a comment on the Facebook post.

Invoicing has been a staple of At The Yard for many years. Going back to our earliest days we wanted to ensure the laborious task of invoicing was made as quick and painless as possible. Since then we've introduced a host of refinements and enhancements each making invoicing easier and quicker and just better!
But at the end of the day... the best invoicing is still the invoicing you never have to do!
With this end in mind we're pleased to introduce a new feature to invoicing in At The Yard - Automated and Advanced Service Invoicing. It's going to save you time, streamline your accounting and improve your yards cash flow.
Automated Service Invoicing lets you set individual services to automatically create an invoice and send it to the customer. Advanced Service Invoicing lets you configure the automated invoices to be sent out in advance of the service date.
Recurring services, such as livery packages and fixed monthly charges represent a large proportion of a yards income. As such it's essential that the invoices for these services go out on time and that payment is received promptly to ensure a steady cash flow for the yard.
By combining automation this with advanced billing you can improve cash flow further by making sure payment is received in advance of the provision of service. This also allows you to address any issues with non payment before the service is delivered.
Life is unpredictable (especially when you run a livery yard) but by automating livery billing it ensures that no matter what else is going on, your business can keep it's cash flowing and the business running.
You may be asking how is this different to the 'Automatically Generate Invoices' option that's already available. From an automation point of view - nothing.
Both features will automatically send out invoices. However the key difference is this new feature gives you all the convenience of automatic invoicing for charges that rarely change (e.g. livery) whilst allowing you to review the invoices for extra charges prior to sending them out (something lots of yard owners like to do).
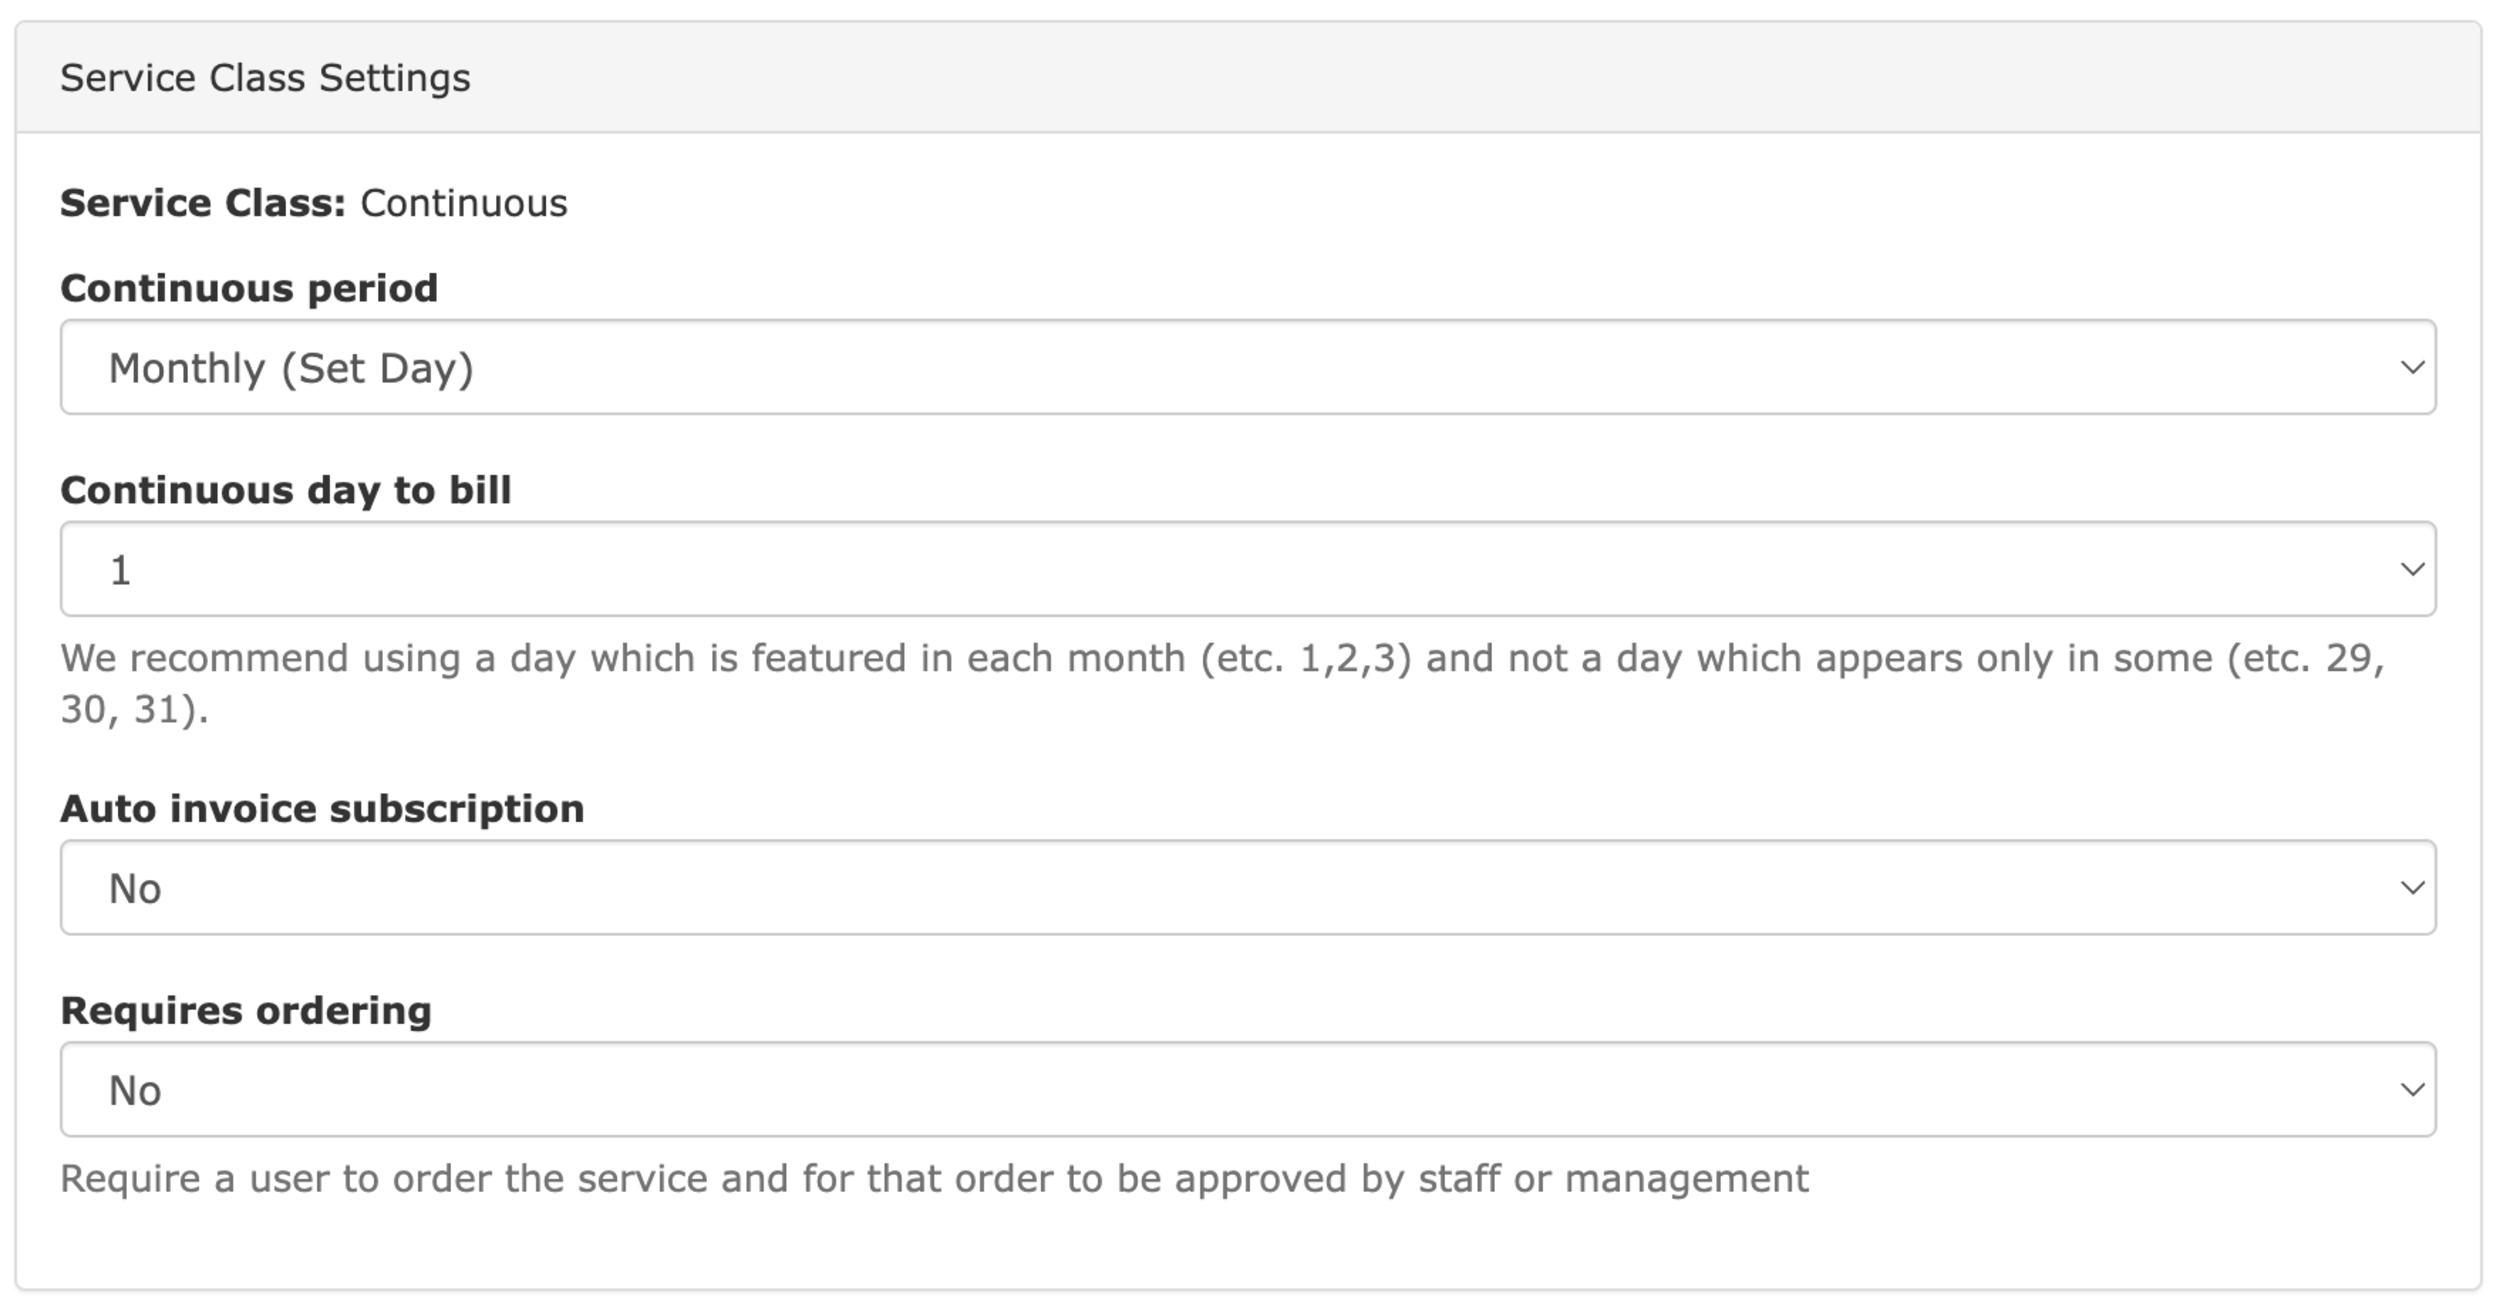
Setting up this powerful feature is quick and straightforward. Follow these simple steps to get started:
Step 1: Log in to Your attheyard.co.uk Account Visit our website and log in to your account using your credentials.
Step 2: Navigate to the Services Section Once logged in, navigate to the services page under the Admin tab. Click 'Edit' on the service you wish to setup for automatic invoicing.
Step 3: Set 'Auto invoice subscription' to 'Yes'
In the service class settings box locate the drop down called 'Auto invoice subscription' and set it to 'Yes'
Step 4: Submit Your Update Click on 'Update Service' at the bottom of the form.
Step 1: Log in to Your attheyard.co.uk Account Visit our website and log in to your account using your credentials.
Step 2: Navigate to the 'Configure Yard' Page Once logged in, navigate to the 'Configure Yard' page under the Admin tab.
Step 3: Find the 'Invoice Settings' section
In this section click on 'Edit Invoice Settings' to bring up the invoice settings page.
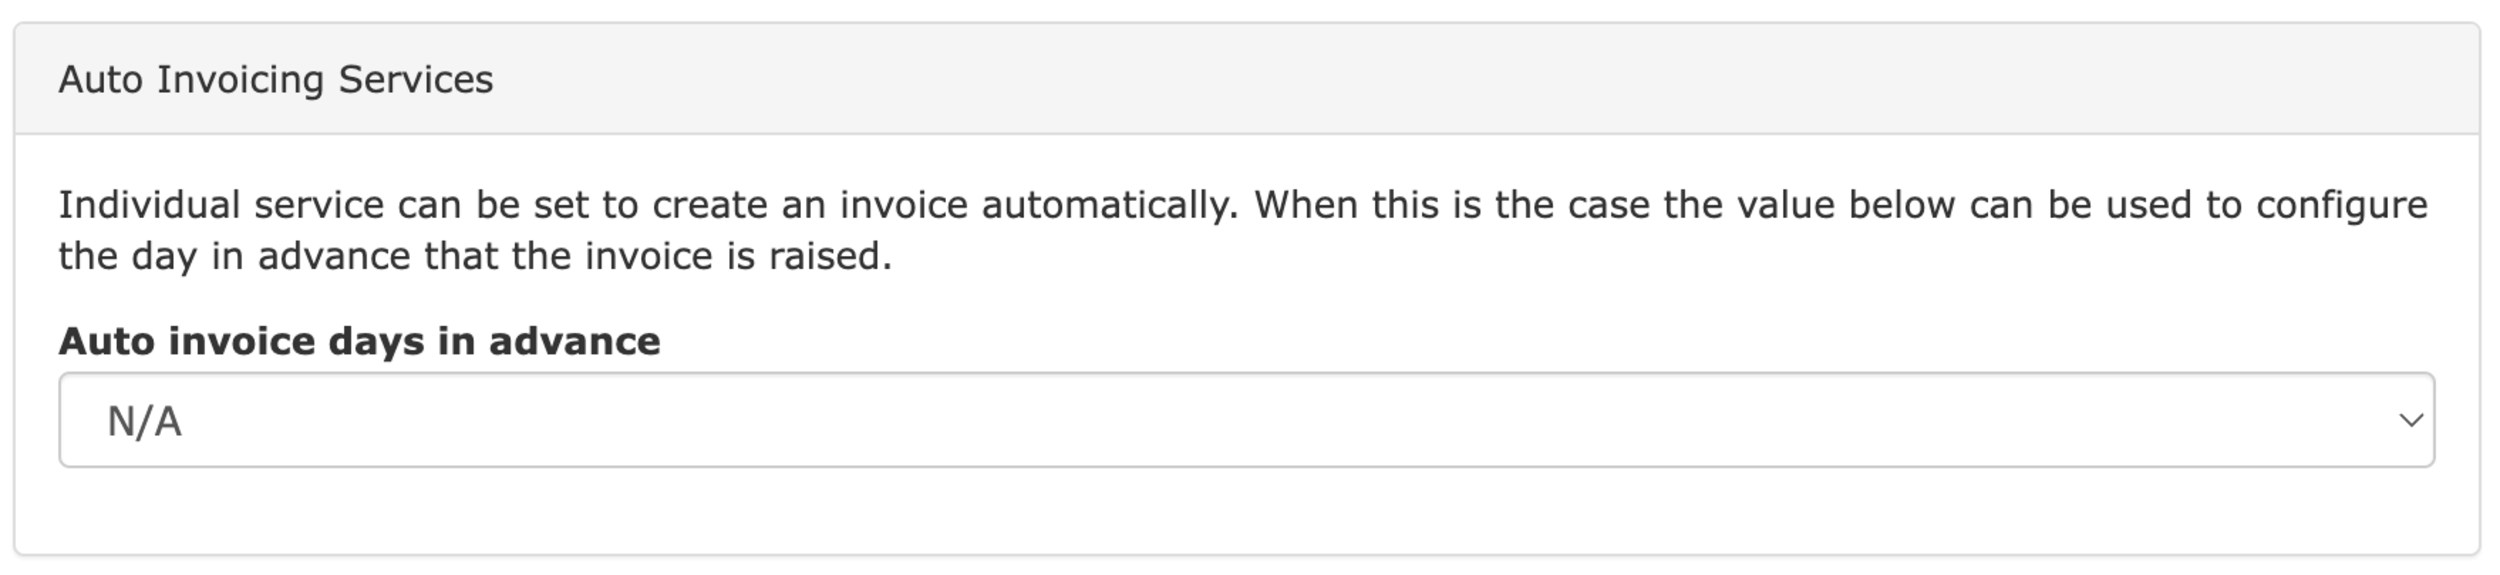
Step 4: Set 'Auto Invoicing Services'
Find the 'Auto Invoicing Services' section. From here you can set how far ahead invoices will be automatically sent out.
Step 5: Submit Your Update Click on 'Update' at the bottom of the form.
With our new Automated and Advanced Invoicing feature, attheyard.co.uk is committed to simplifying your invoicing process, saving you time and ensuring a steady and predictable cash flow. Embrace the future of hassle-free invoicing and take your business efficiency to new heights.
Ready to experience the convenience?
This step-by-step guide will walk you through the process of setting up your shop in At The Yard, empowering you to maximise your reach, connect with potential customers and seamlessly manage payments. Get ready to expand your businesses horizons and unlock new opportunities in the equestrian community!
If you haven't already, visit At The Yard's website and request a trial account. A member of our team will review your request. Once reviewed your account will be created and you'll gain access to the full suite of features and services At The Yard has to offer.
Upon logging in (as an admin), locate the "Manage Shop" menu item within the admin menu. Clicking on it will take you to the shop configuration page from where you can set up and manage your shop.
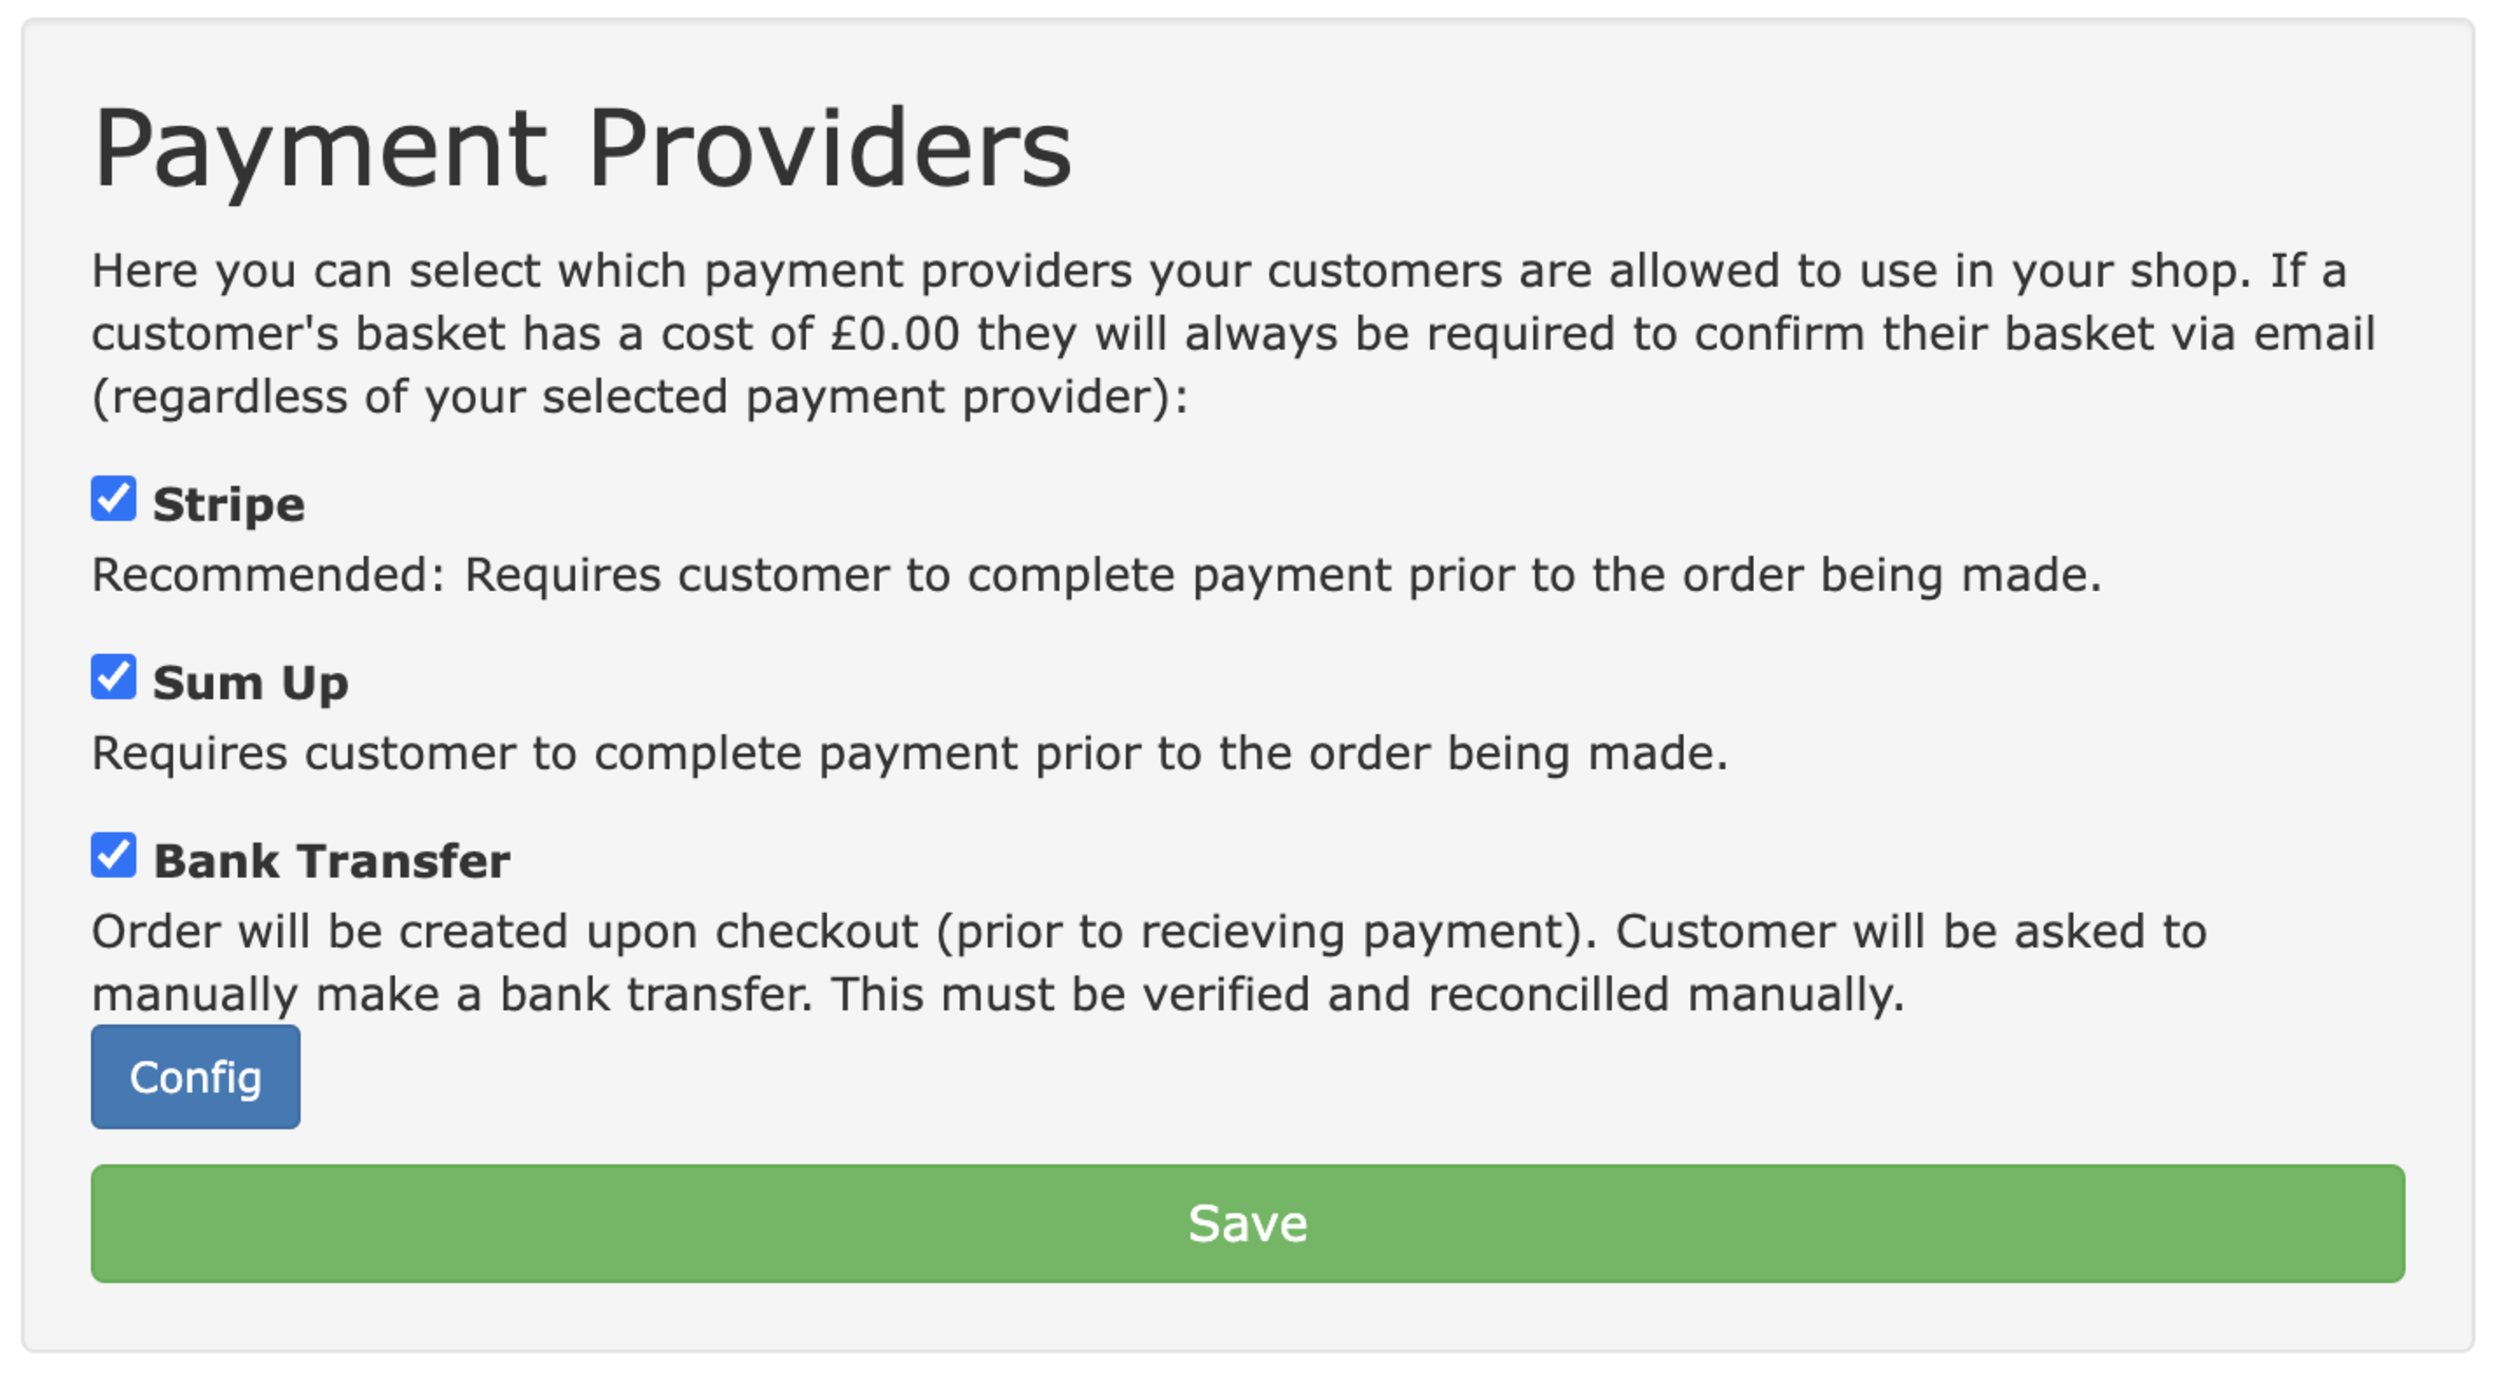
To streamline transactions and automate payment processing we've integrated a number of payment gateways with At The Yard.
Before you begin you'll need to have an account with one of these payment providers. If you don't already have one you'll need to create one (see links below):
We recommend Stripe for the majority of clients as it offers some extra features. However SumUp is available, upon request, for markets where Stripe is not available (e.g. Channel Islands).
Once you've got your account at a provider you'll need to return to the Shop Configuration page in At The Yard to connect At The Yard to the payment provider. To do this go to payment providers panel where you'll see the link complete a configuration step in the integrations panel.
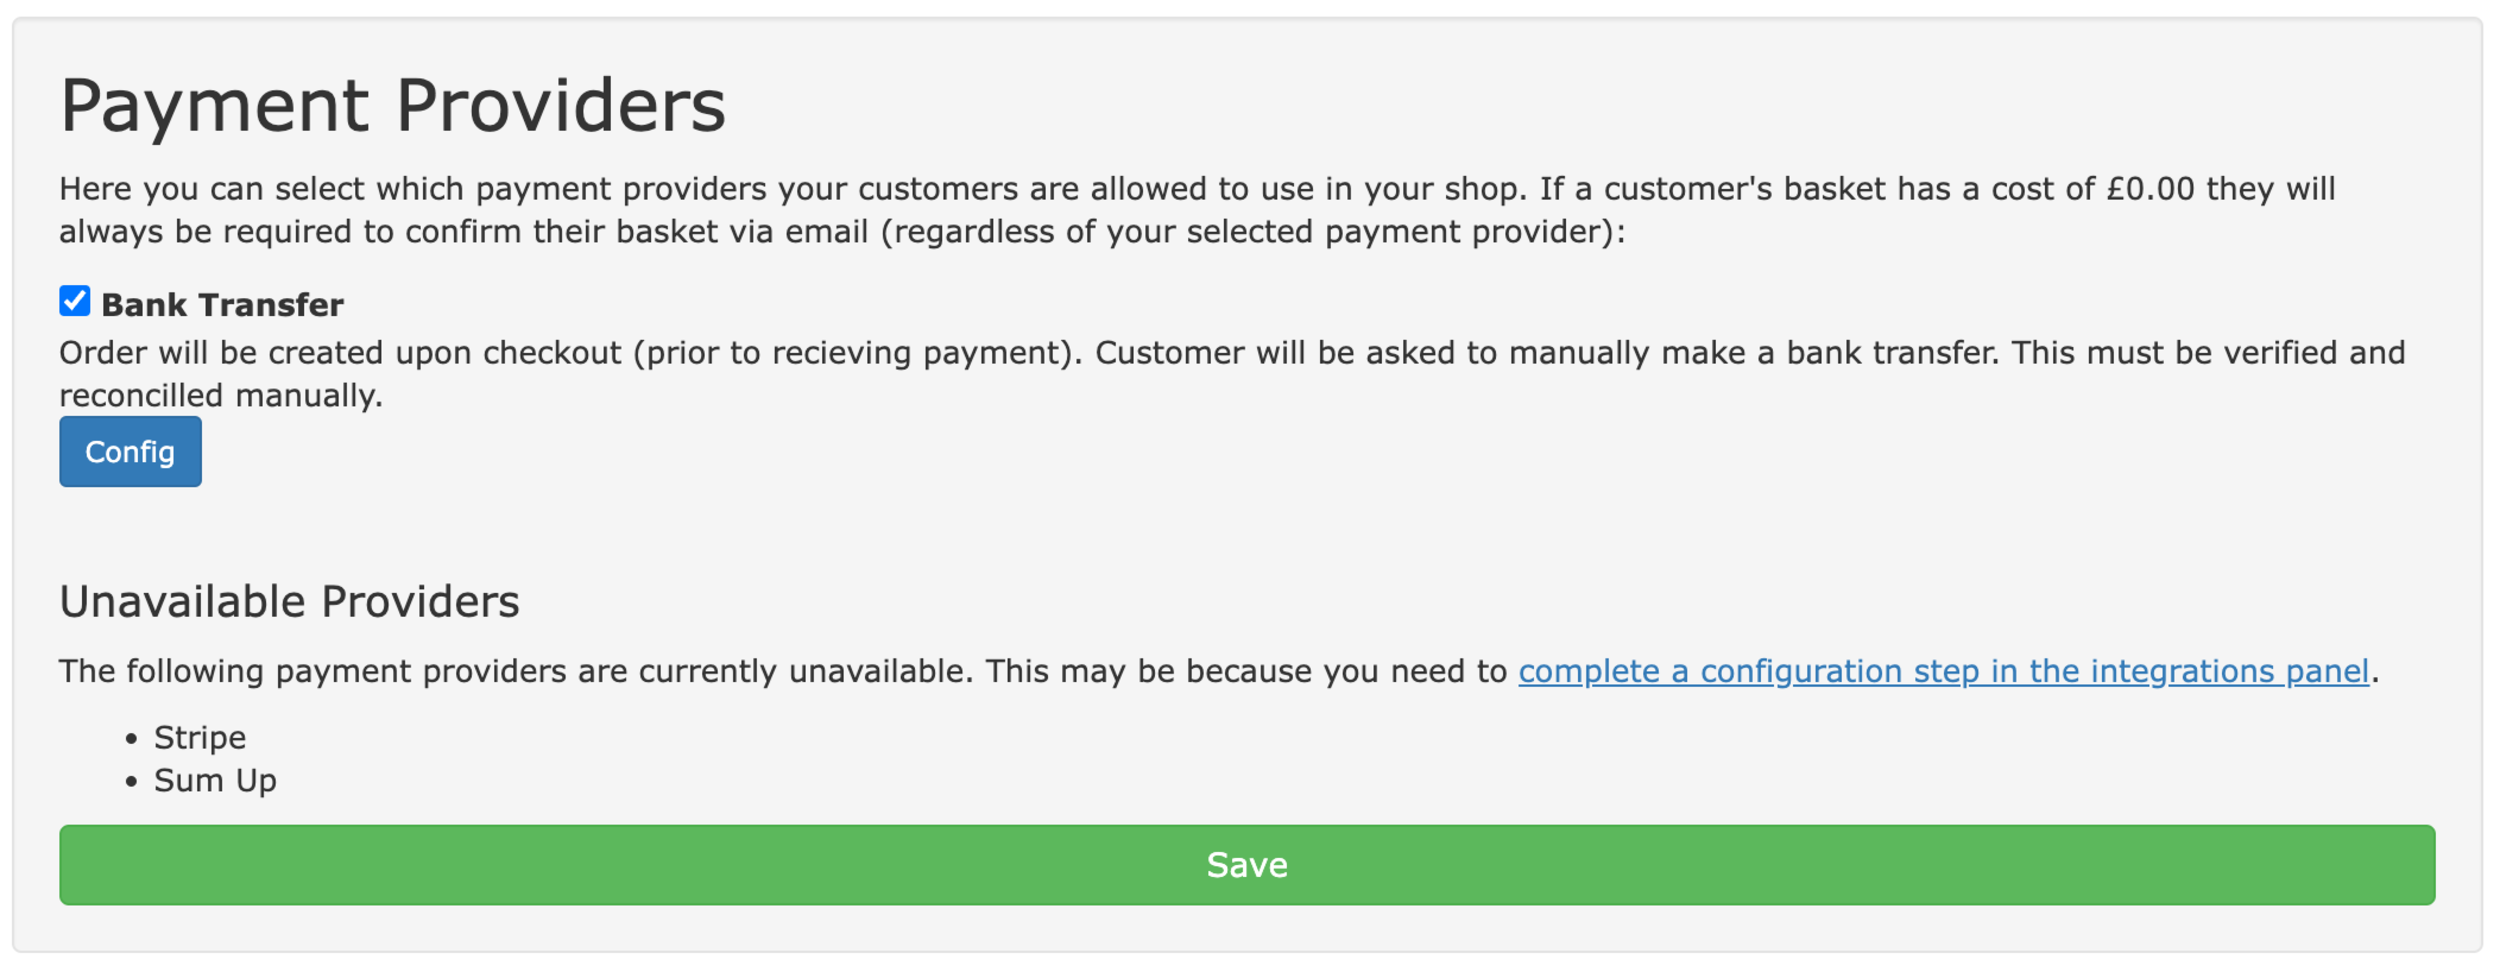
The link takes you to At The Yard's integration page. The first step is to enable your payment provider of choice by clicking 'Enable'. Then find the link 'Connect with Stripe/SumUp' and click on it to proceed to the next step.
Follow the instructions the payment provider gives you until you return to At The Yard. Your provider is now connected! You can return to the shop management page where you'll now have the option to tick your choice of payment provider (remember to click Save once you're done).
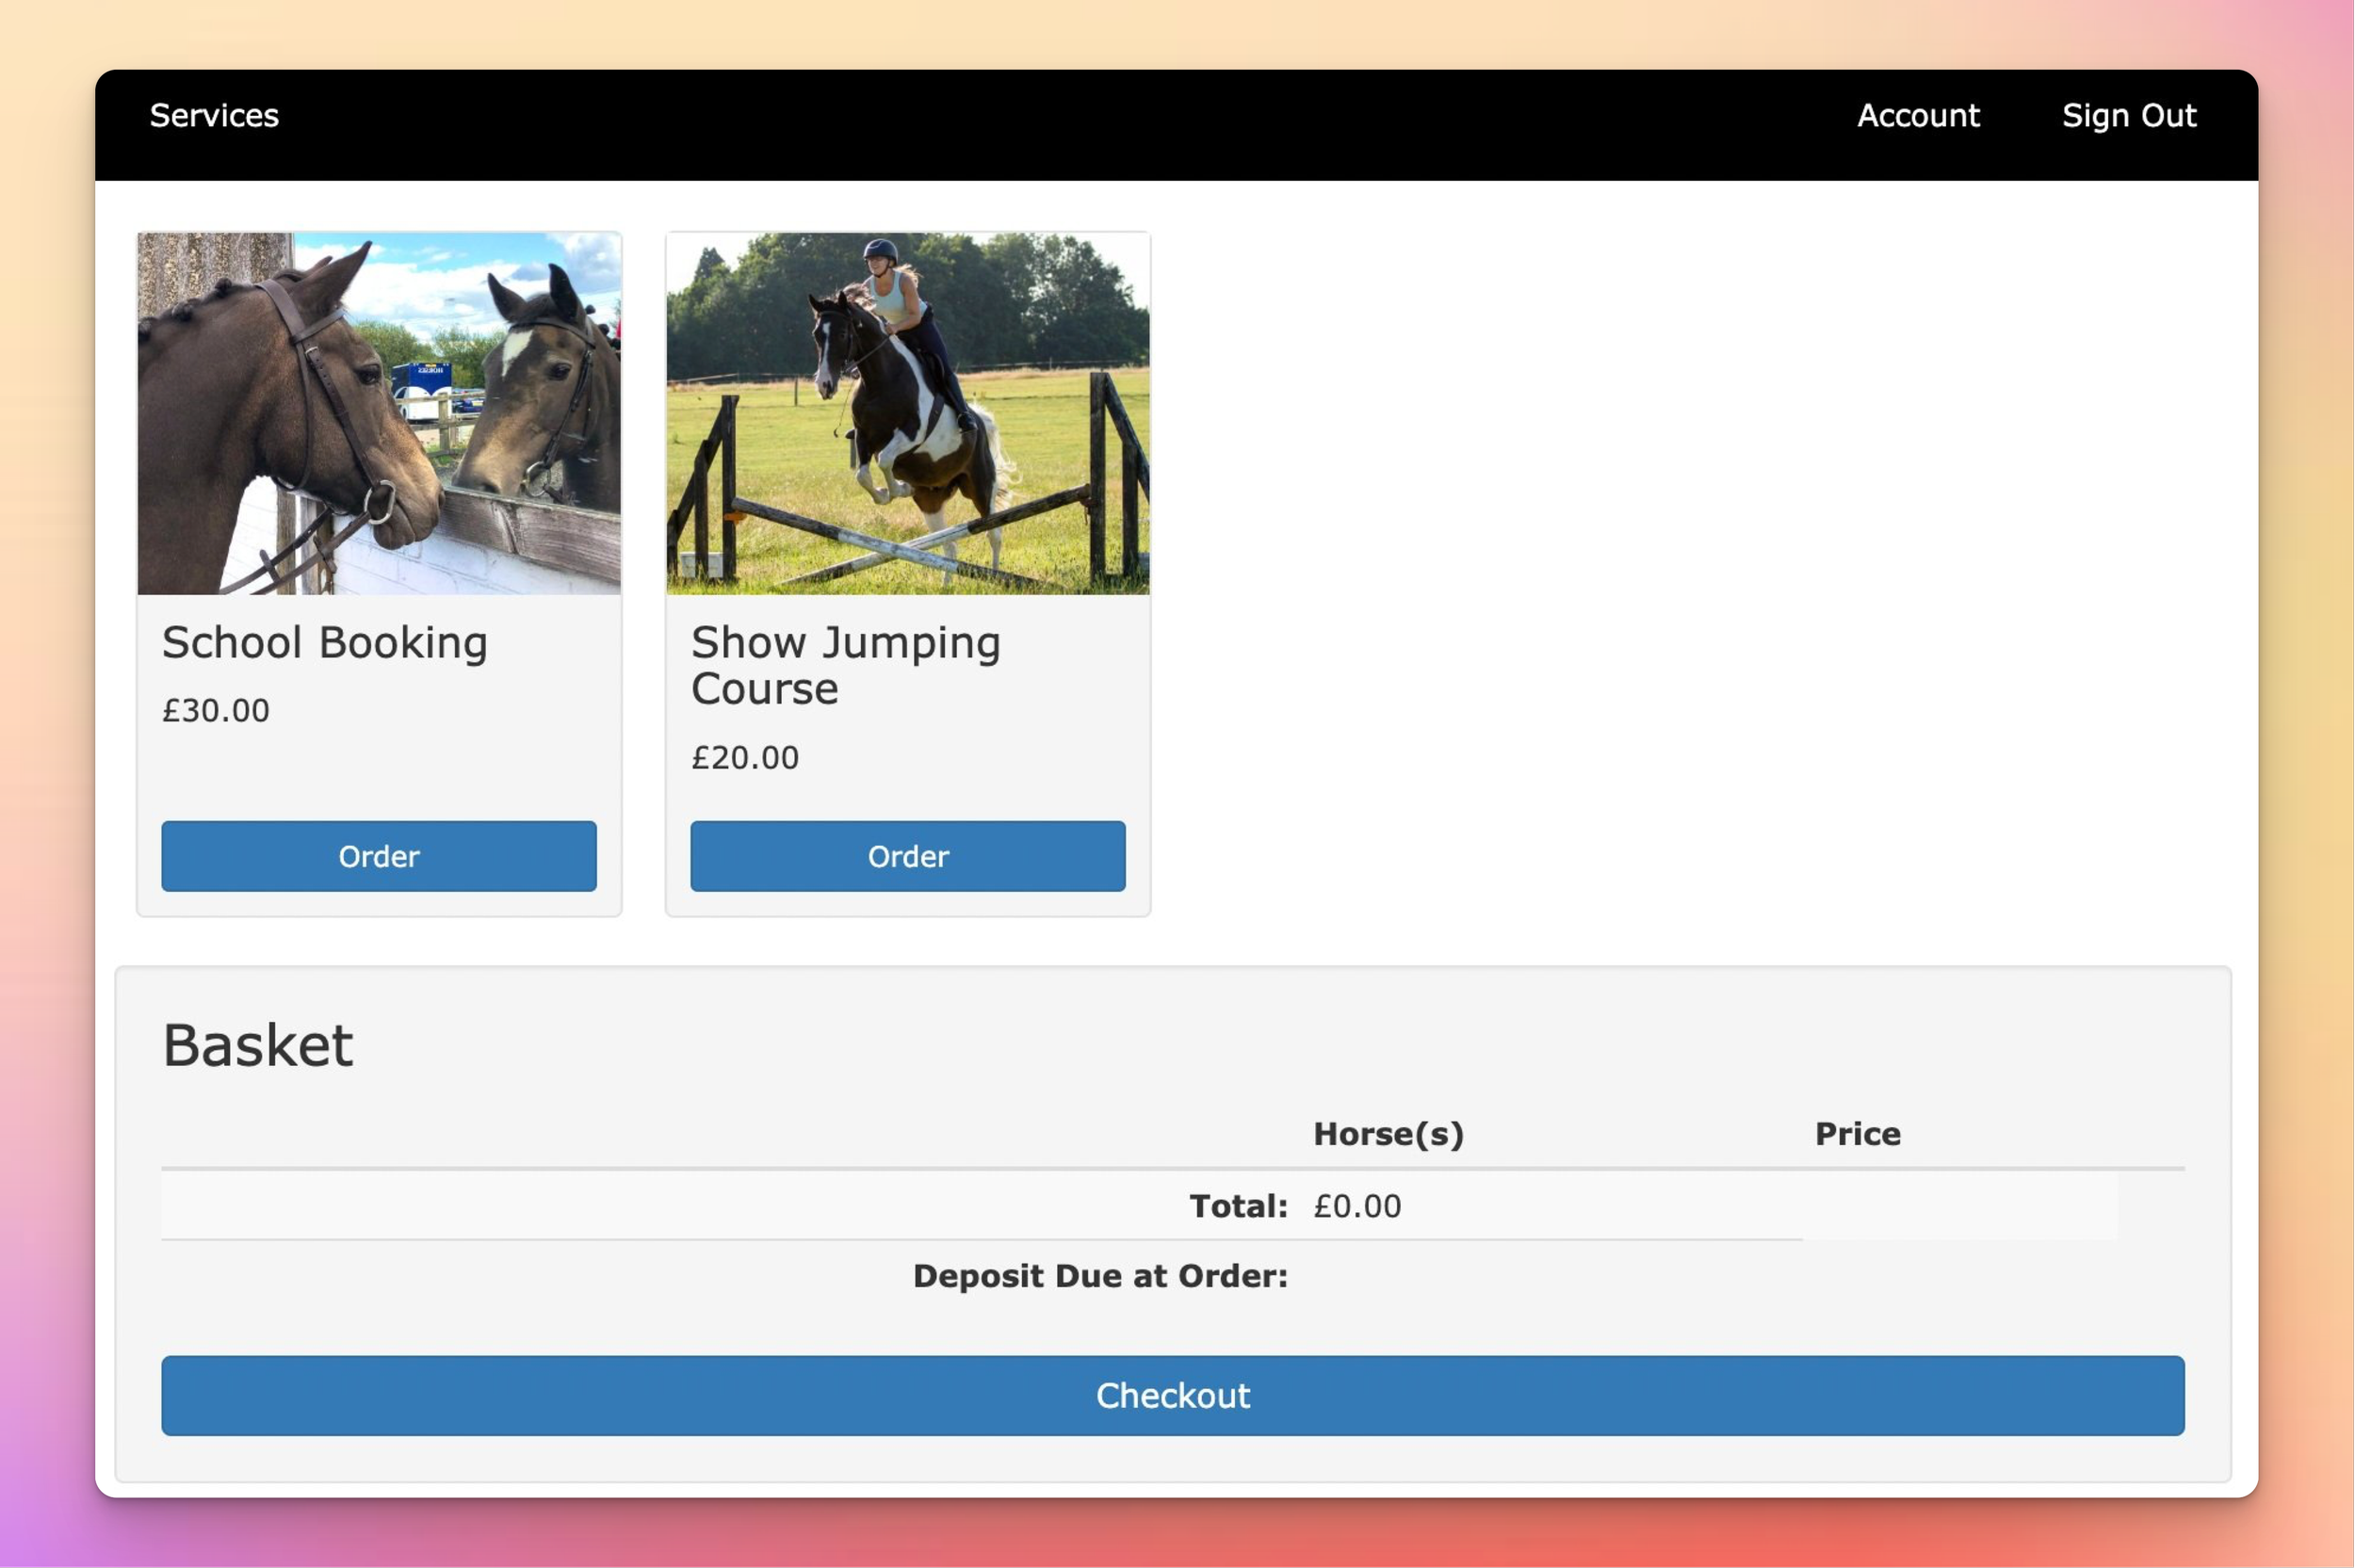
Before you can publish anything in your shop you first need to set them up in At The Yard as a service. This can be done on the Services page (listed under the admin menu tab). You can use existing services or create new ones exclusively for the shop.
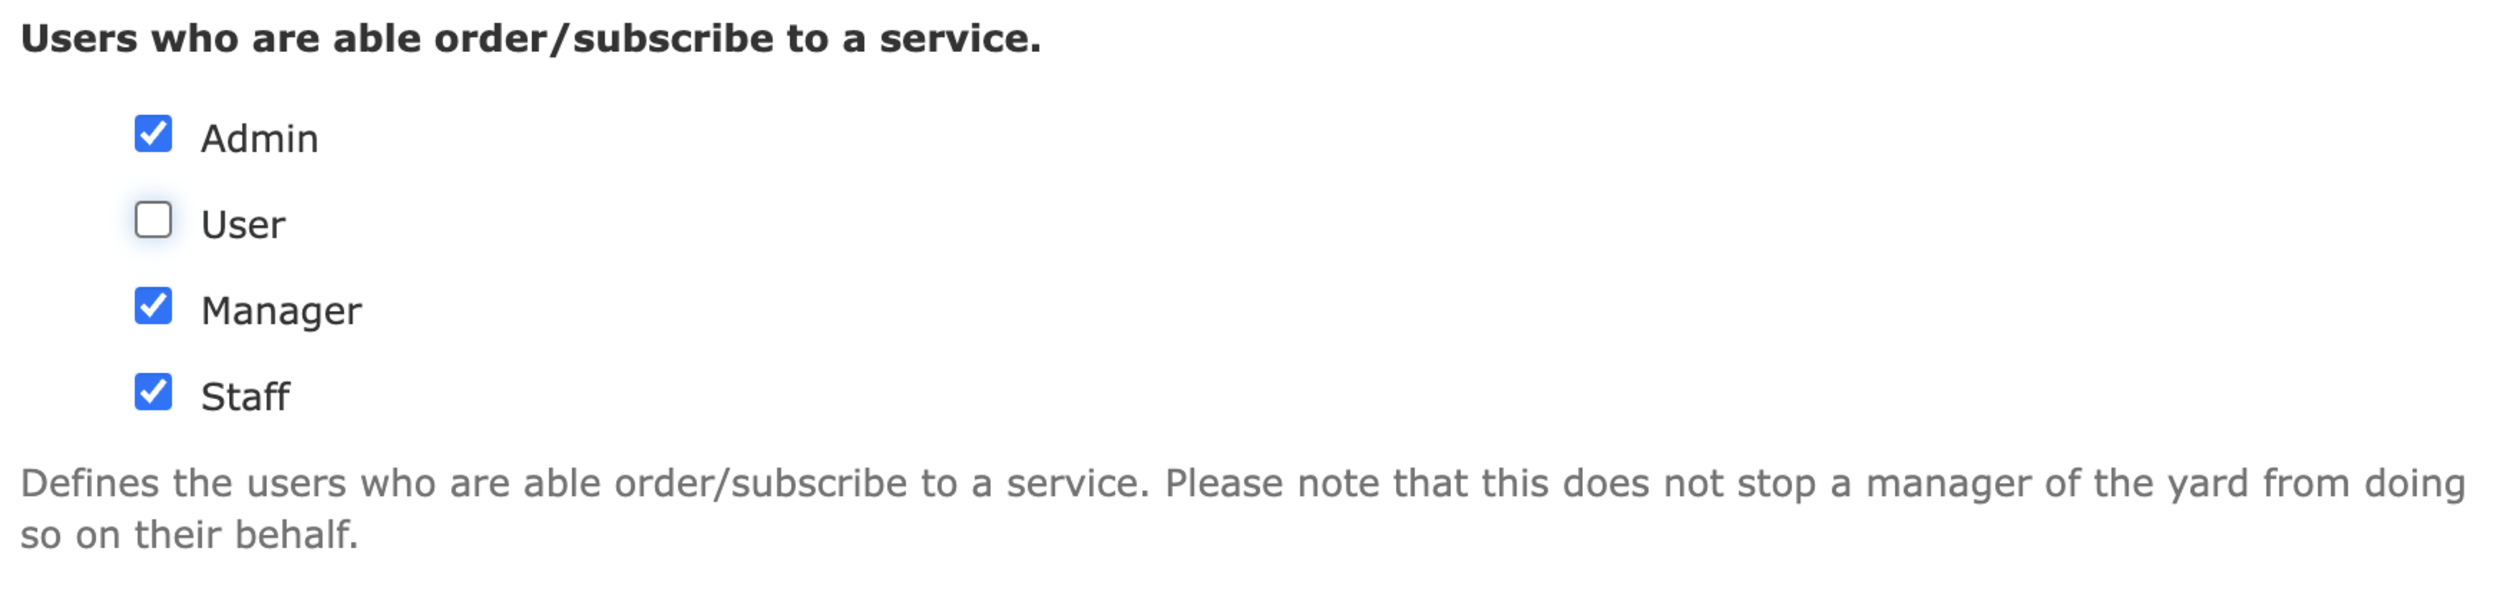
Helpful Tip: To make the service only available in the shop, and not to your existing livery users, remove the tick from User in 'Users who are able order/subscribe to a service' option when creating the service (shown below).
As with all services in At The yard you can specify the availability and any relevant ordering policies for the service, ensuring a smooth and efficient scheduling process for your customers.
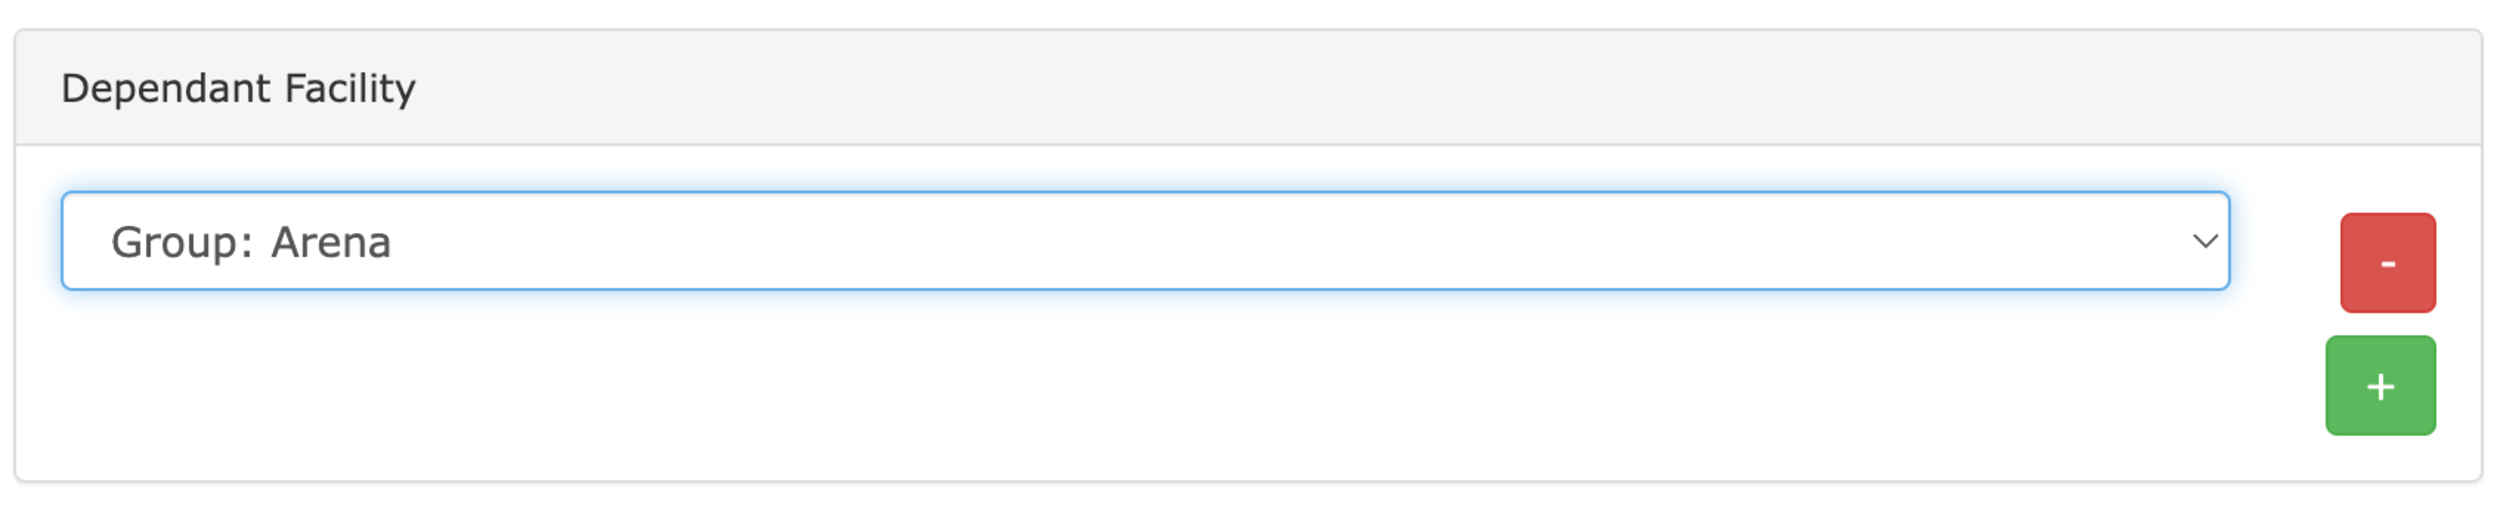
When publishing a facility (sand school, arena etc) you will first need create a new service with the Allow ordering by calendar? option set. This will allow users to pick from a calendar. This can be linked to your existing facility with the Dependant Facility feature (as shown below).
Now you've created the services you're ready to publish each of them. To do this go to the shop manager and click Publish New Service at the bottom of the service publications panel.
To showcase your offerings effectively you'll want to include a detailed description, high-quality images and all the information a prospective customer needs when making a booking.
To support this each publication has a number of options available to you which we've outlined below:
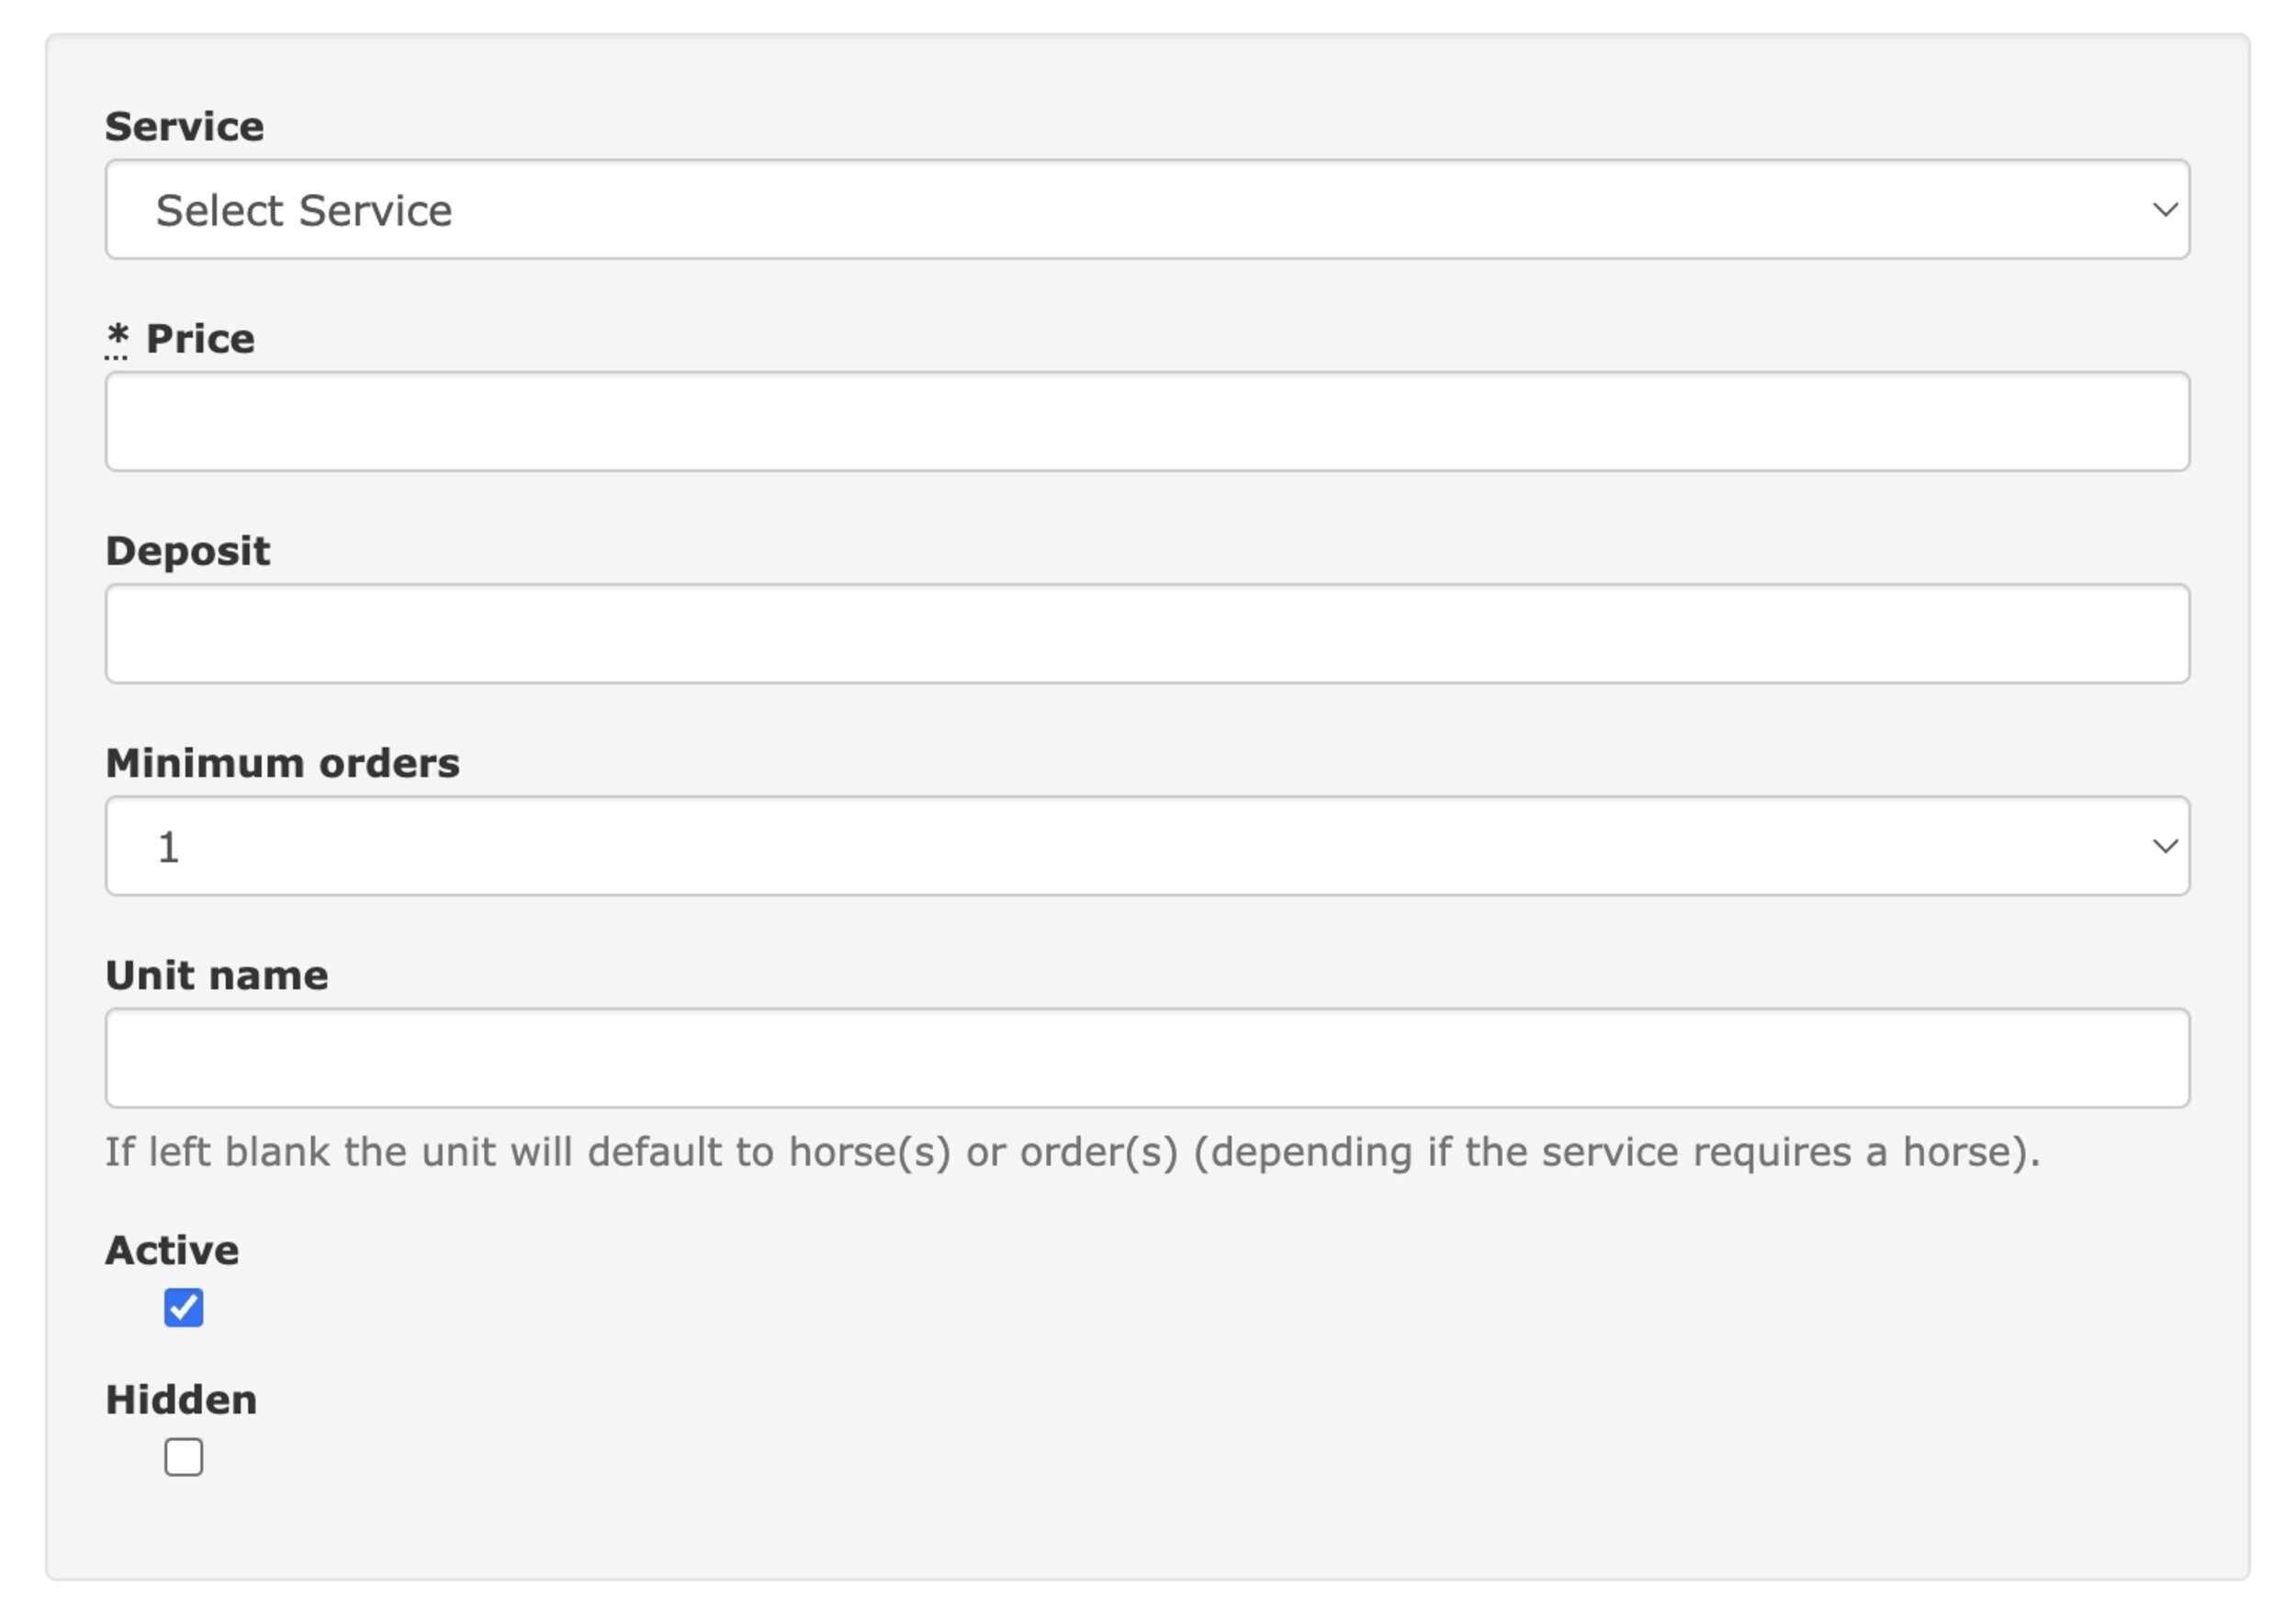
Service: Select the new or existing service.
Price: Select the price your customers will be charged in the shop for a single order/booking.
Deposit: If you wish to only take a deposit (leaving the rest to collect manually when they arrive) enter the amount here.
Minimum Orders: You can require the customer to order more than 1 unit of a service by changing this value (this needs to be combined with a corresponding pricing option shown below).
Unit Name: Use if you need to change the name of the unit (for example to 'rounds' if you're hosting a clear round competition).
Active: When unchecked it stops users from ordering this service.
Hidden: When checked the service is available but is hidden from the front page of the shop. Customers can still access the service if they have the web address shared with them.
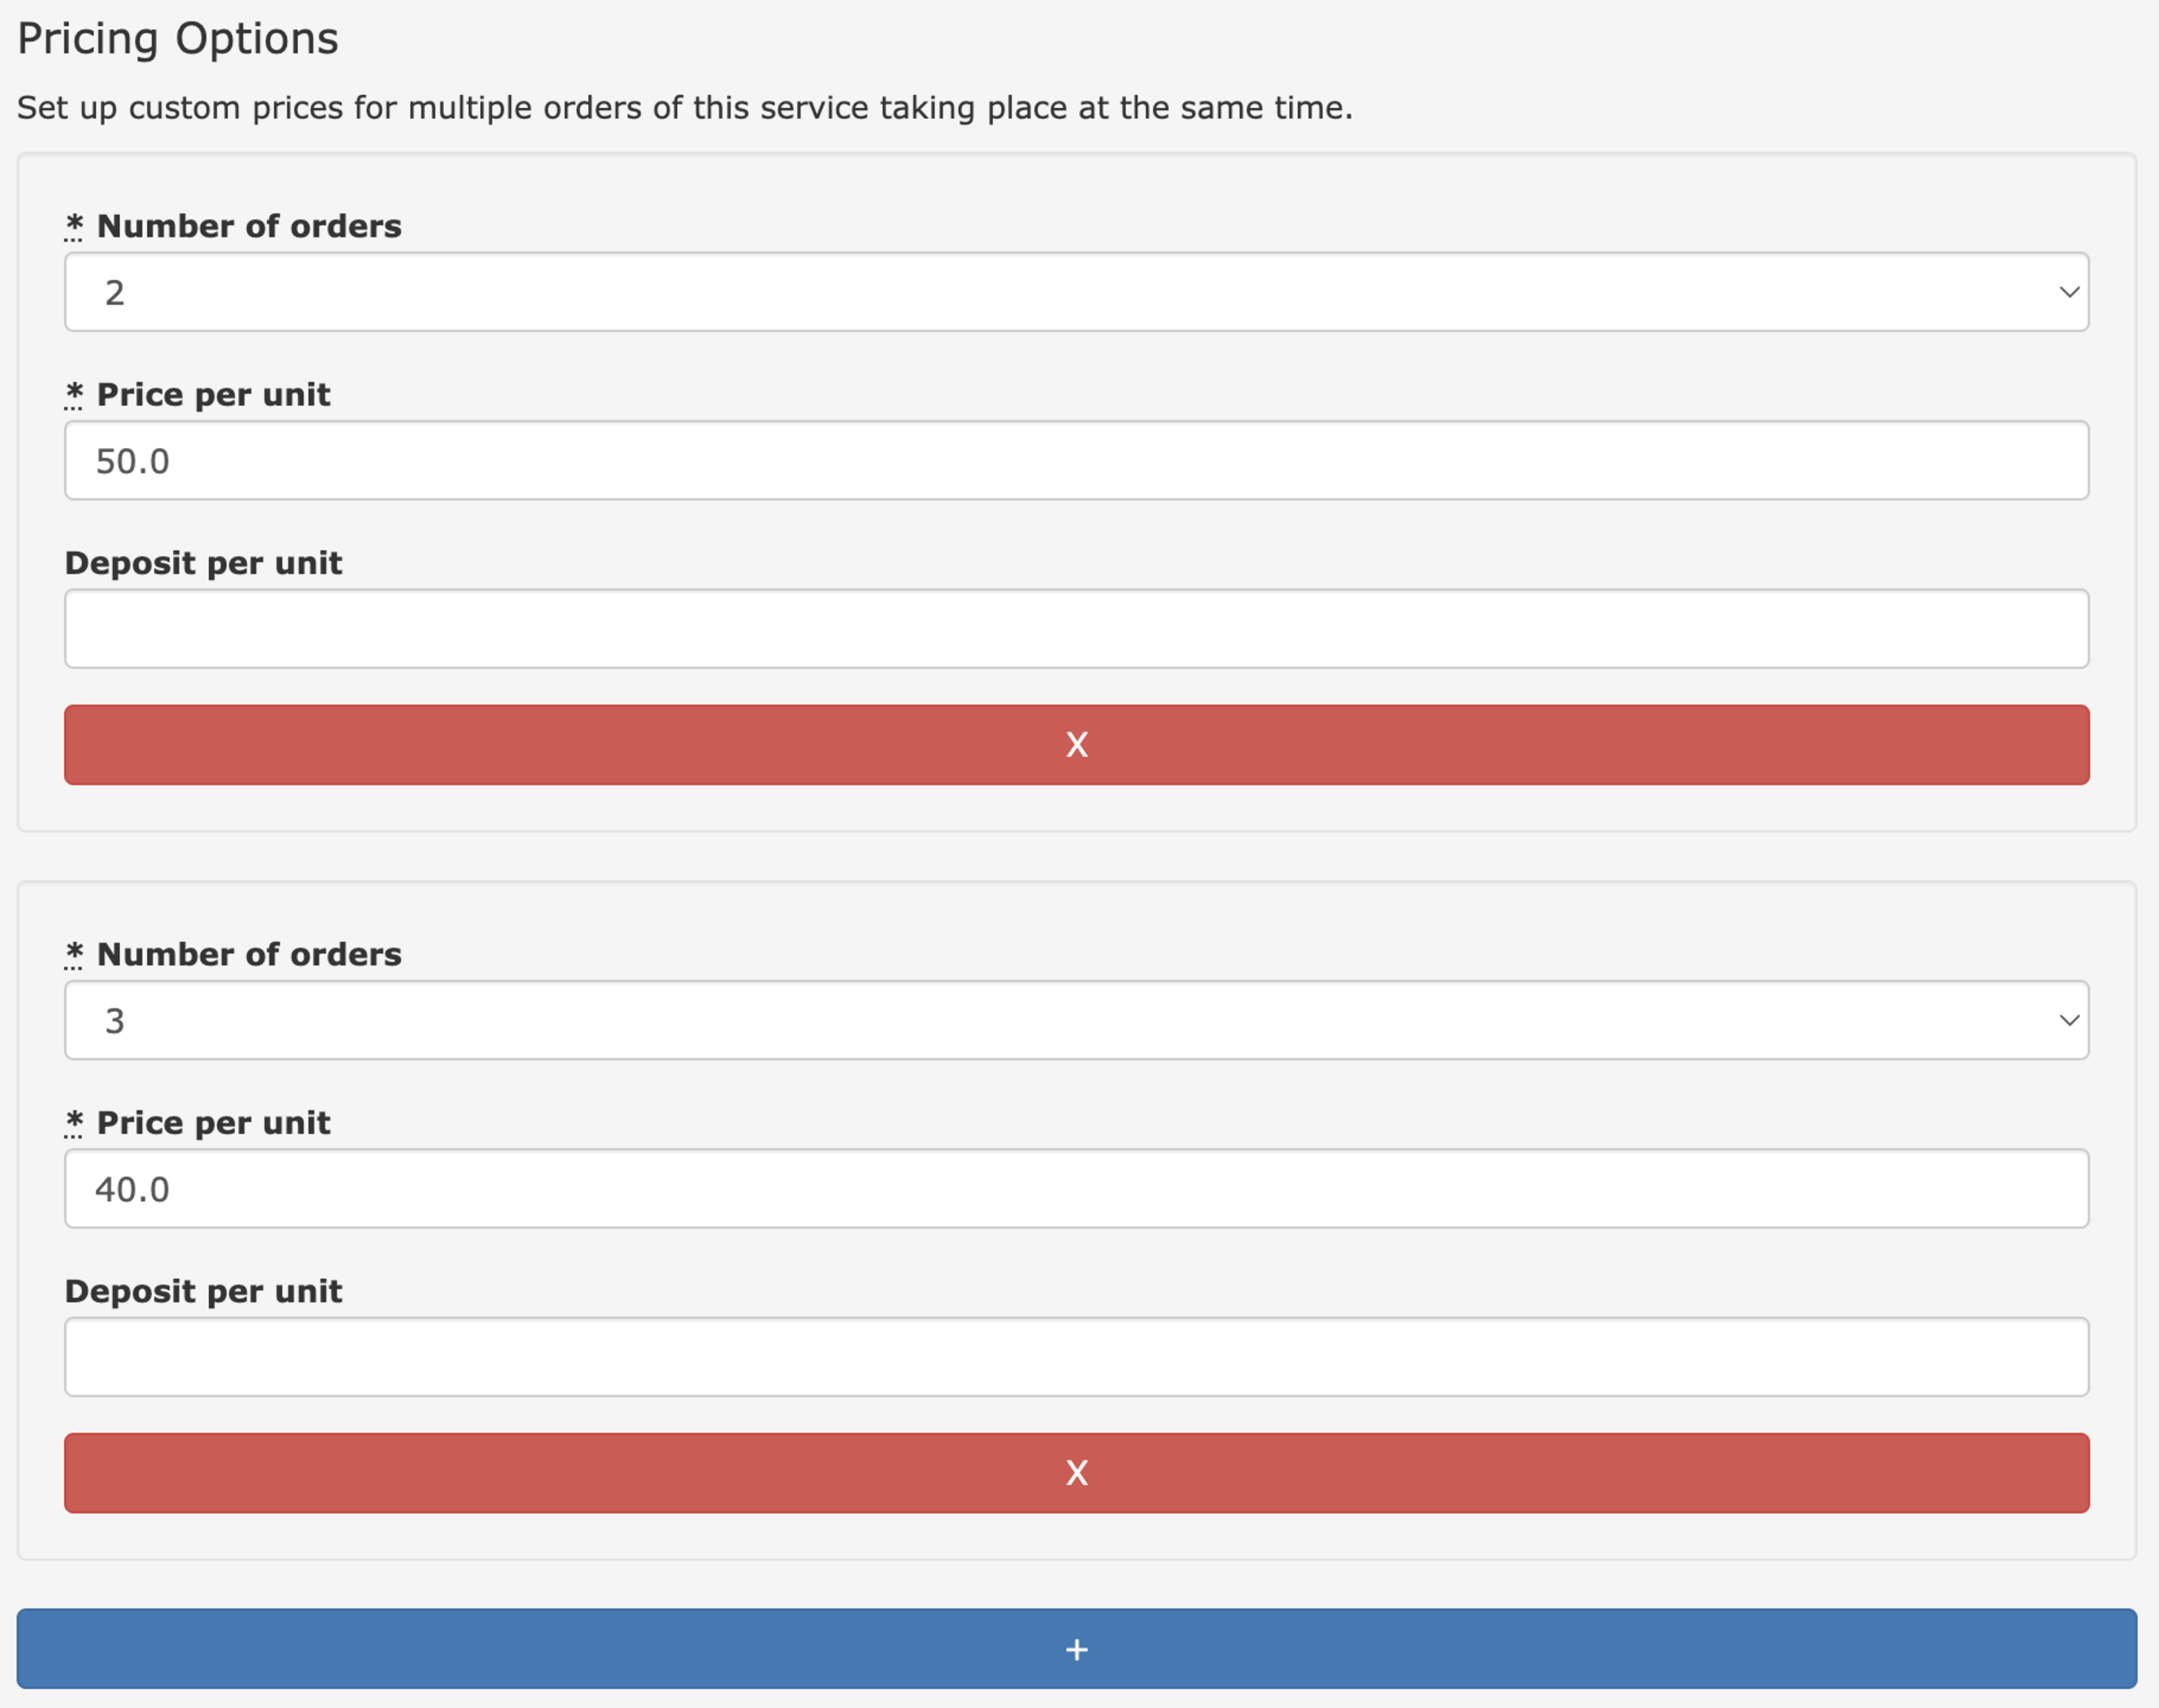
Pricing Options give you more flexibility in pricing your services for customers, allowing you to set a different price dependant on the number of orders they make.
Please Note: It is important that you create a pricing option for every different size of order you want to support. If you, for example, create a pricing option for 2, 3 and 5 orders (4 has been skipped) then they're will be no option for a customer to order 4 of that service.
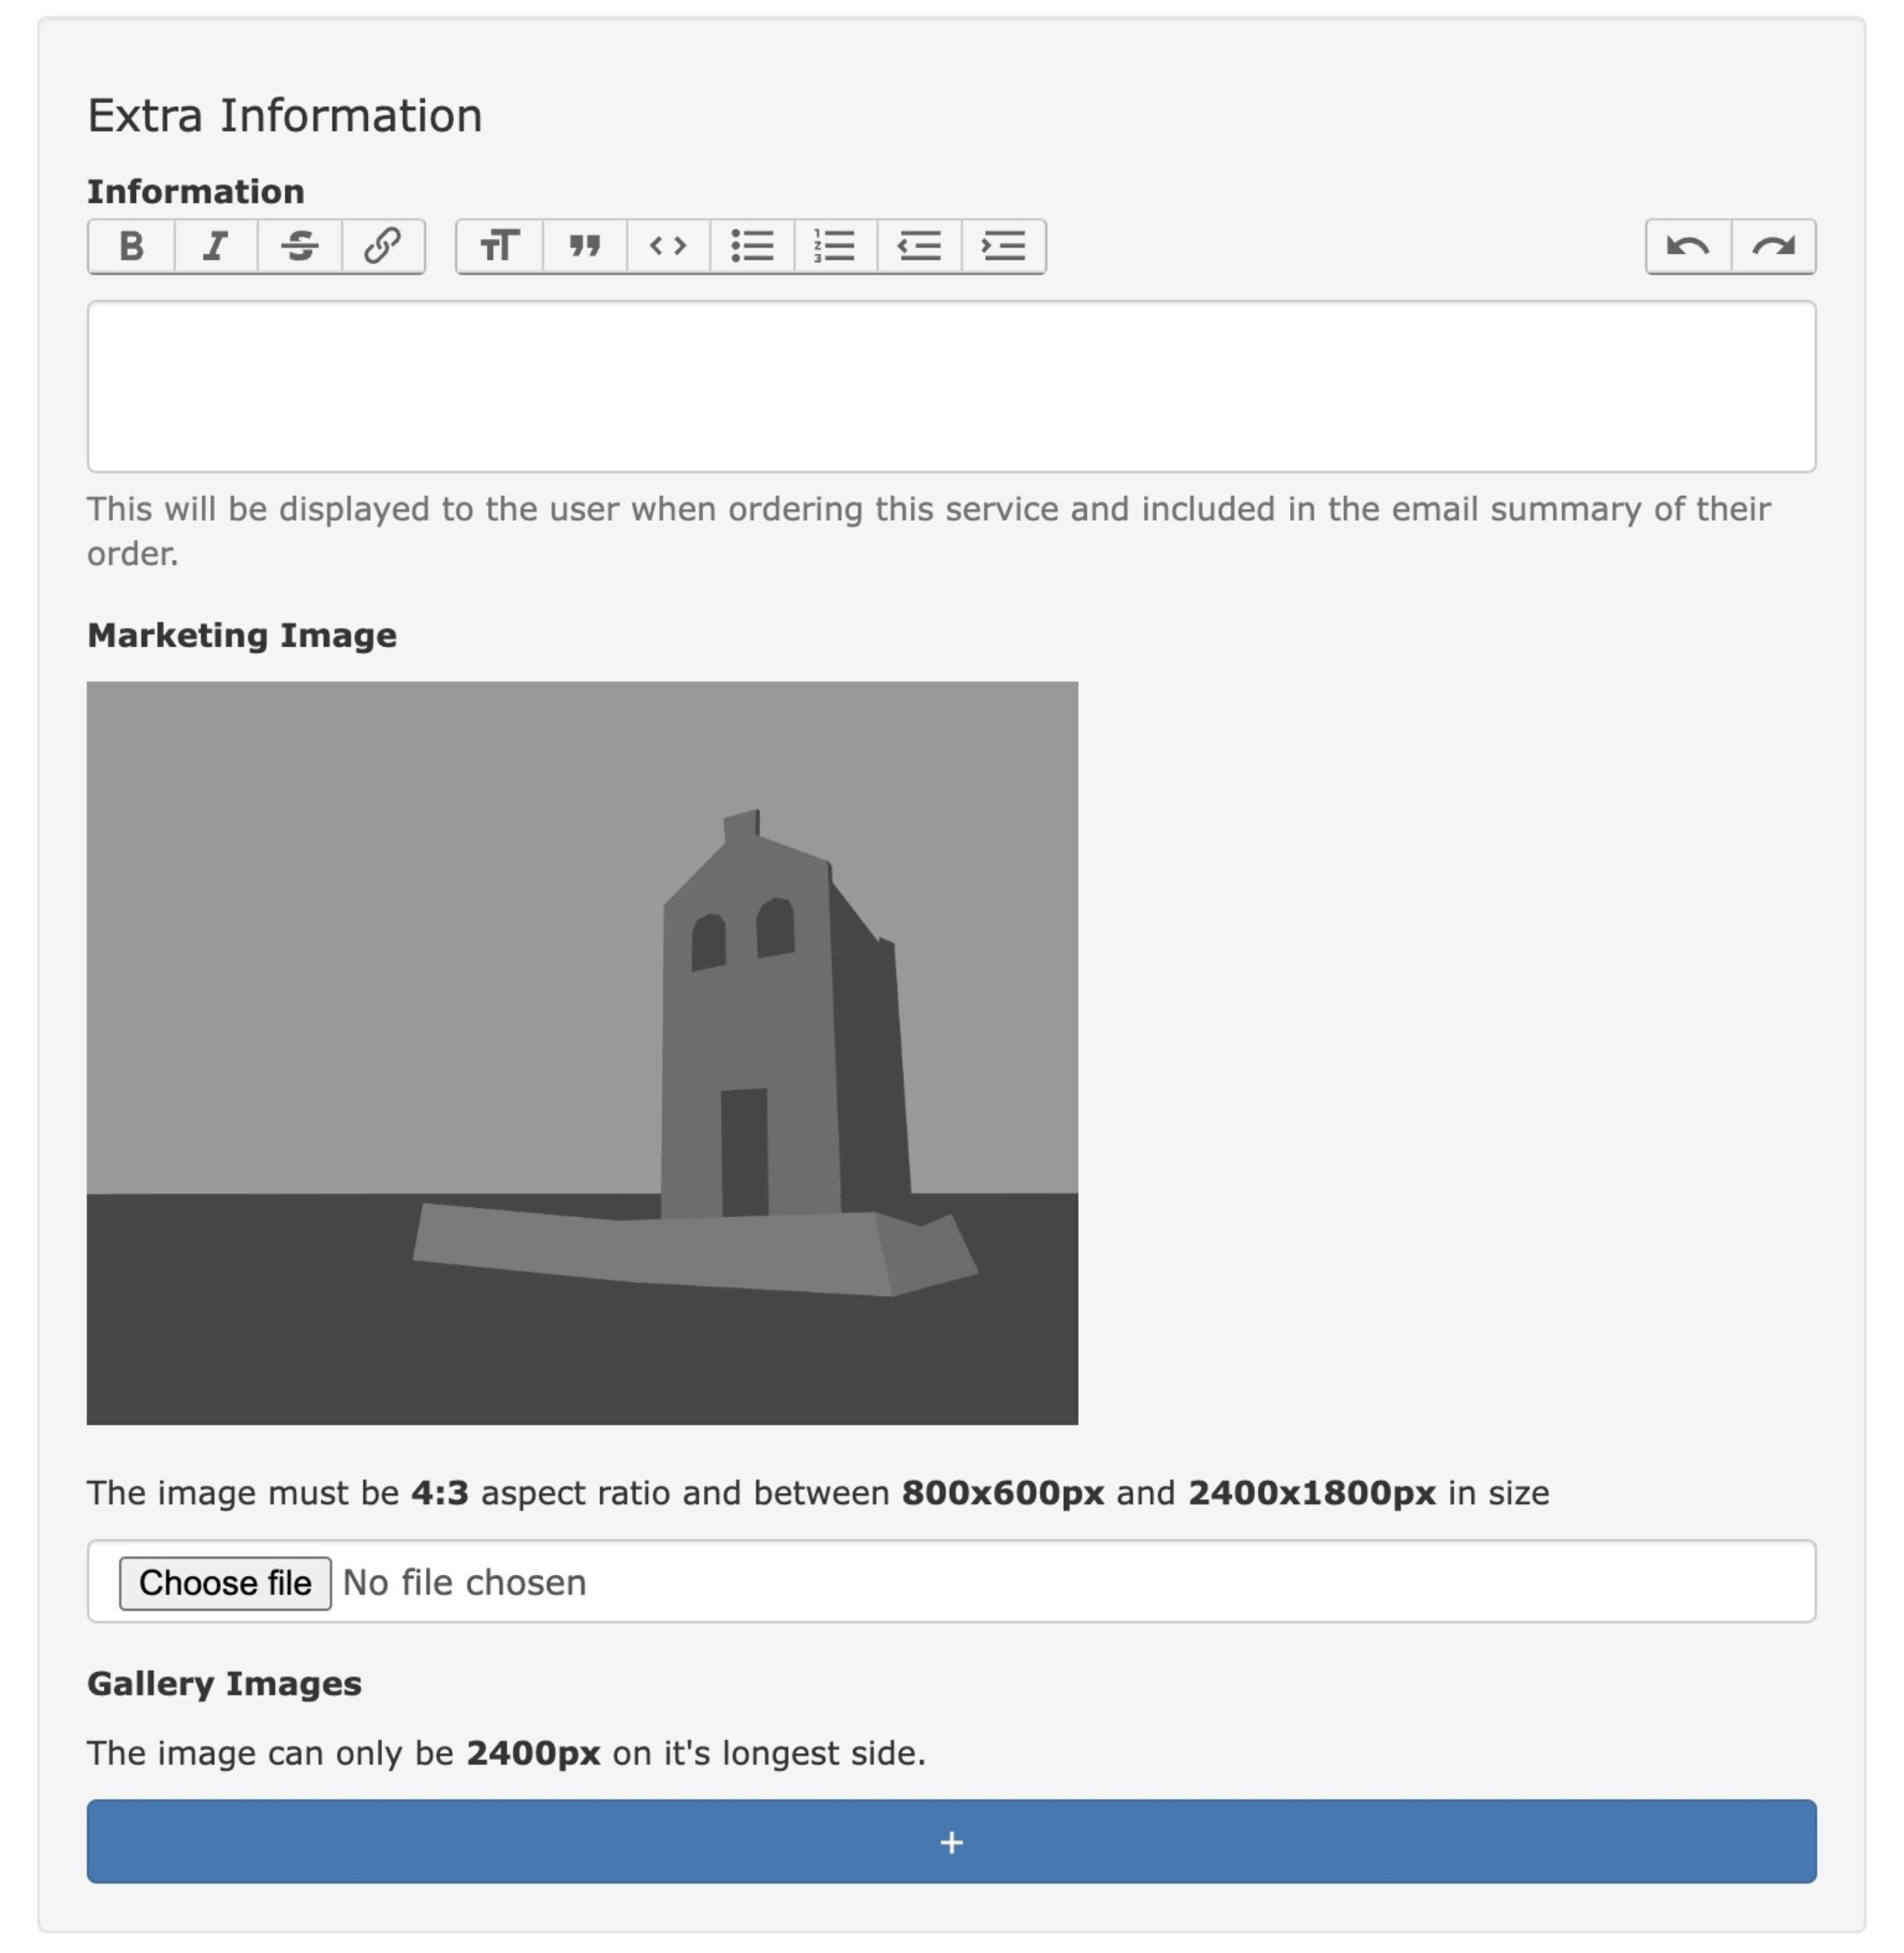
Information: Here you can provide all the additional information a customer might need to know when they're ordering a service.
Marketing Image: This is the image that will show on the front page of the shop.
Gallery Images: You can upload as many images as you want here to showcase this service/facility at it's best.
Once you've finished adding all of your services you're almost ready to go. Take a moment to take a look over the ordering of the services in your shop - you can make adjustments up and down by using the green and orange arrows.

Finally do one last review of everything. Proofread your descriptions, double-check your pricing and once you're satisfied, hit the Enable Shop button on the shop management page and watch your shop go live with At The Yard!
The web address for the shop will be shown at the top or left of the shop configuration page (it'll end in /shop).
Now that your shop is up and running, it's time to spread the word. Leverage your existing networks, social media platforms, and equestrian communities to promote your new shop.
Setting up your shop with At The Yard is a straightforward process that can significantly expand your equestrian business horizons. By following these steps, you can create an enticing shop, showcase your services and facilities, automate payment processing, and tap into a broader community of riders and enthusiasts.