
Blog
Today we’re announcing a brand new and major feature we’ve been working on. It’s one that’s been requested by many of our customers and will add a whole new way of using At The Yard. We call it Kiosk View.
The Kiosk view can be used by yards to allow their customers quick and easy access to At The Yard, allow them to make bookings, orders and to keep everyone informed about up and coming events. Its availability and visibility acts as a direct replacement for the old yard diary or book.
To make this possible all you need to do is find a tablet or old PC to place in your tack room or communal area. Once set up with the Kiosk view your customers can start using it straight away.
Without further ado we’ve put together a short promo video outlining what you can do with the Kiosk.
The key features made available to users through to Kiosk view are:
Once set up your users just need to choose what they want to do (book, purchase, order), select their name and then fill in the options. It’s as easy as that!
This feature further reduces the barrier to entry in getting your yard up and running with At The Yard. No longer will you require your customers to have a smart phone or tablet as now they can do all the basics from the Kiosk view.
We’ve designed the Kiosk view to run on most tablets but will be happy to optimise a version for popular tablets chosen by our subscribers (iPad, Kindle Fire etc). In addition to this, there are a range of Kiosk stands for tablets that can be purchased (e.g. https://www.amazon.co.uk/s?k=ipad+secure+kiosk ) to help get the tablet installed safely at your yard. As we receive feedback from our subscribers we’ll be posting some of our favourite setups to our Facebook page along with popular stands being used.
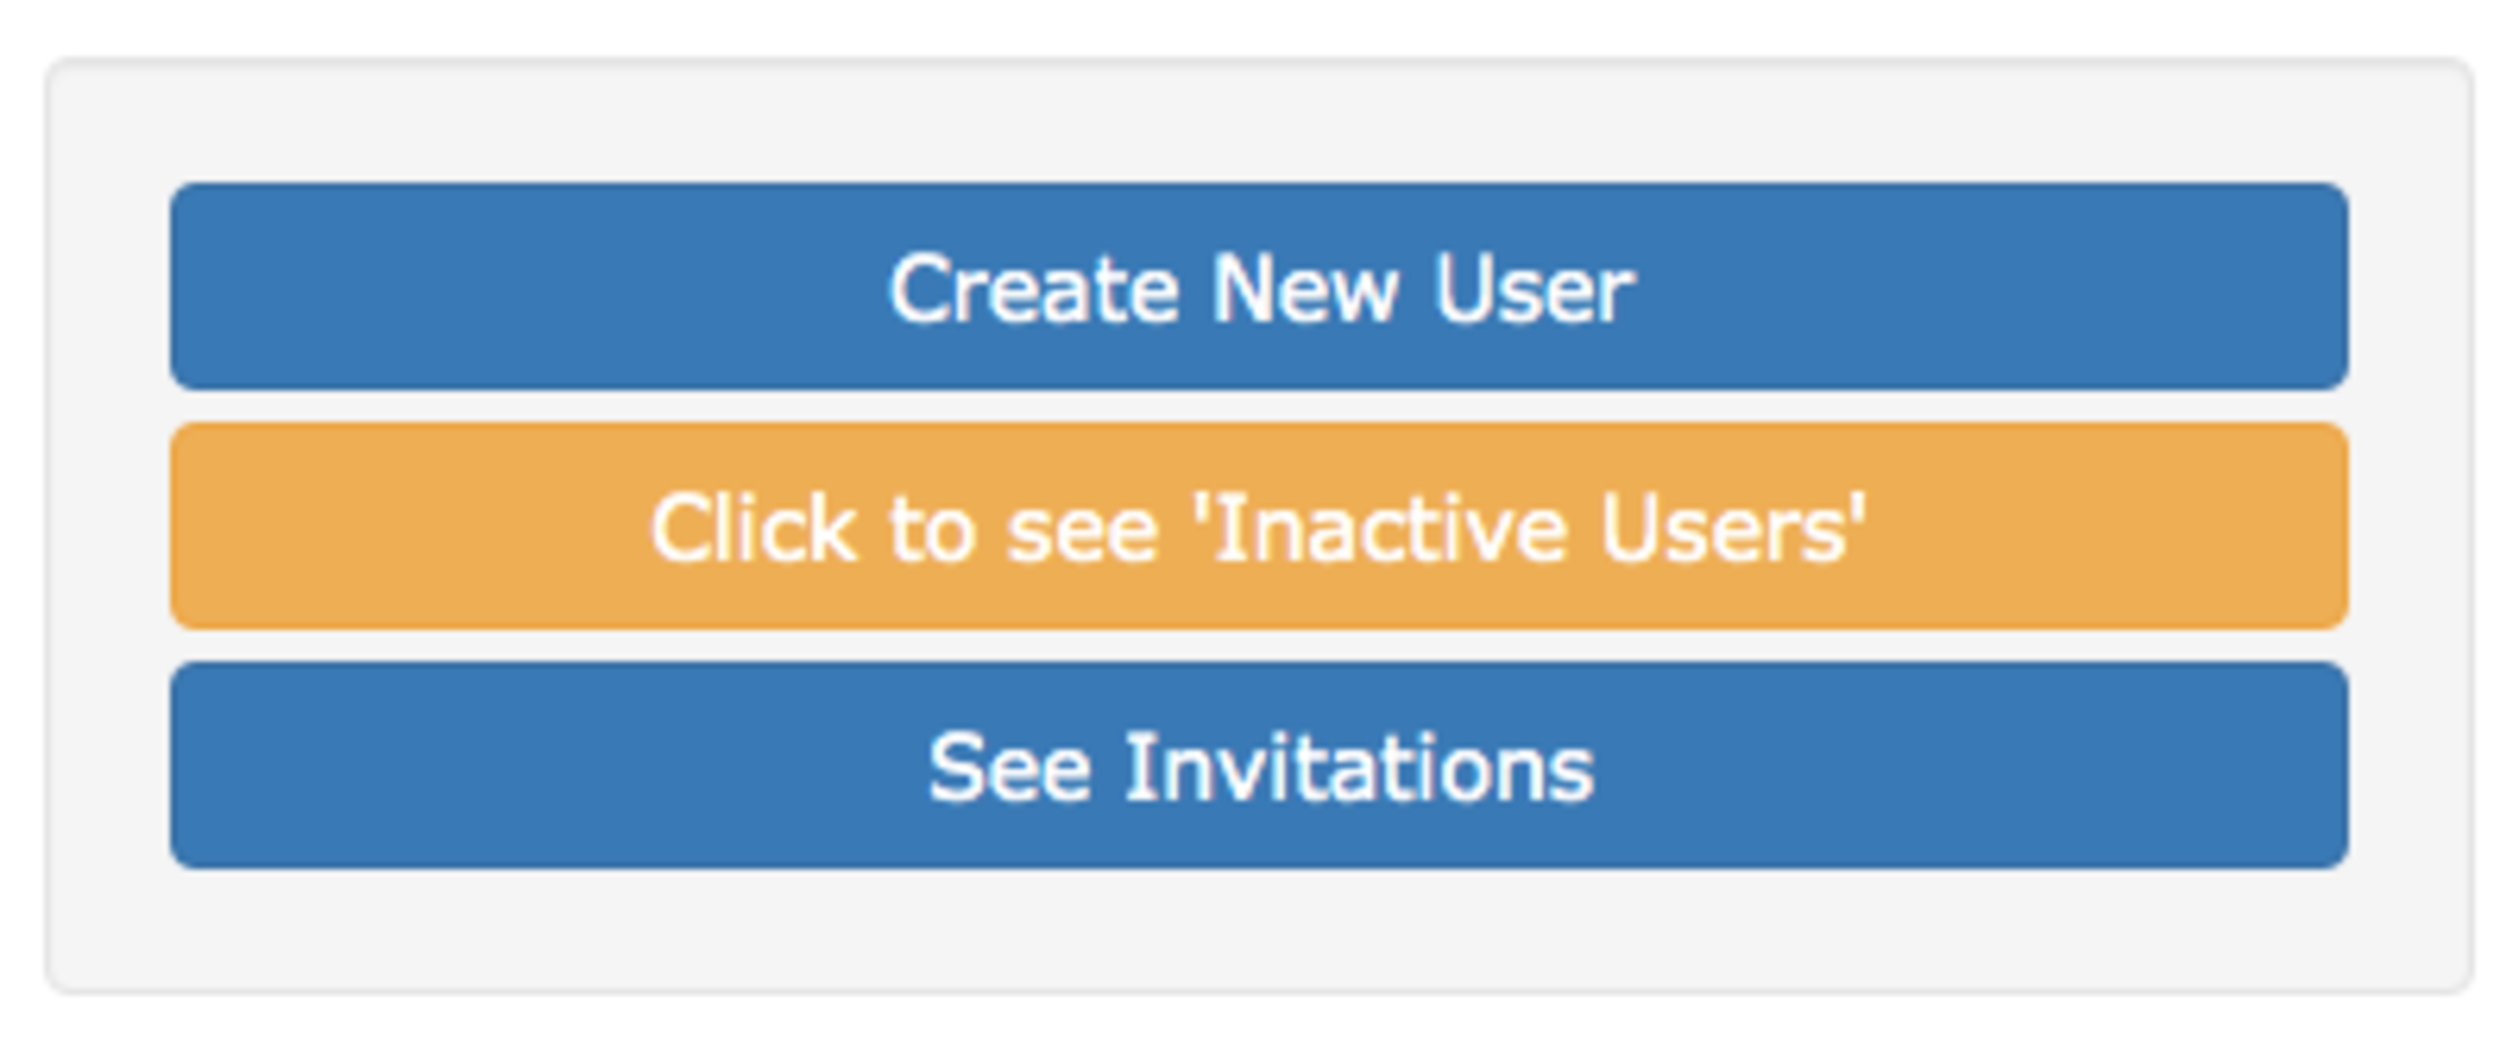
The setup process for the Kiosk view is very similar to a standard user set up. So the first thing is to go to the Admin -> Users page. From there, click on Create New User button.
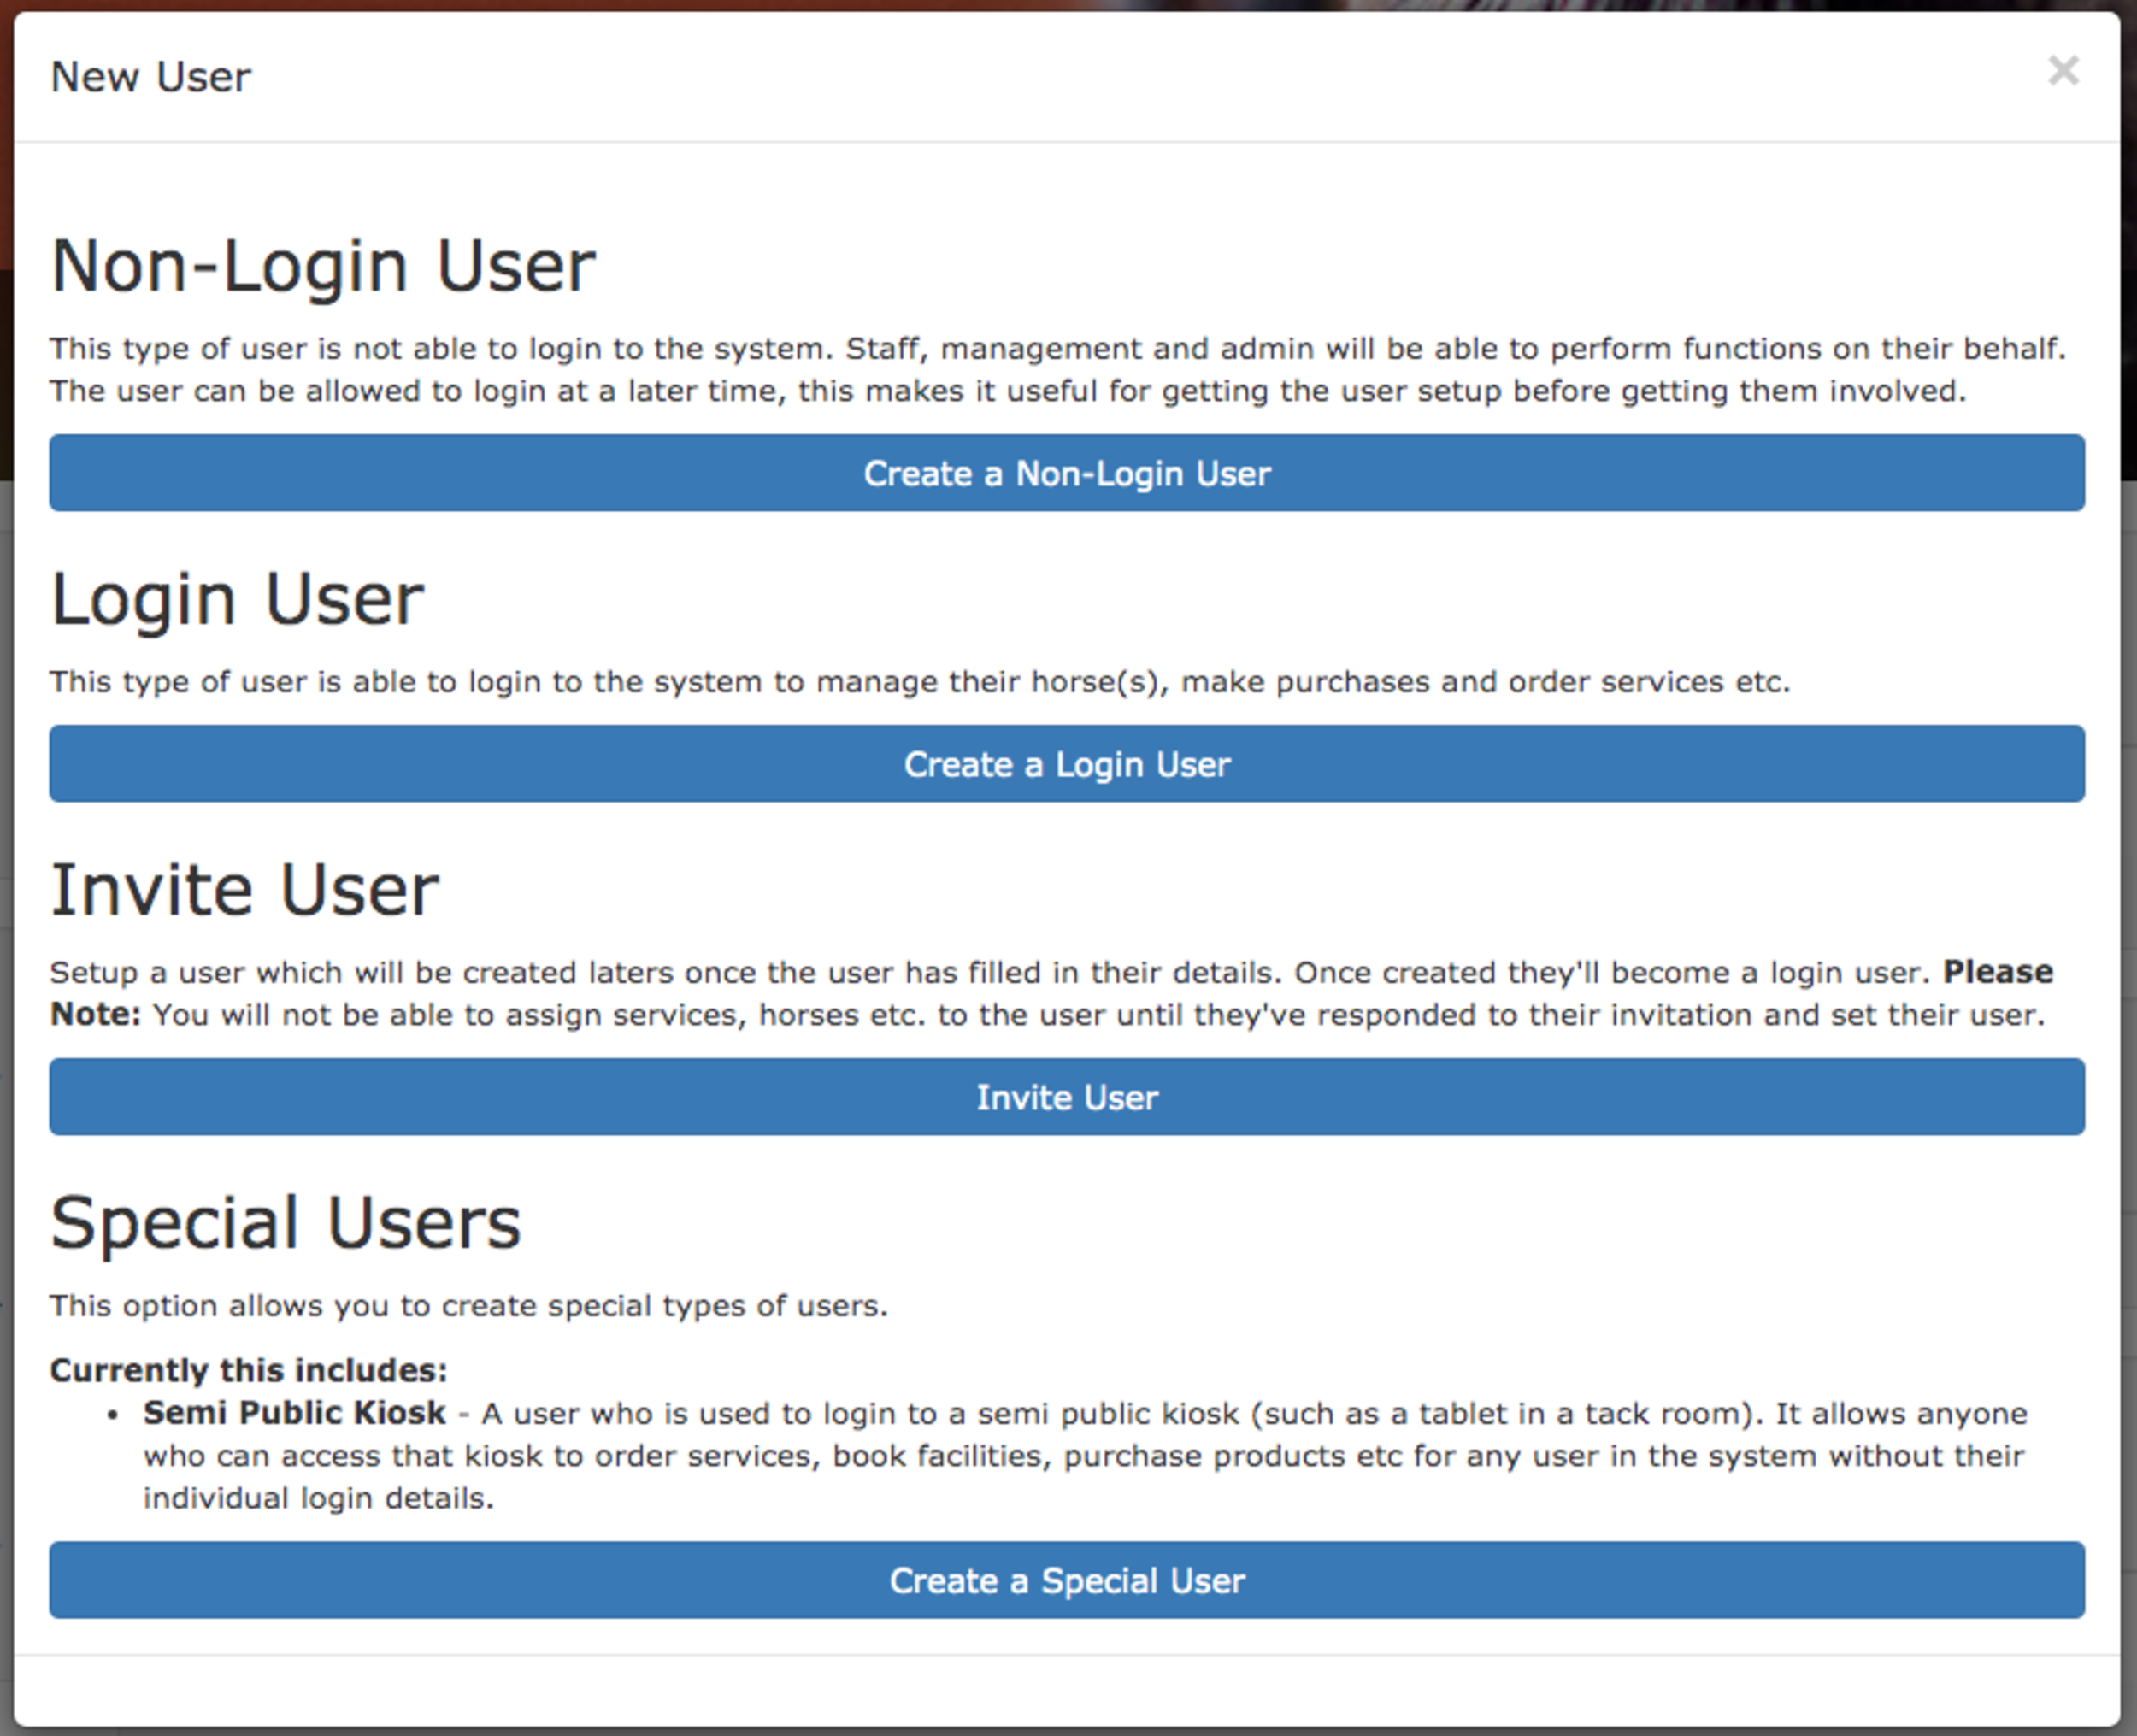
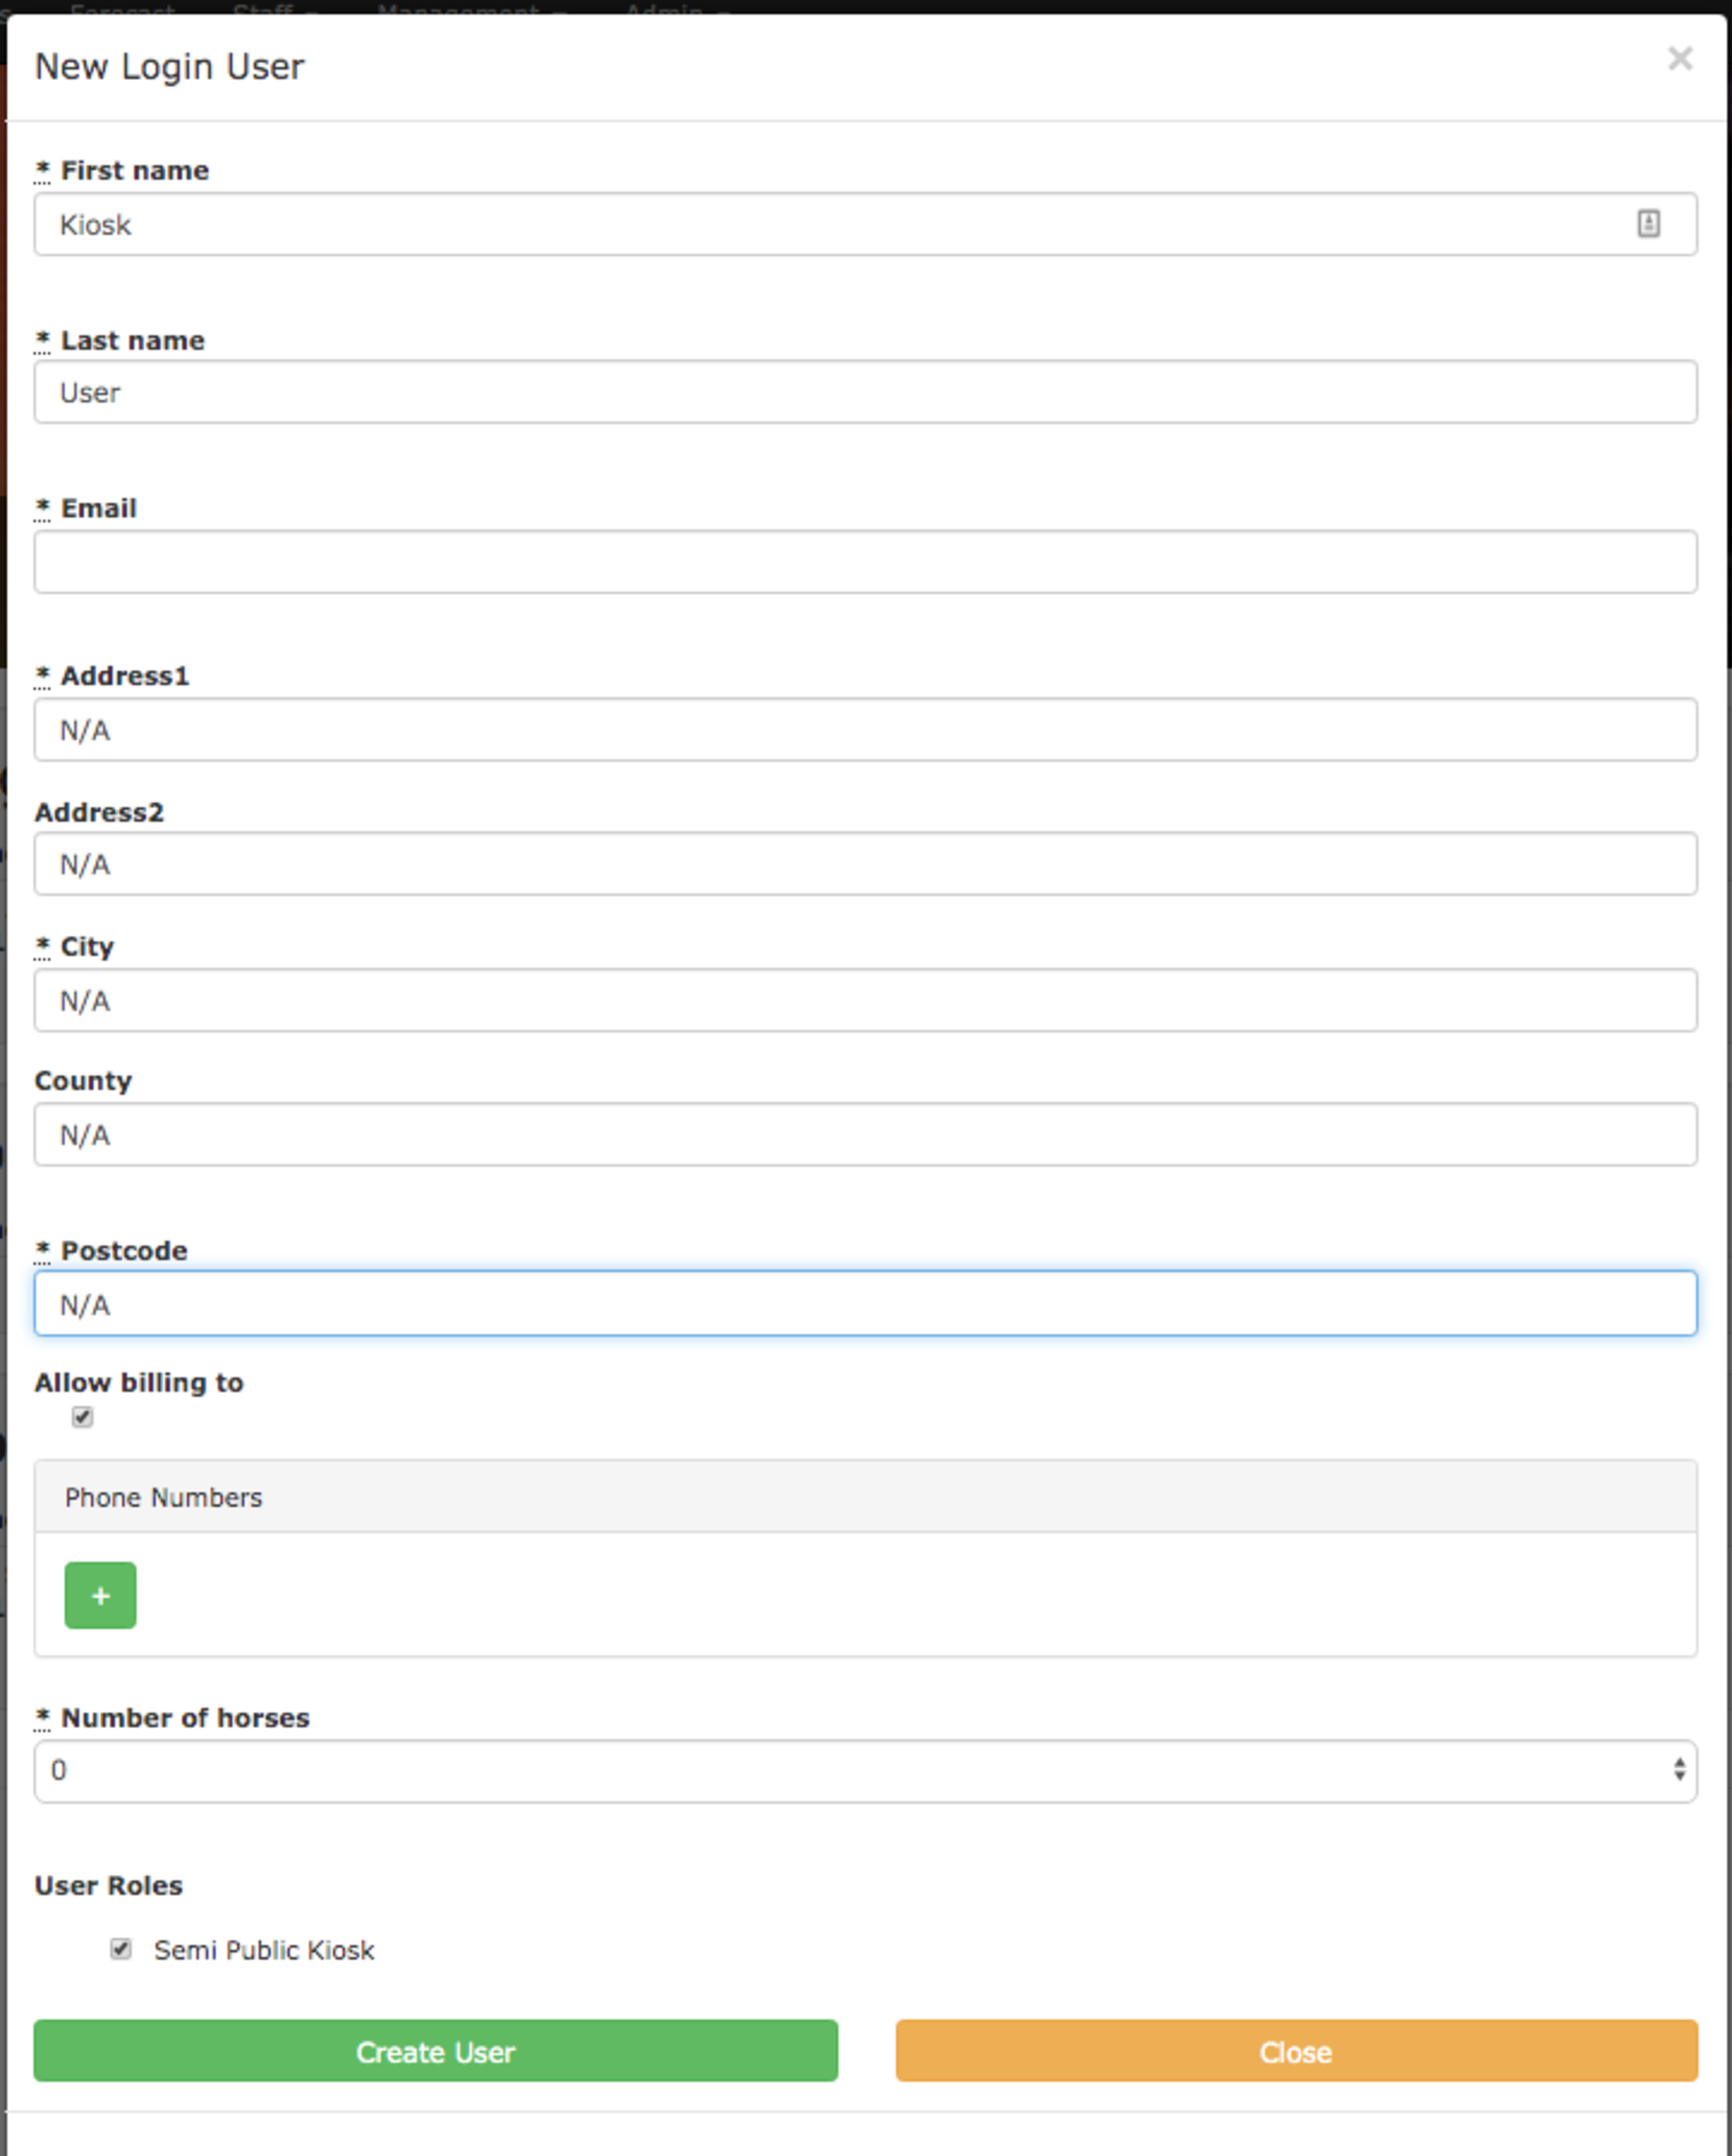
You’ll be shown the user type selector where you’ll need to click the Create a Special User button. This will bring up a standard New Login User form. For the majority of the fields you can fill them in with N/A and select 0 horses and remove the default phone number box.
Please Note: We’ll be clearing this screen up in the future so you don’t have to put the N/A in manually
Once done click on Create User and your new kiosk user will have been created.
The email account you entered in the above step will receive an email which will allow you to set the password for the new Kiosk user. Once set up you can then use this email & password to login on your tablet. Login works just like a normal user, go to your yard’s individual address on the tablet and enter the login details.
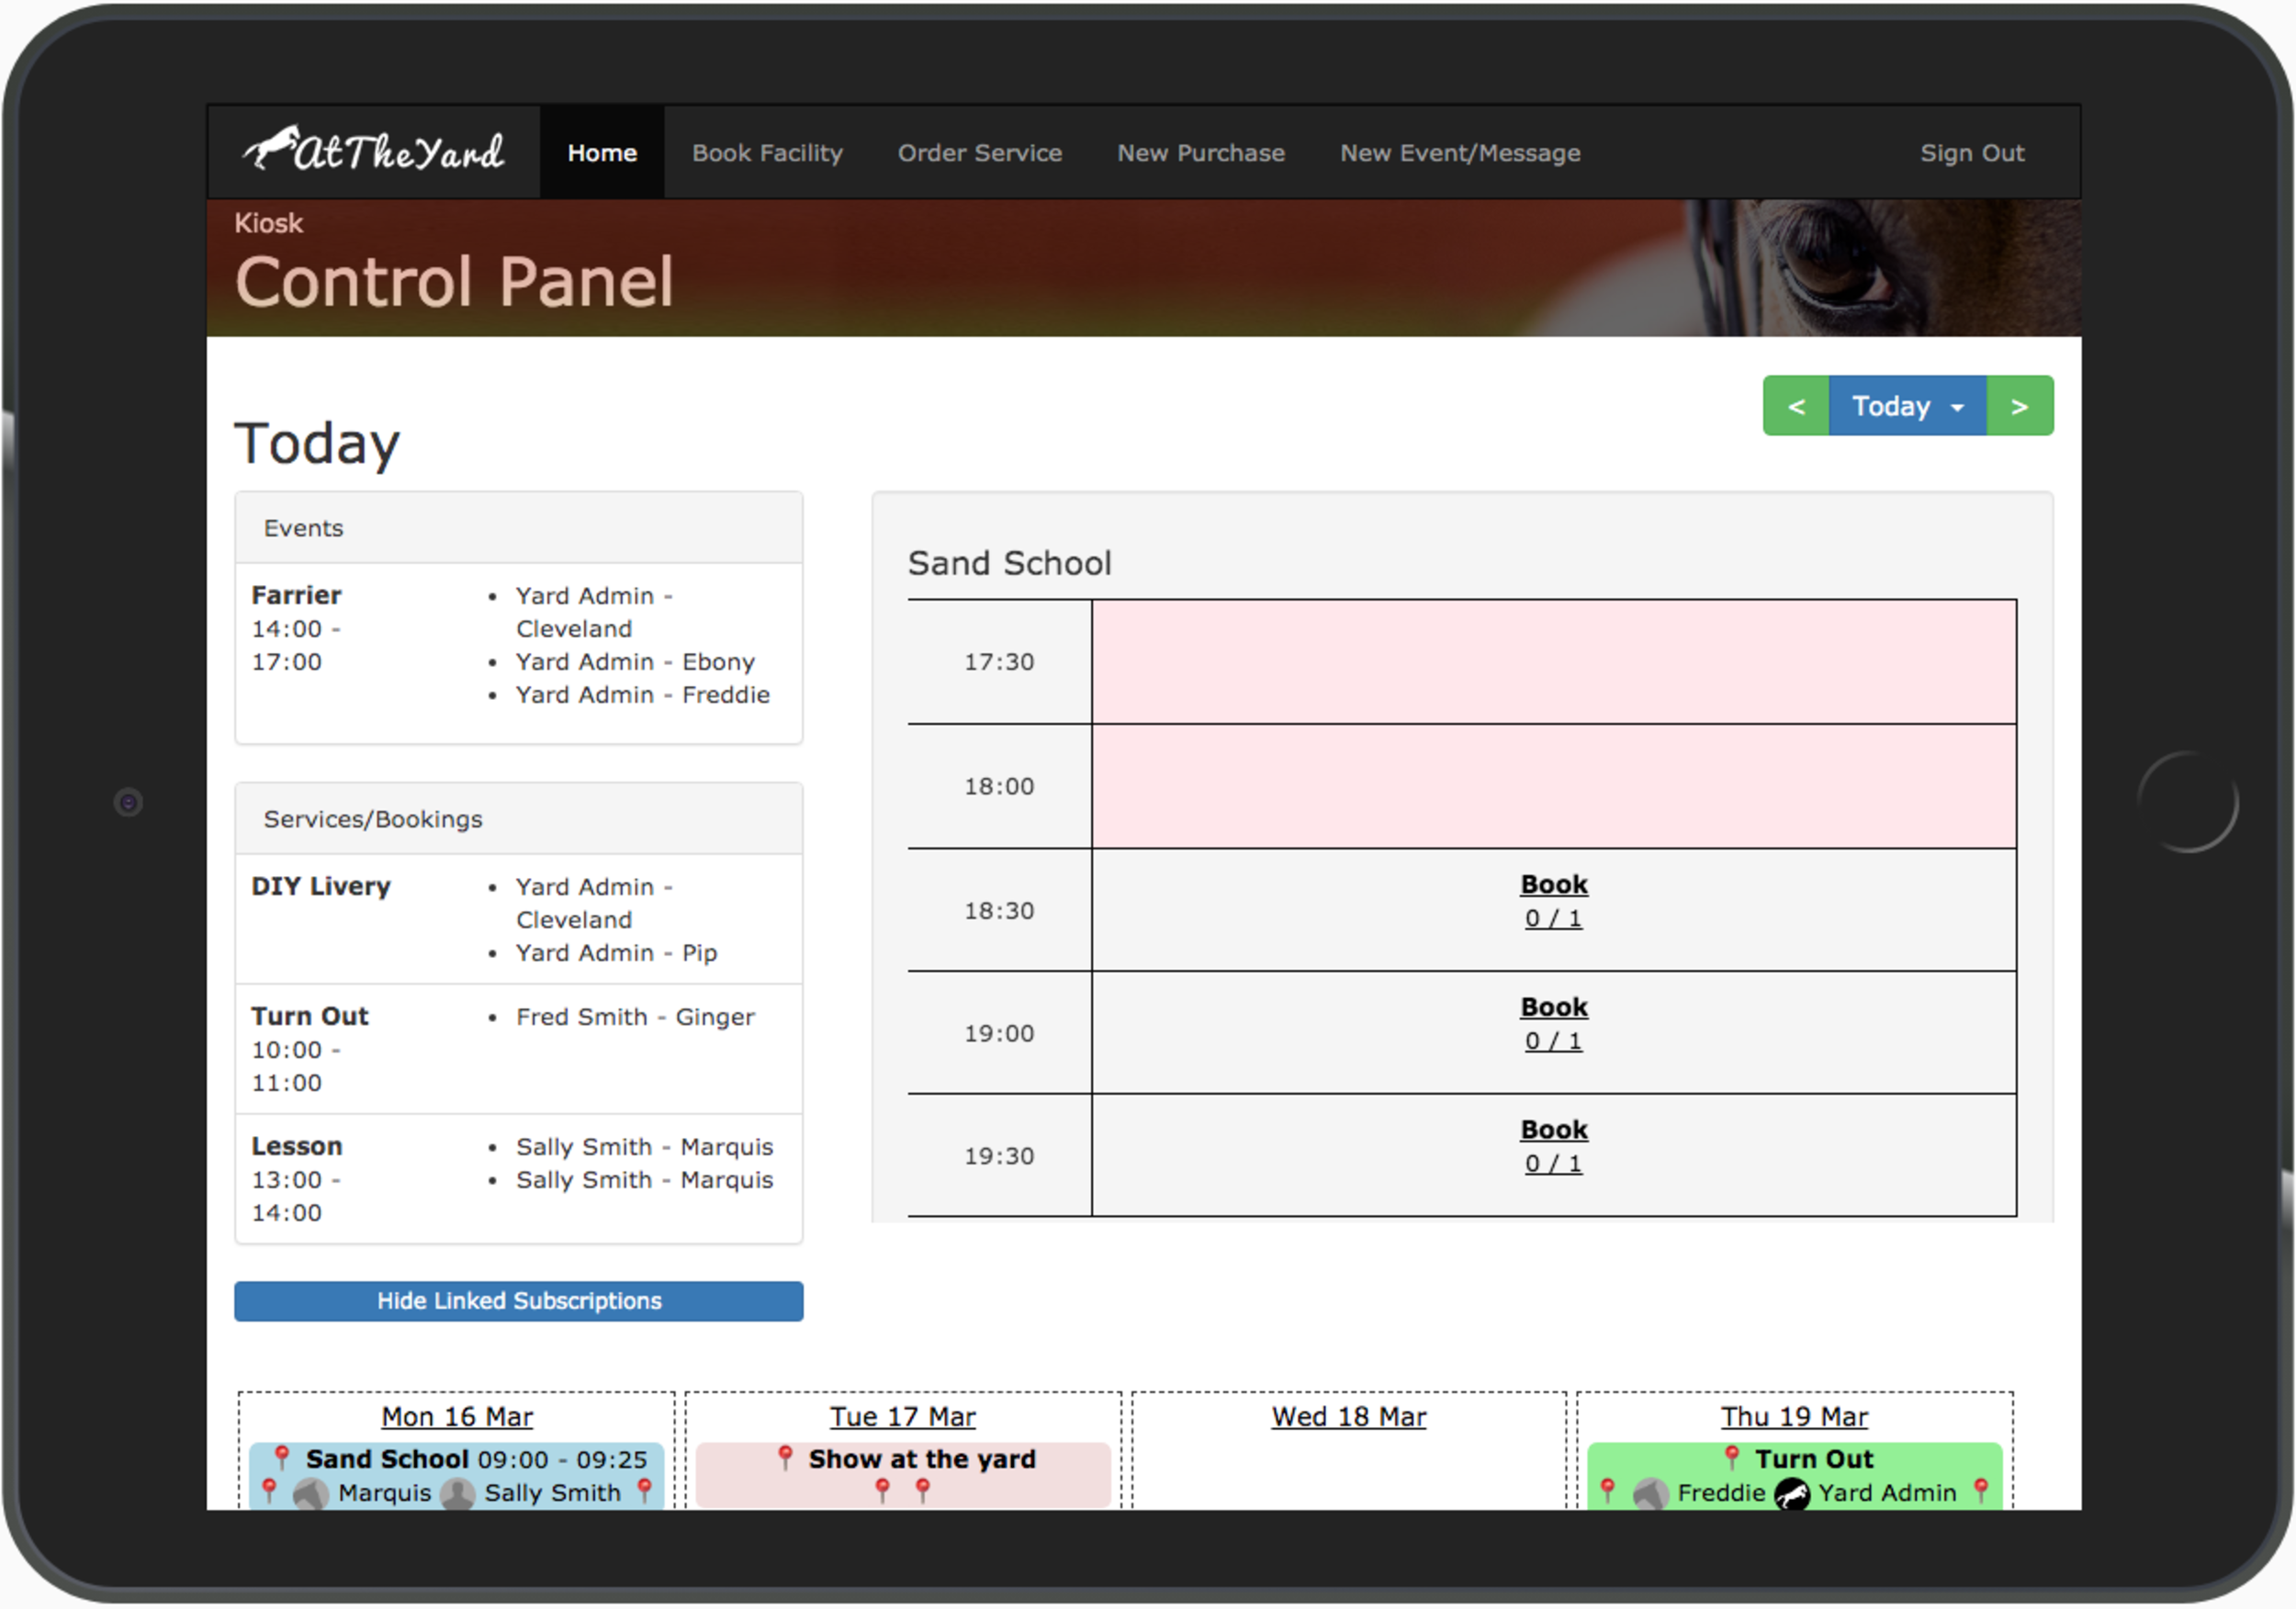
The first screen you’ll be welcomed with is the diary view. This gives an overview of the day’s events, services and bookings. This page automatically refreshes which means this screen will never be more than a few minutes out of date.
We can’t wait to see this feature out in the wild and installed in your tack rooms, barns and everywhere in between.
Along with getting a secure kiosk mount for your tablet we want to remind you that as this kiosk view allows anyone with physical access (or the account details) to make purchases, booking and orders etc on behalf of other customer it’s important to put this in an area that only customers you trust can access it. You also need to ensure your use of it is compliant with your privacy and data protection policies (this would be the same as when you were using a paper diary showing the same information). It’s also important to outline the rules of use to your customers to ensure it’s used responsibly.
At The Yard has a wide range of ways for your customers to record their needs/requests. From Facility Bookings through to Service Orders the customer can choose what they need when they need it (inline with the rules and restrictions you put in place as the yard manager).
However, as much as structure is important, there is always somethings we can’t predict or don’t fit into a predefined box. You need to let your customers let you know what’s going on or allow them to give you and/or the entire yard a message.
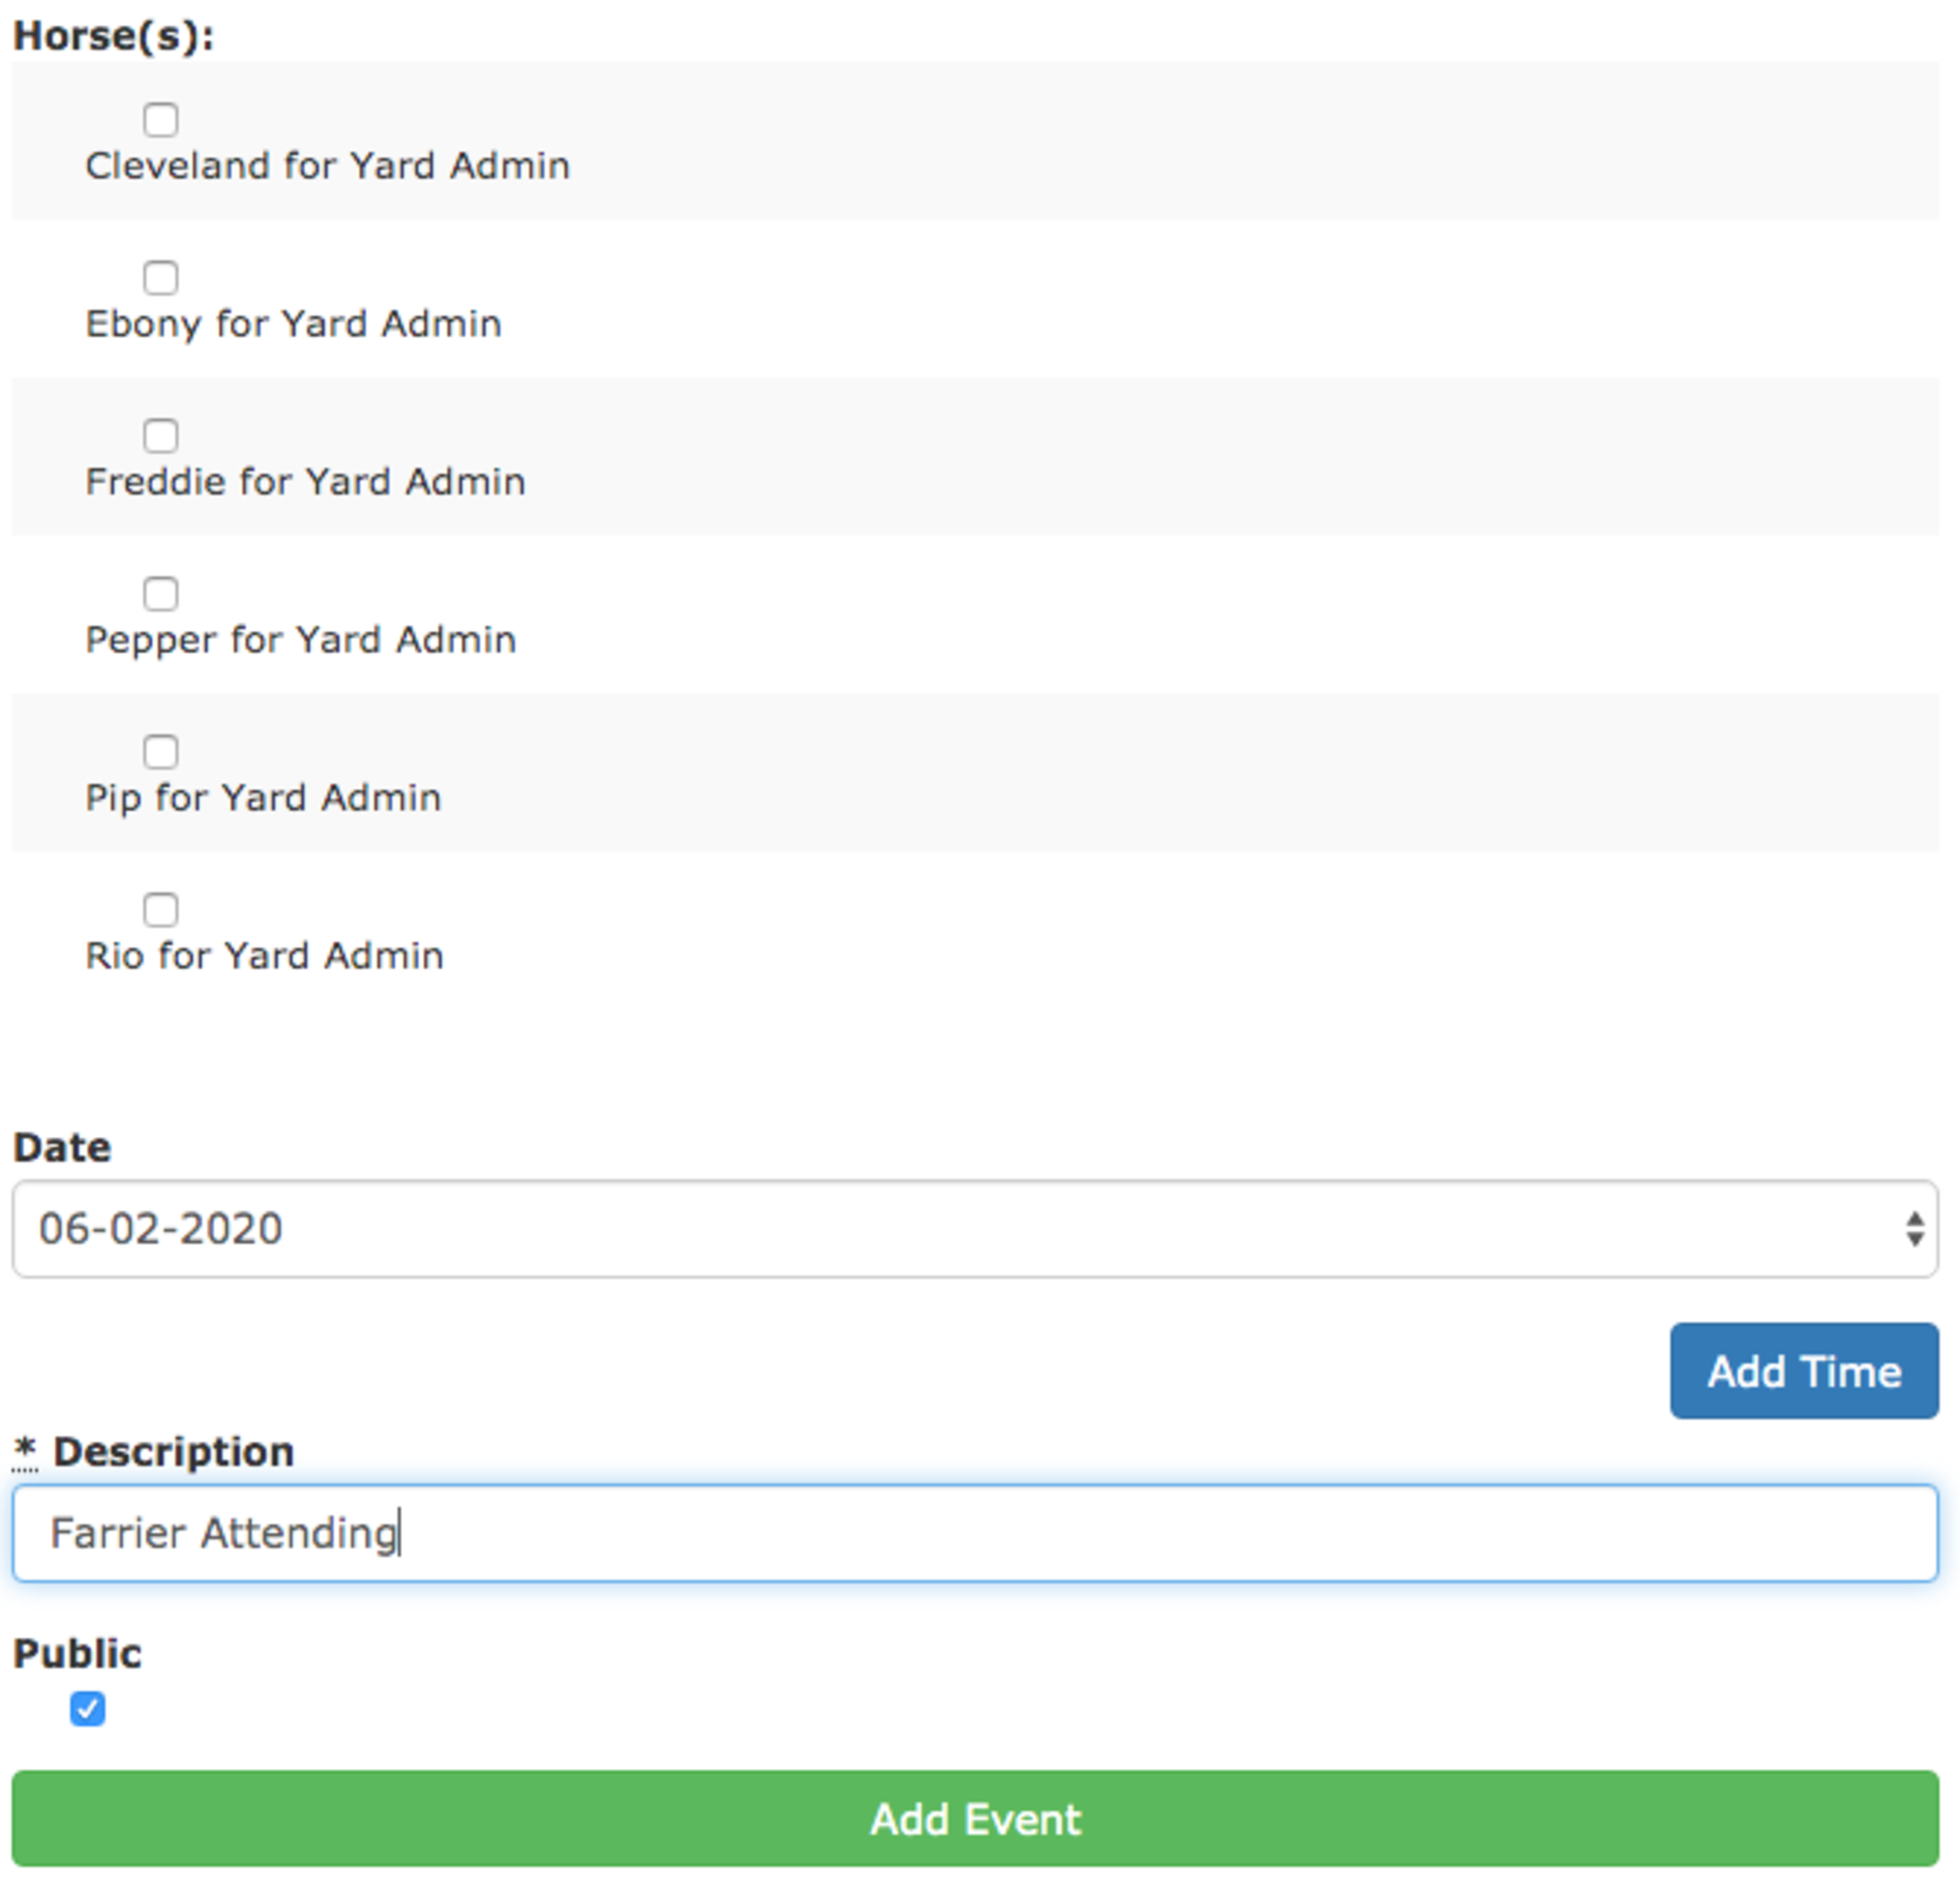
To support this we have what we call Messages & Events. This allows you to simply write your message (as you might do on a whiteboard or notebook), choose the horse(s) (if any) the message applies to and finally choose to share it with everyone or just yourself and staff. It’s as easy & as quick as that.
Of course the benefit of putting it into At The Yard is that the customer can write the message from anywhere and that it can be read from anywhere (the office, the stable block etc).
Some examples of this might be:
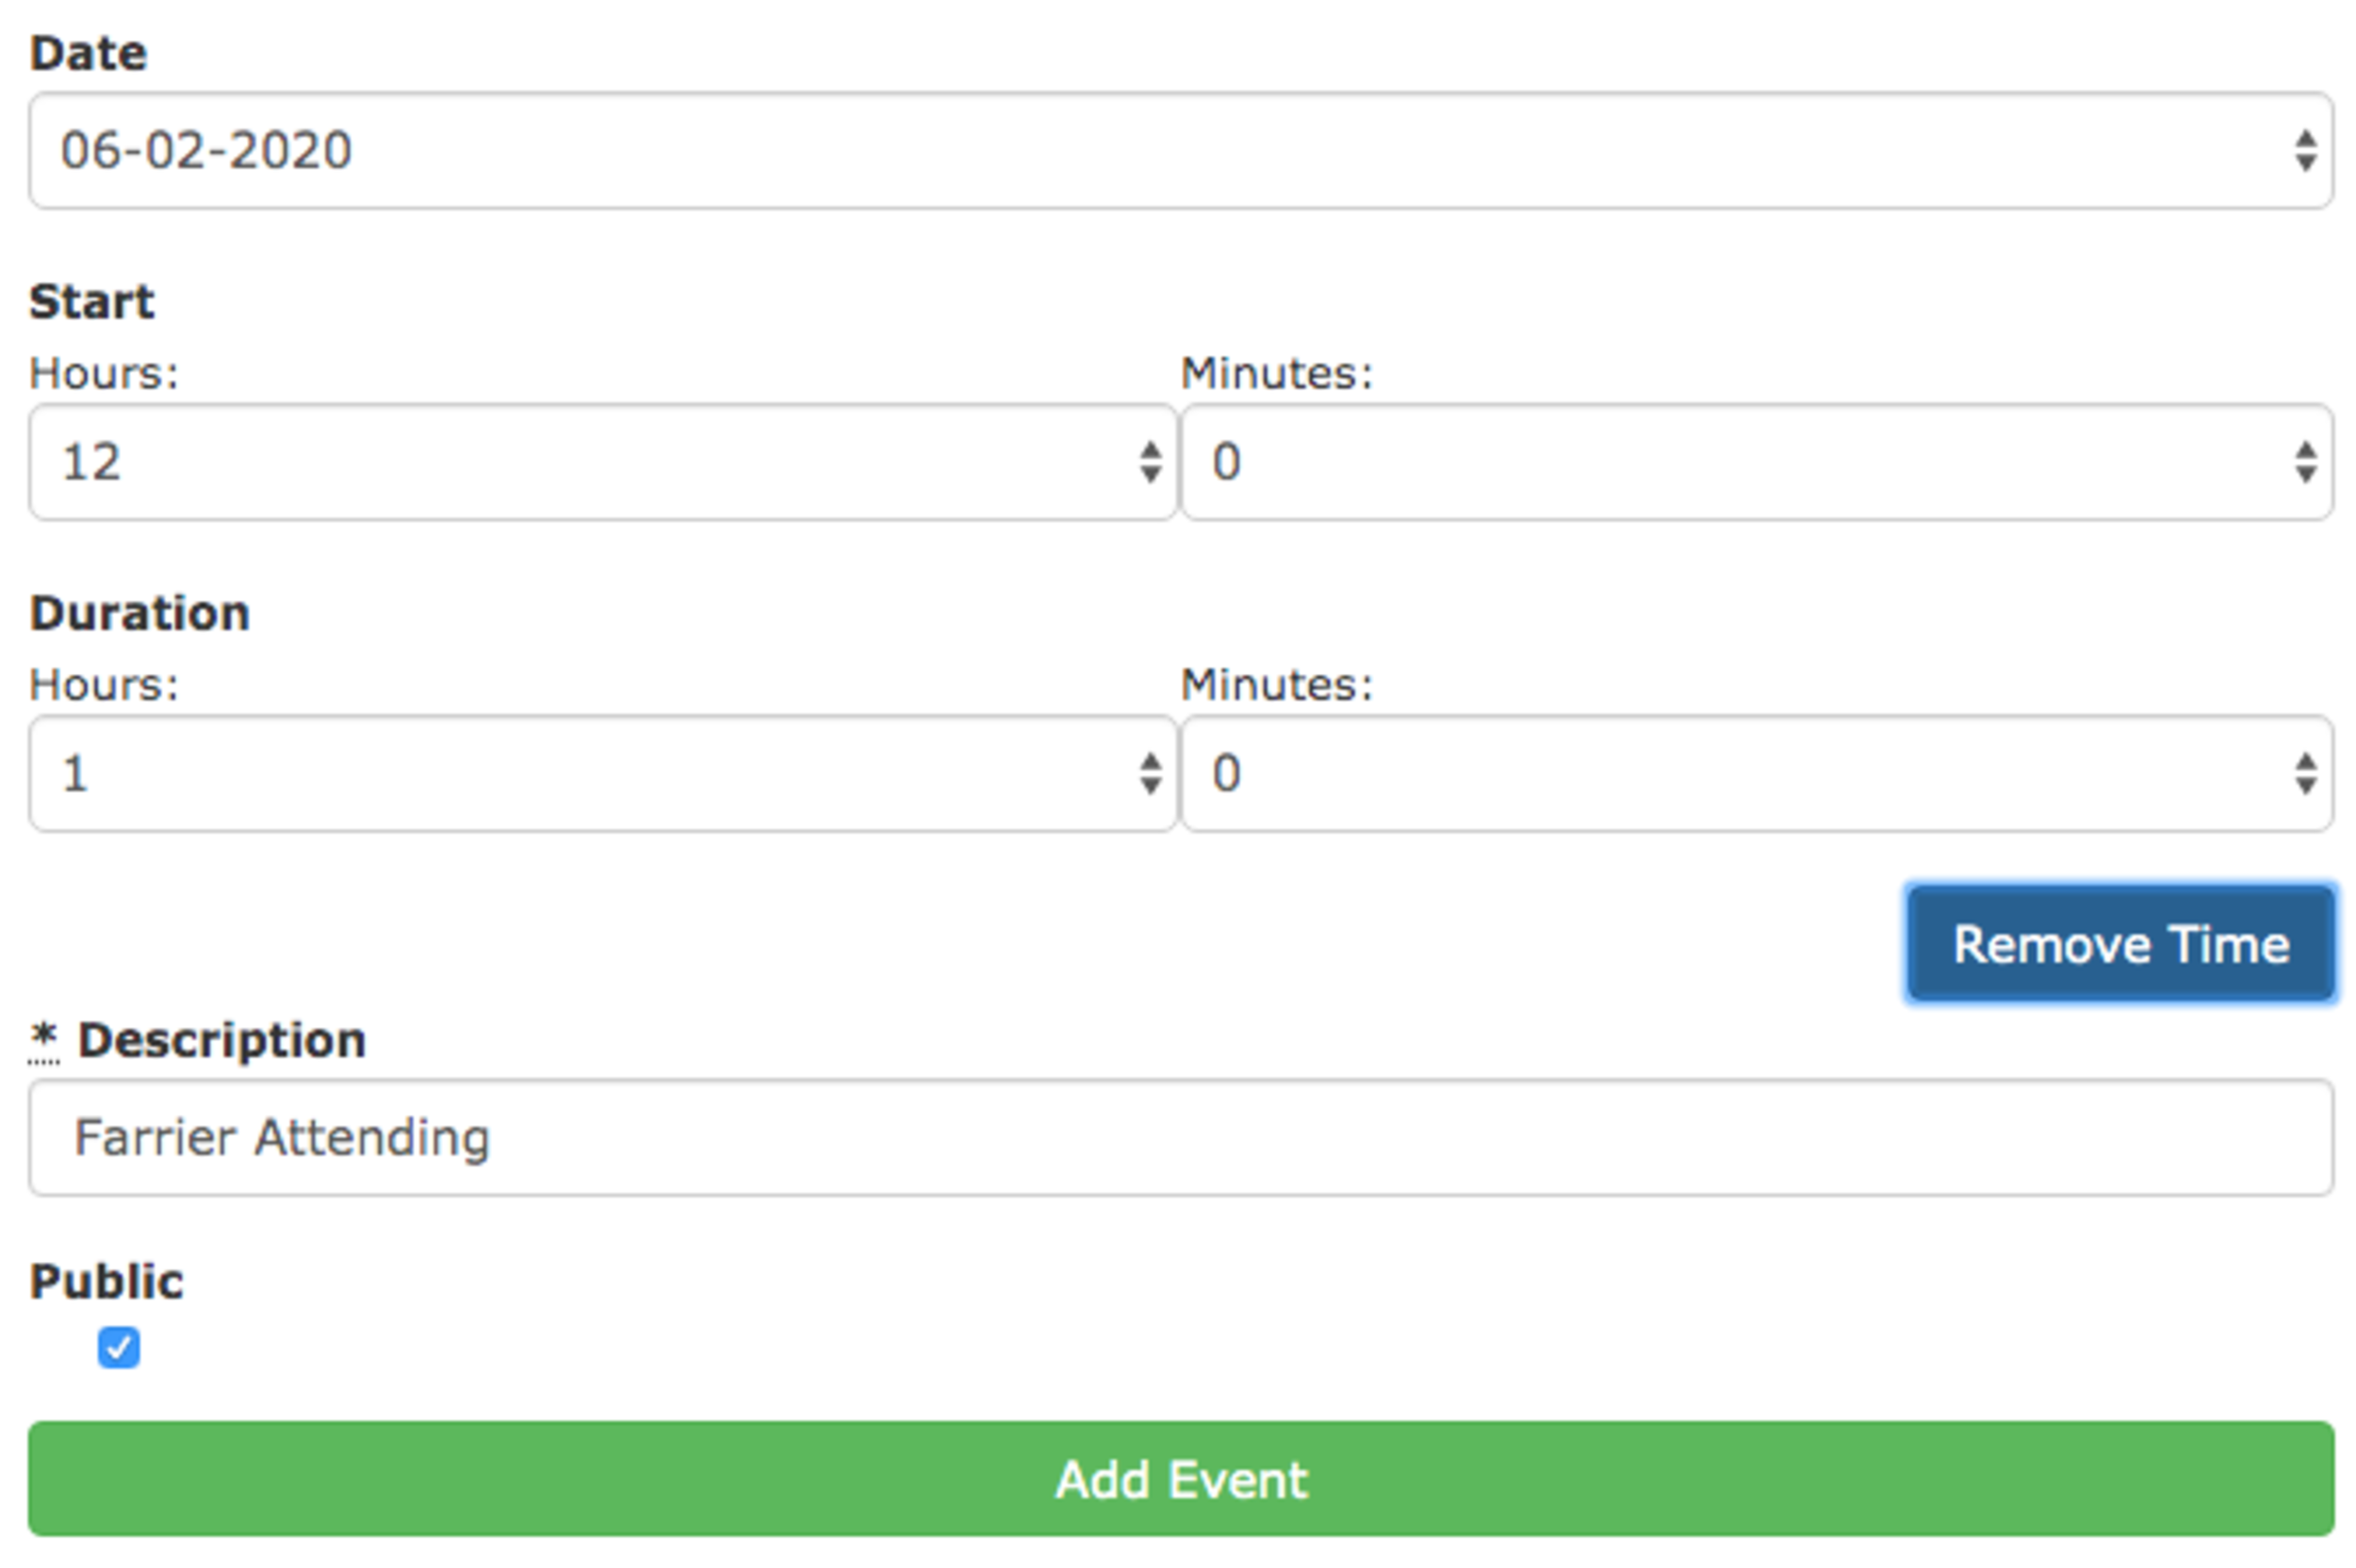
We’ve recently released an update to the Messages & Events system to, by default, make it easier and quicker to create the message. The update removes the requirement to add a time to the event. This means you no longer have to choose a time for an event which applies all day (e.g. putting on a rug) whilst still retaining the ability to be more specific when necessary (e.g. when letting people know when the farrier is coming).
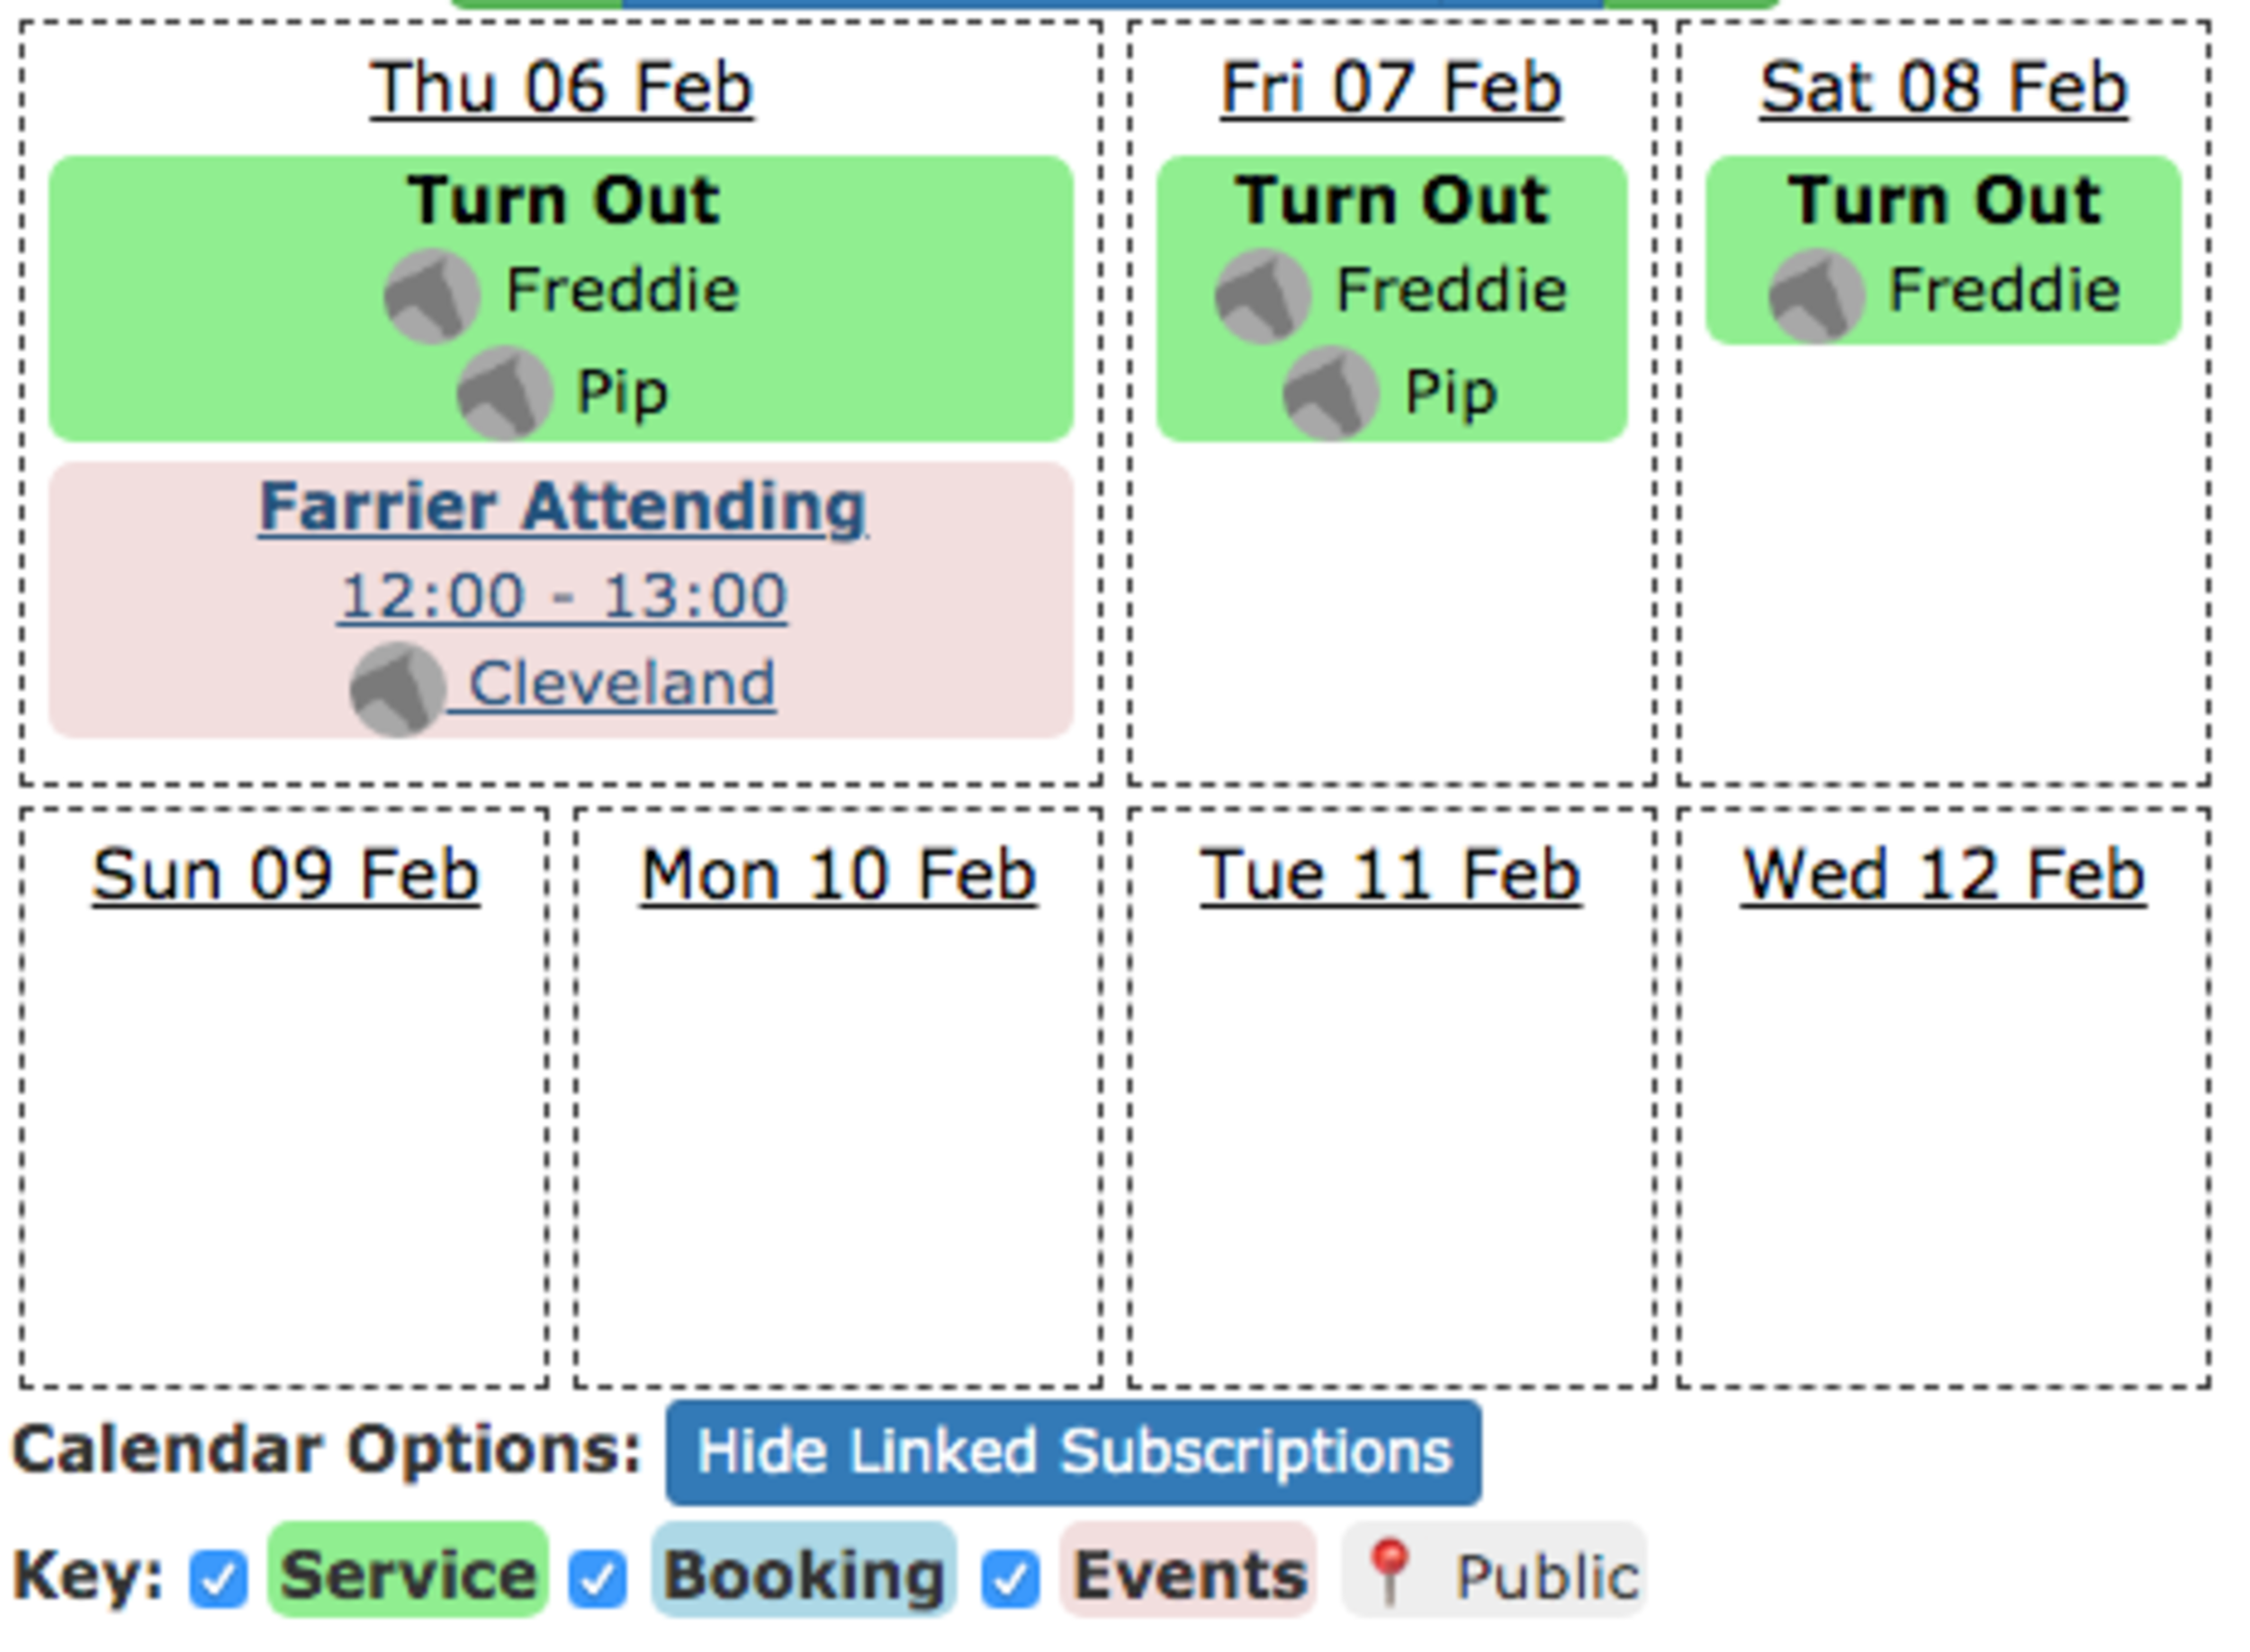
And like most things in At The Yard this is then shown both on a users personal calendar & the staff forecast view.
This update makes a small improvement to the usability of an existing feature. We’re working on some major new features so keep an eye on our blog & Facebook to keep up to date.
Can you believe the first week of 2020 is already over. We’re determined to get the year off with a bang so we’re excited to be announcing our first feature release of the year - Included Facilities Schemes.
This feature allows you to manage the included facility usage you get as part of a livery/membership package. This brings it inline with the existing feature that allowed you to manage the included services.
We built this system on top of our previous work with service allowances and so it works in a very similar way. This means if you’re used to setting up the services that come included with your livery package you’ll find setting up included facilities quick and easy.

The first step is going to Admin → Services on the menu. Once there find the livery package you want to add a facility allowance to and then click on the edit drop down button. Find the ‘Edit Included Facilities Schemes’ button. Clicking this will bring up an overview of the existing facility allowances you have setup (shown below).
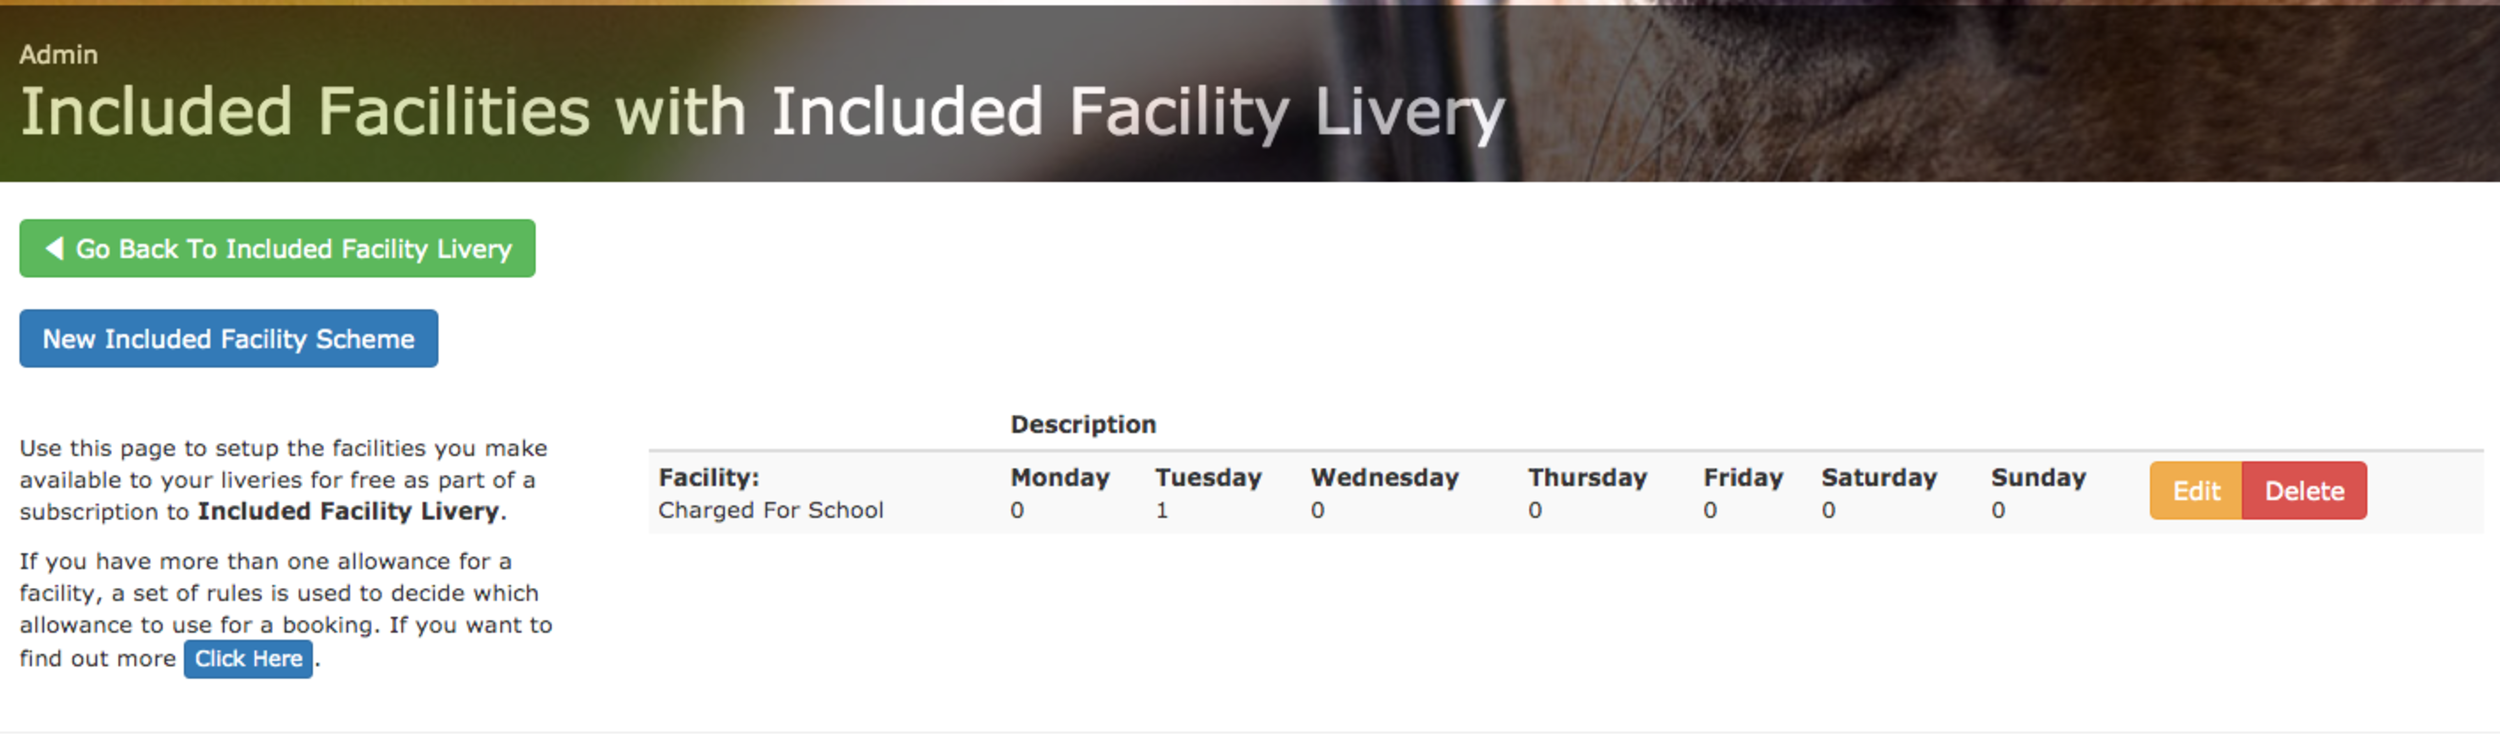
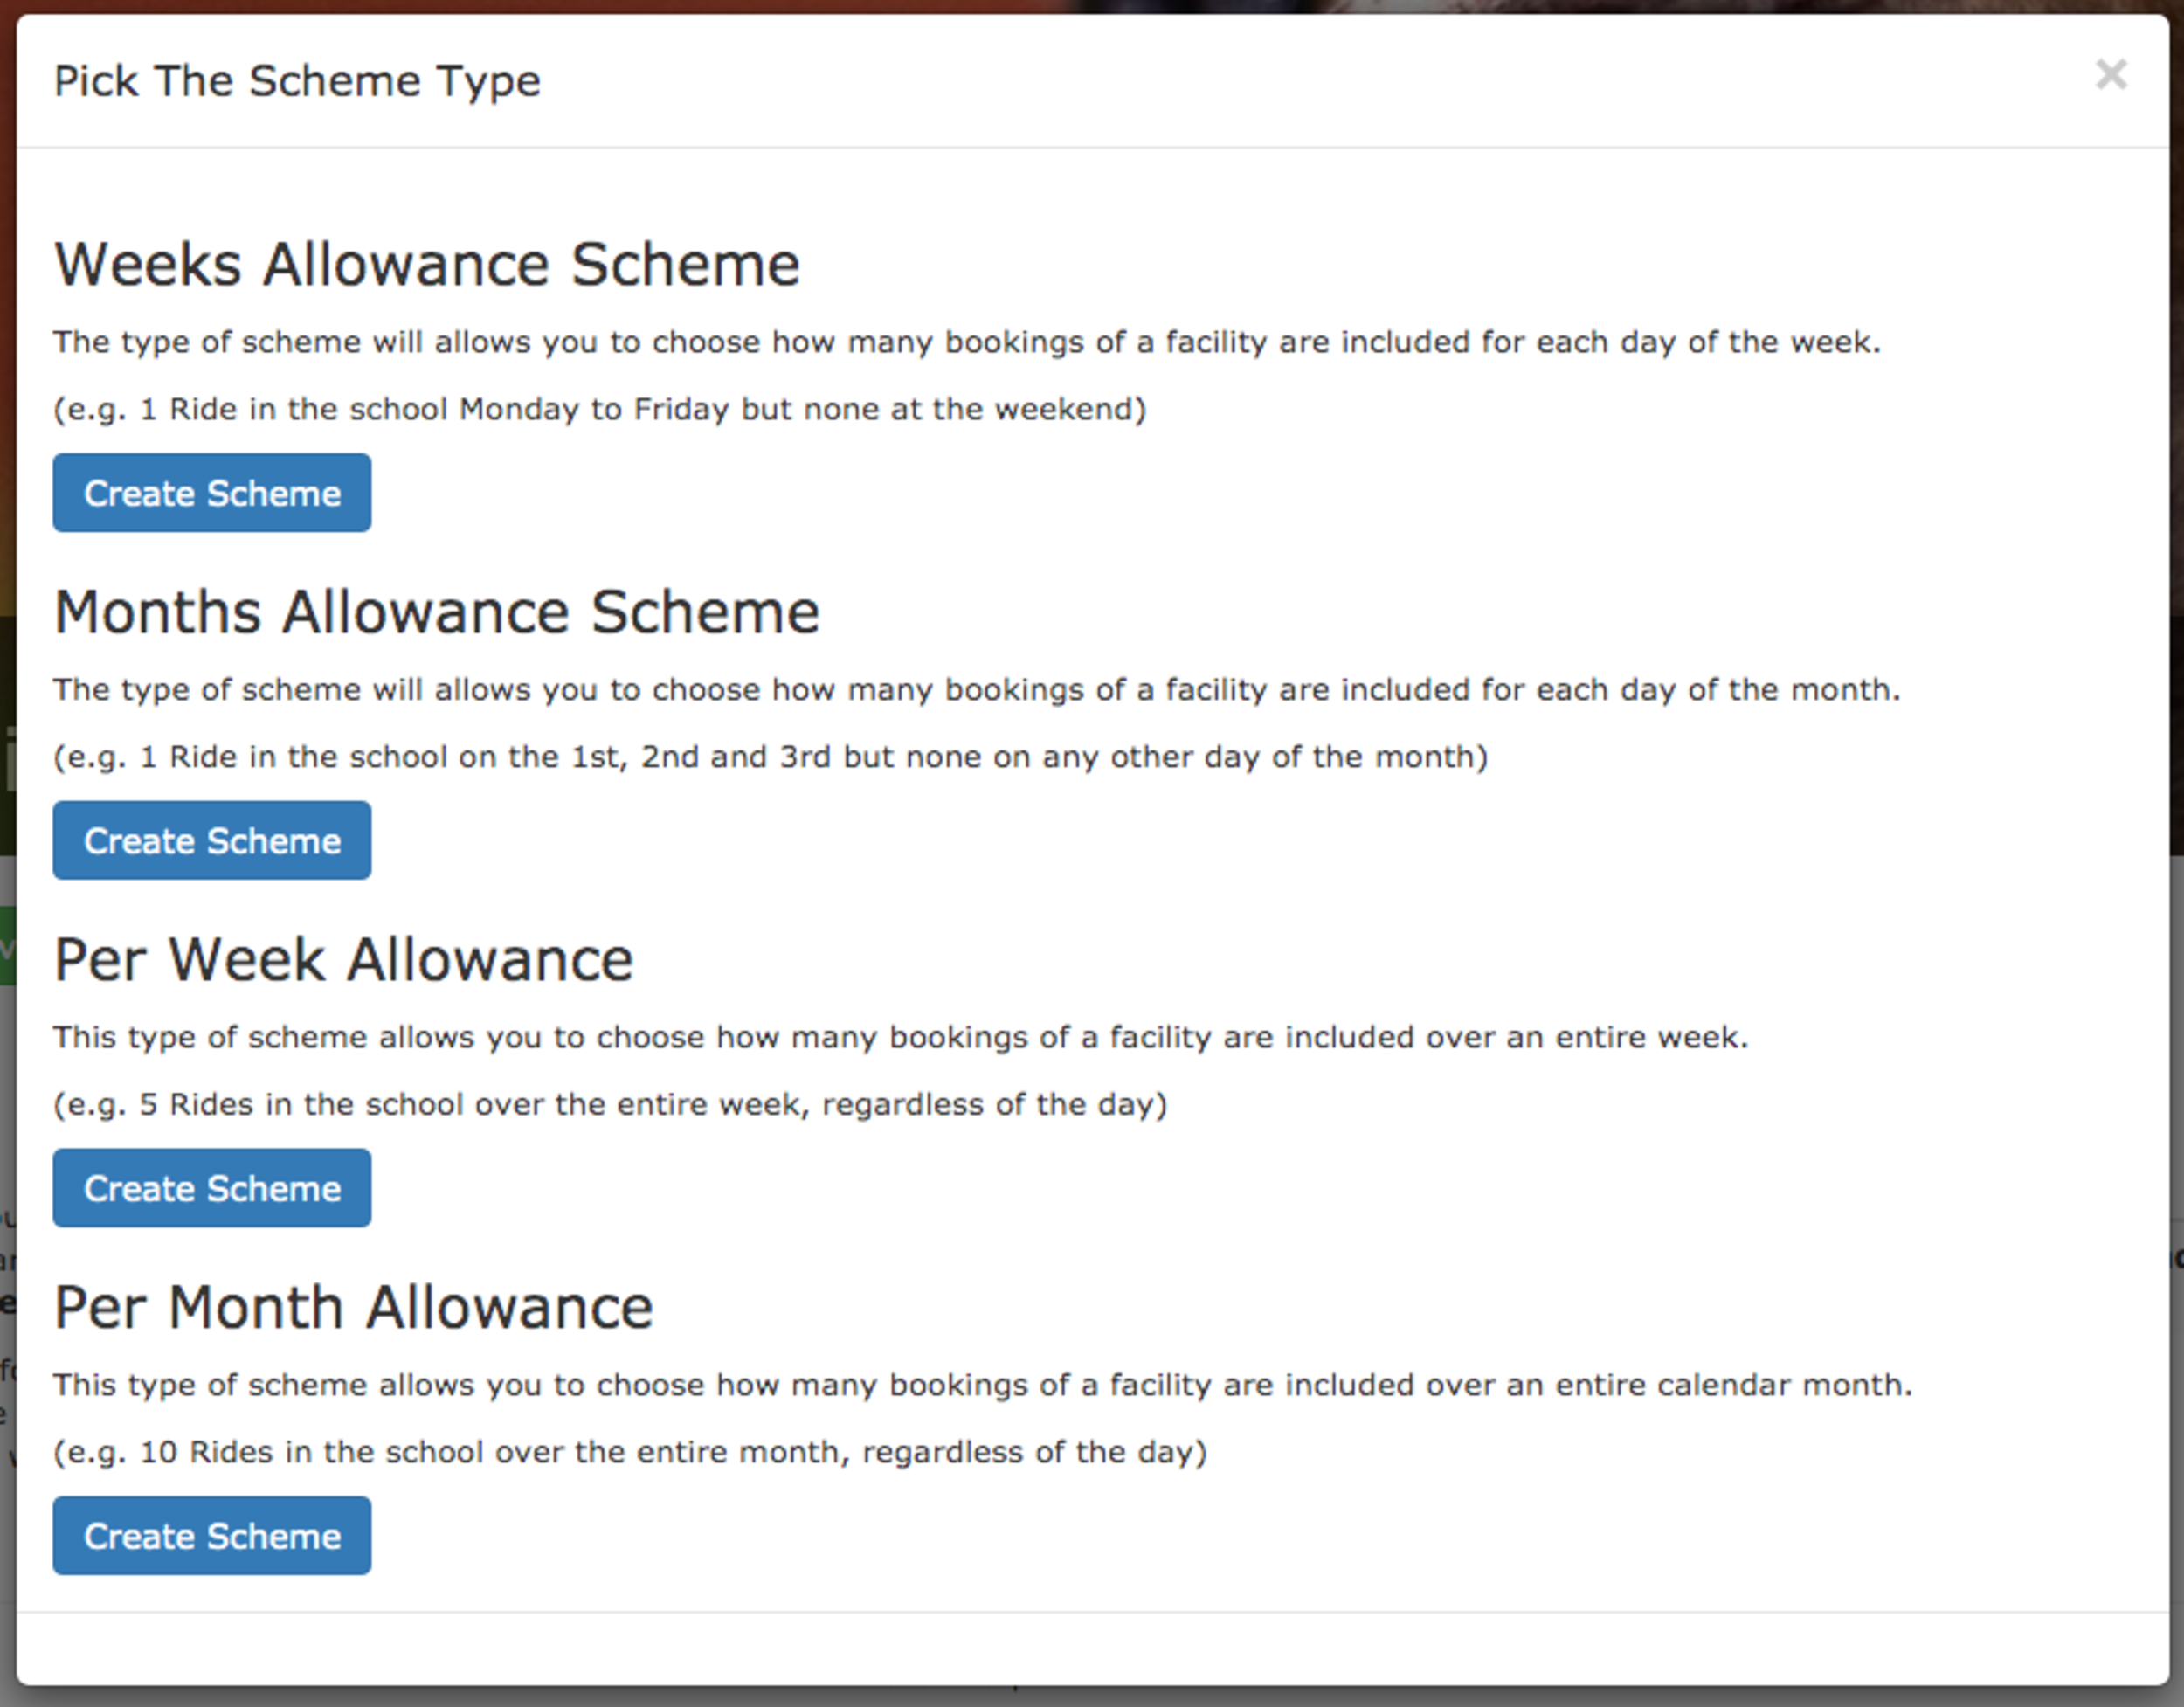
You’ll see all the existing schemes and the details of them. You can either click on Edit to make changes or click on New Included Facility Scheme to create a new allowance. This will bring up the scheme type selection screen which will allow you to choose the type of scheme that suits your needs. Once you’ve decided click on the ‘Create Scheme’ and you’ll be taken to the setup screen where you can fill in the details of the allowance.
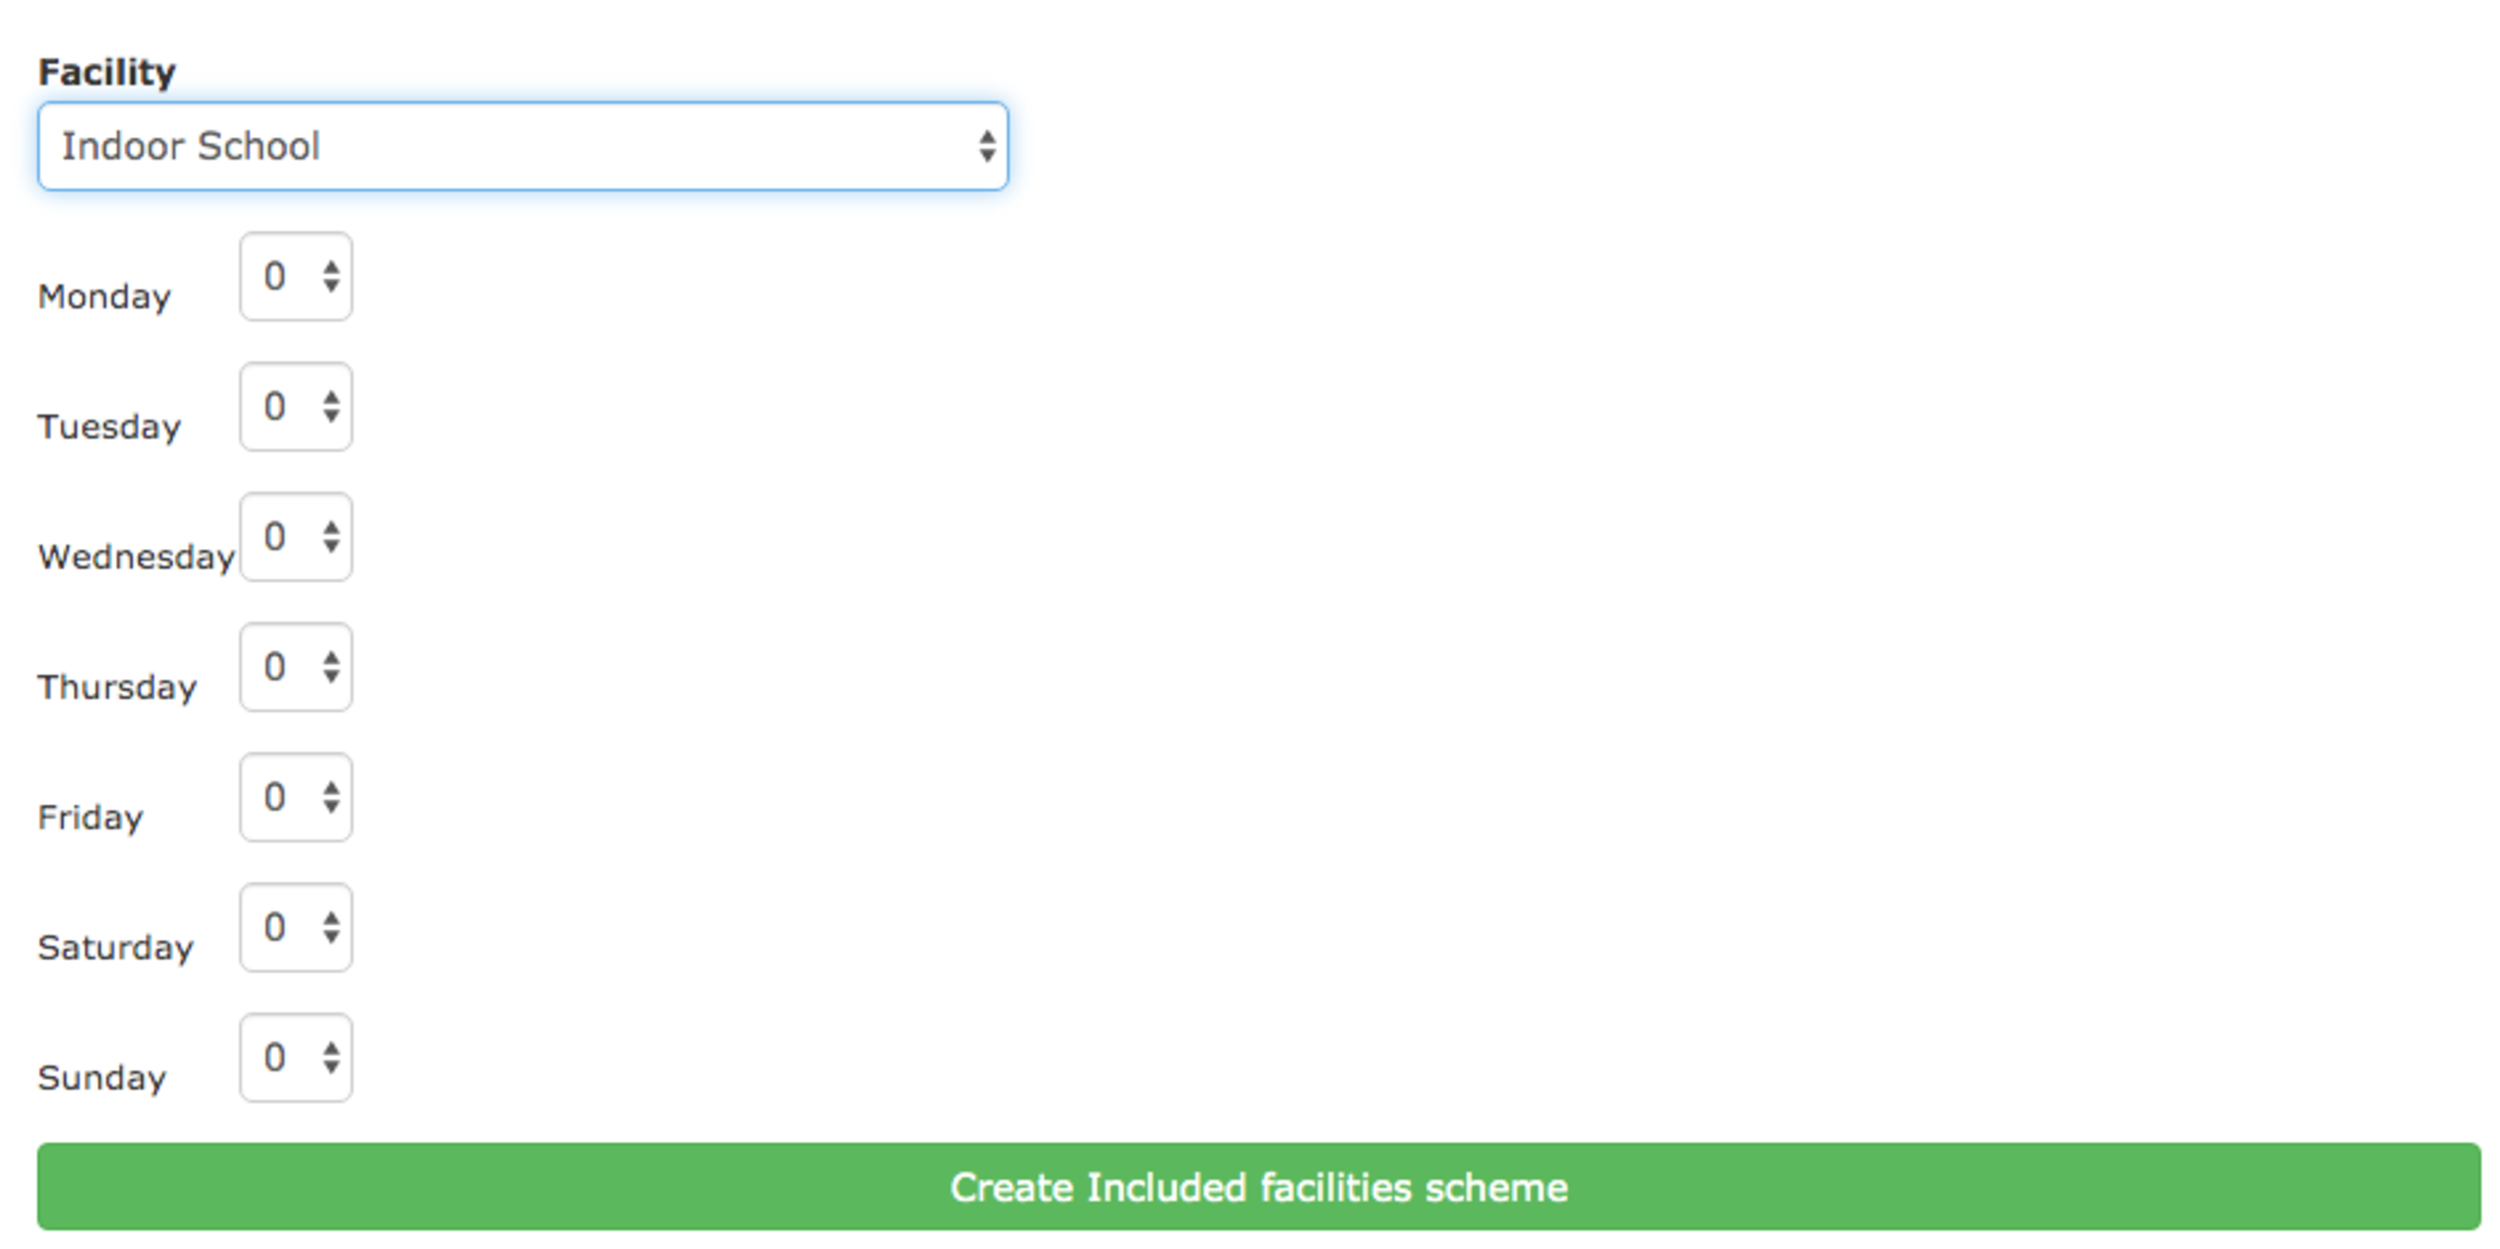
You can create as many schemes as you need to allow you to encapsulate all the included facilities you offer as part of a package. The best part? Once setup it’ll just work. It’ll track everything for you either billing (or not billing) your customers as necessary.
Today we’ve released an update to the Horse Database.
This update allows you to store Rich Text and images in the horse database (much like you’ll be used to in any word processor etc).
To explain how it works and what you can do with it we’ve made a quick video:
We think this new feature will let you better update your customers and keep more comprehensive records. For example you can:
We’re sure you’ll find lots of other uses we could never think of. We can’t wait to see what you do with it. As always if you have any questions or suggestions please get in touch!
Today we’re releasing a new feature - Service Assignments. This new feature allows you to assign the services that need fulfilling at your yard to the staff members responsible for their completion.
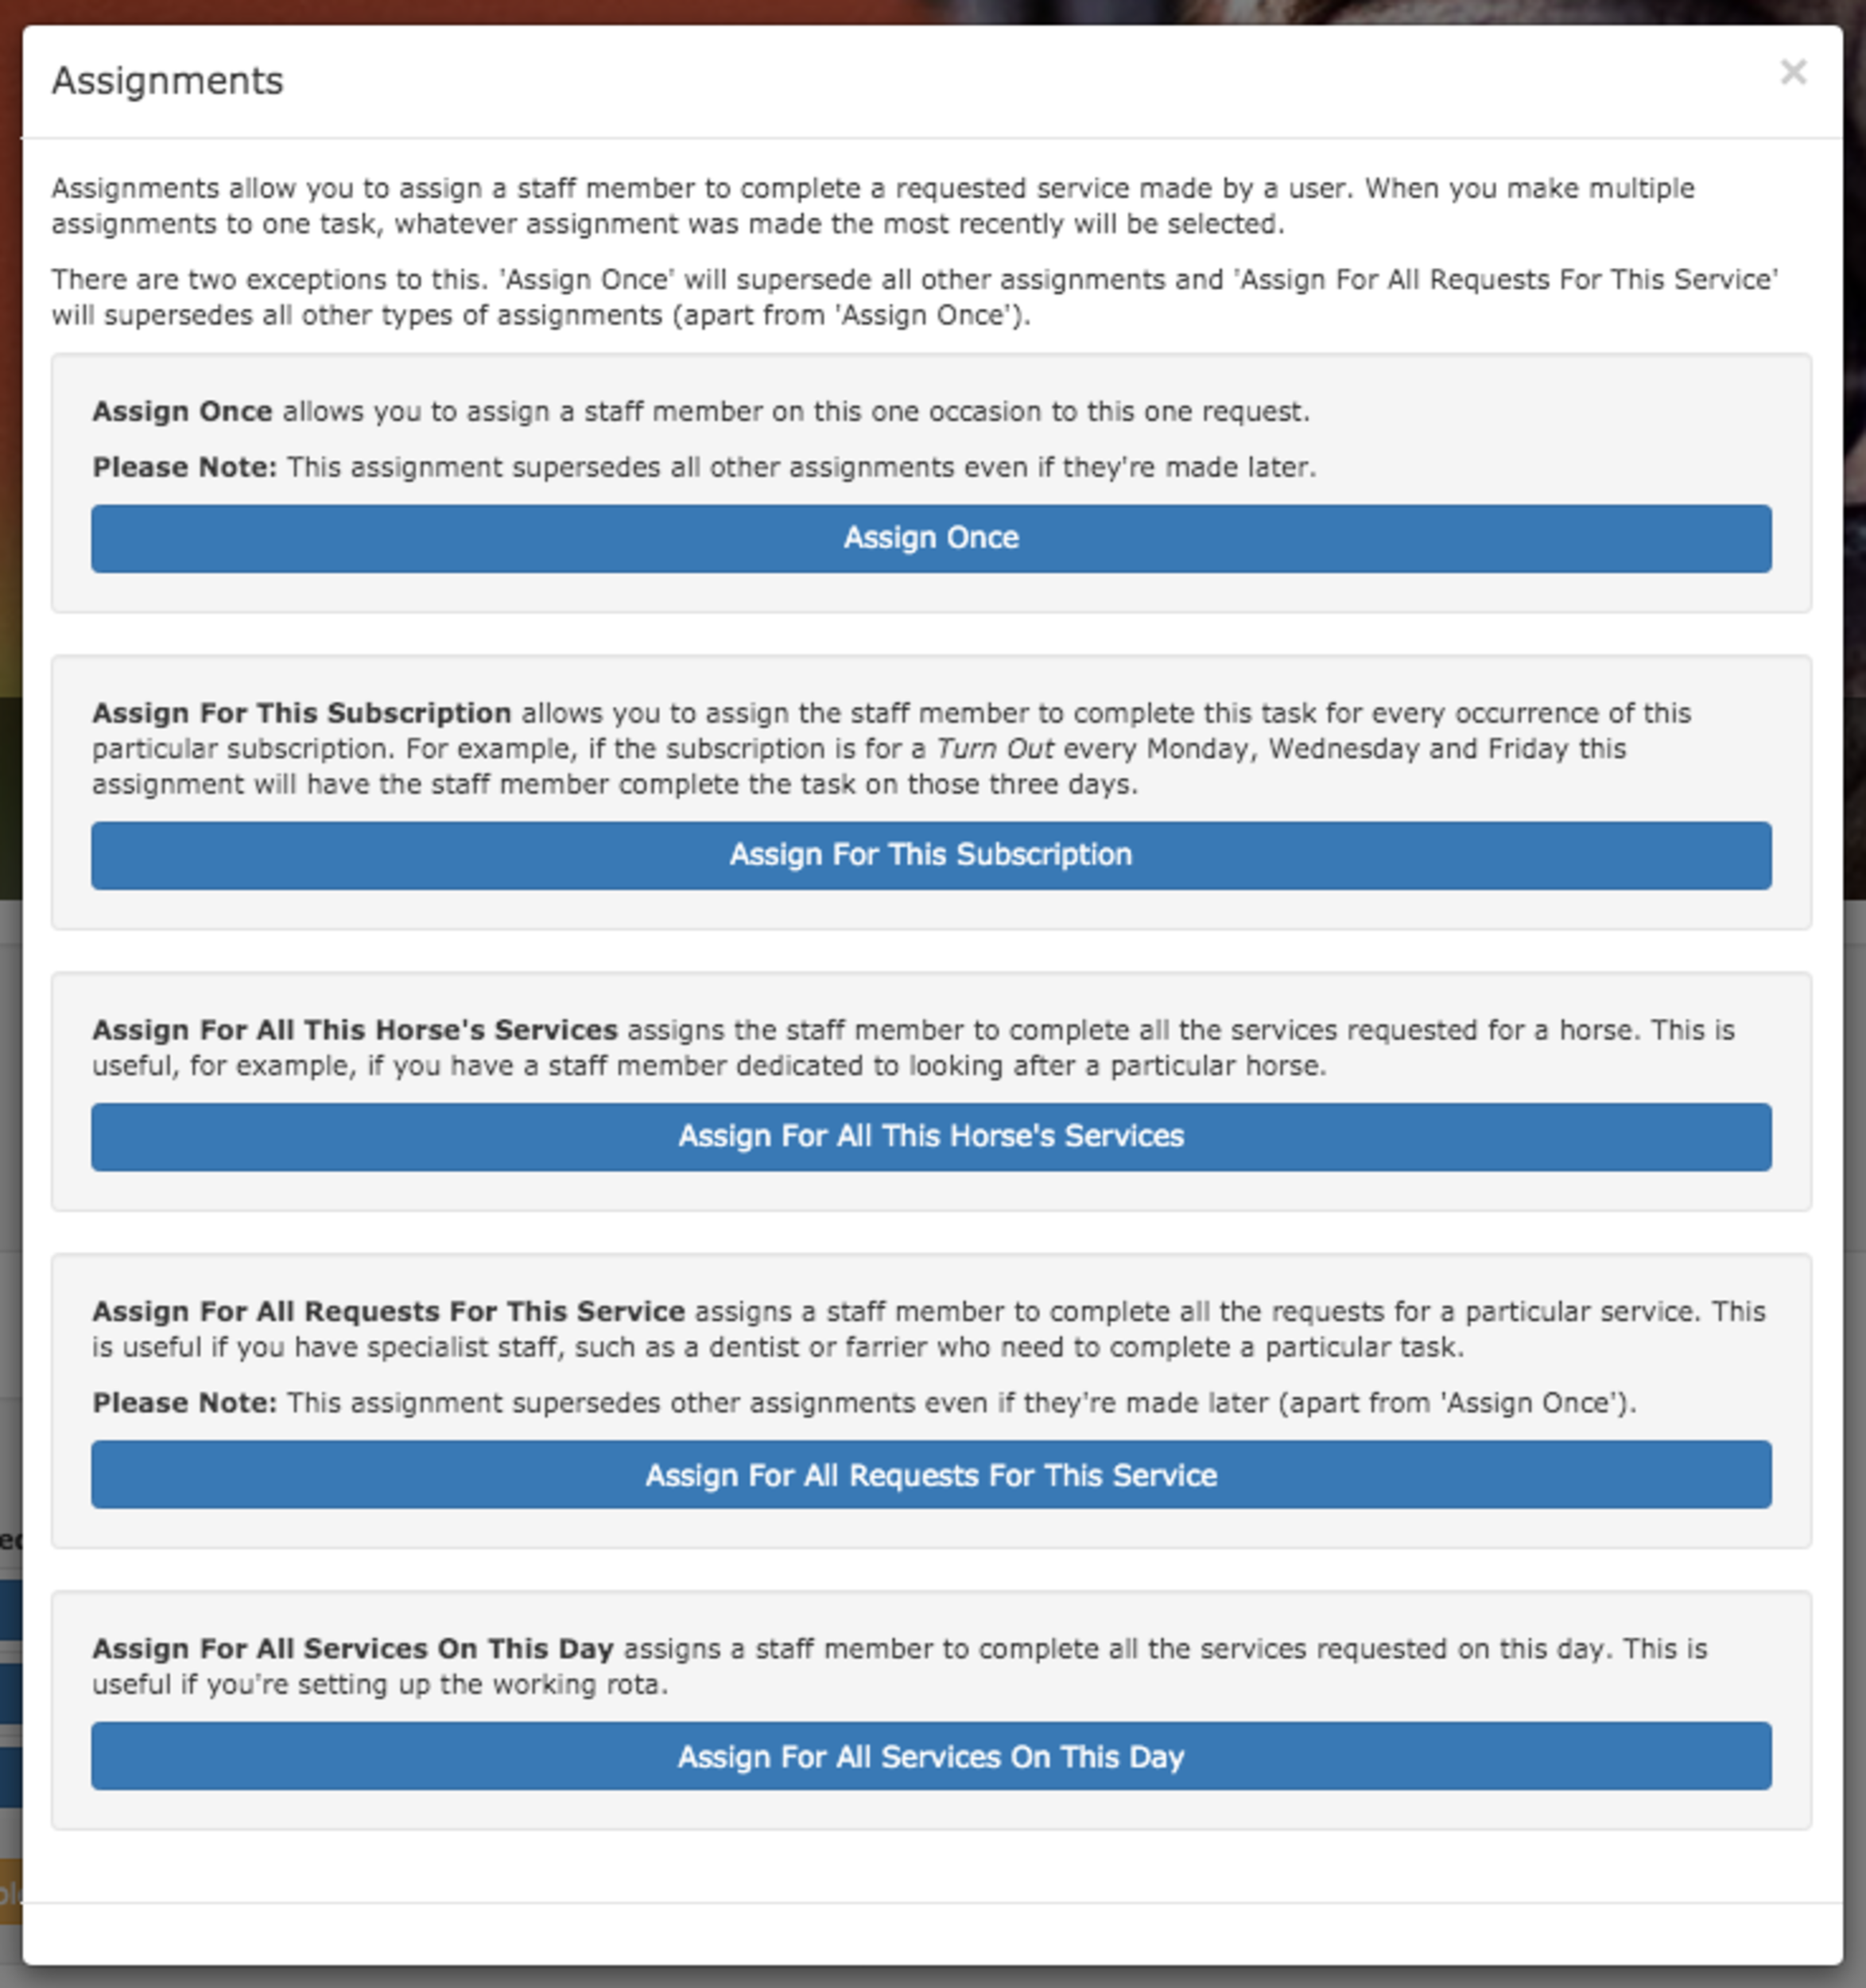
As always, we know that every yard is different. That’s why we’ve added a comprehensive set of assignment types to encapsulate the way you want your yard to work.
Assign Once allows you to assign a staff member to a single instance of a request for a service.
Assign For A Subscription allows you to assign the staff member to complete this task for every occurrence in a particular subscription. For example, if a subscription for a Turn Out every Monday, Wednesday and Friday this assignment type will have the staff member complete the task on those three days.
Assign For All A Horse's Services assigns the staff member to complete all the services requested for a horse. This is useful, for example, if you have a staff member dedicated to looking after a particular horse.
Assign For All Requests For A Service assigns a staff member to complete all the requests for a particular service. This is useful if you have specialist staff, such as a dentist or farrier who are the only ones qualified to complete a particular task.
Assign For All Services On A Day assigns a staff member to complete all the services requested on a particular day. This is useful if you're setting up the working rota and want to assign the member of staff who works on that day.
Both making of and viewing assignments is done through the service forecast view
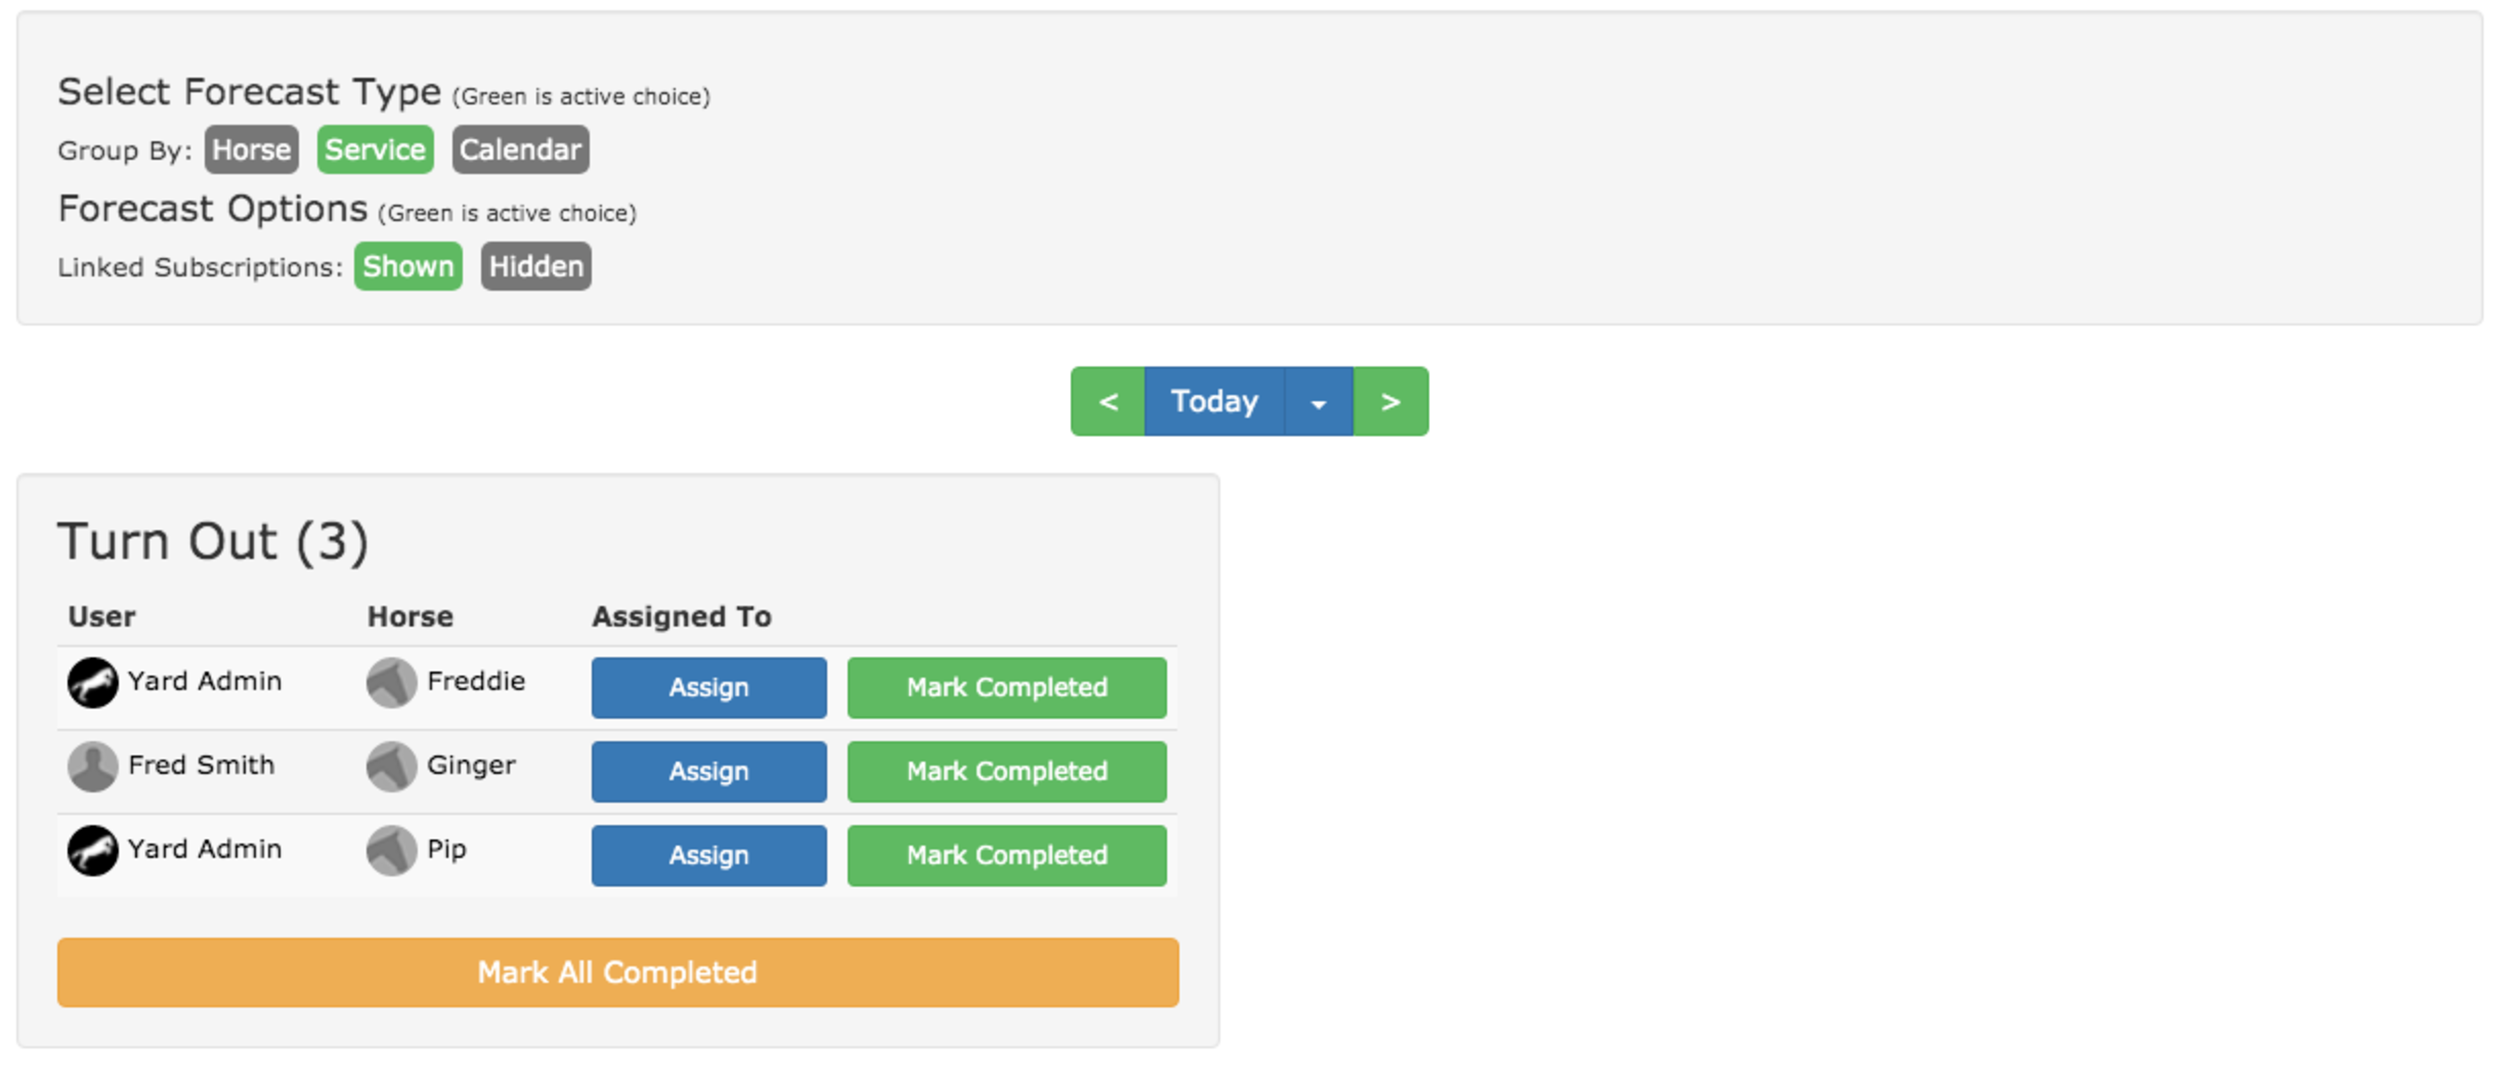
From this view you click on any of the Assign buttons shown to you. Your choice of button will effect certain types of assignments.
For example, if you’re making a day assignment the day on which you press the button will set the day you’re making the assignment for.
Likewise, if you’re making a horse assignment the button you choose will select which horse you’re making it for.
Whatever button you click you’ll get the Assignments page (shown below). This page outlines the details of each assignment type so you can always be sure you’re making the correct choice.
From here you can choose the type of assignment you wish to make, for this example we’re going to make a horse type assignment by clicking the Assign For All This Horse’s Services button. You’ll be shown the Assignment screen (shown below). This screen will change slightly depending on the type of assignment your making but the principals remain the same.
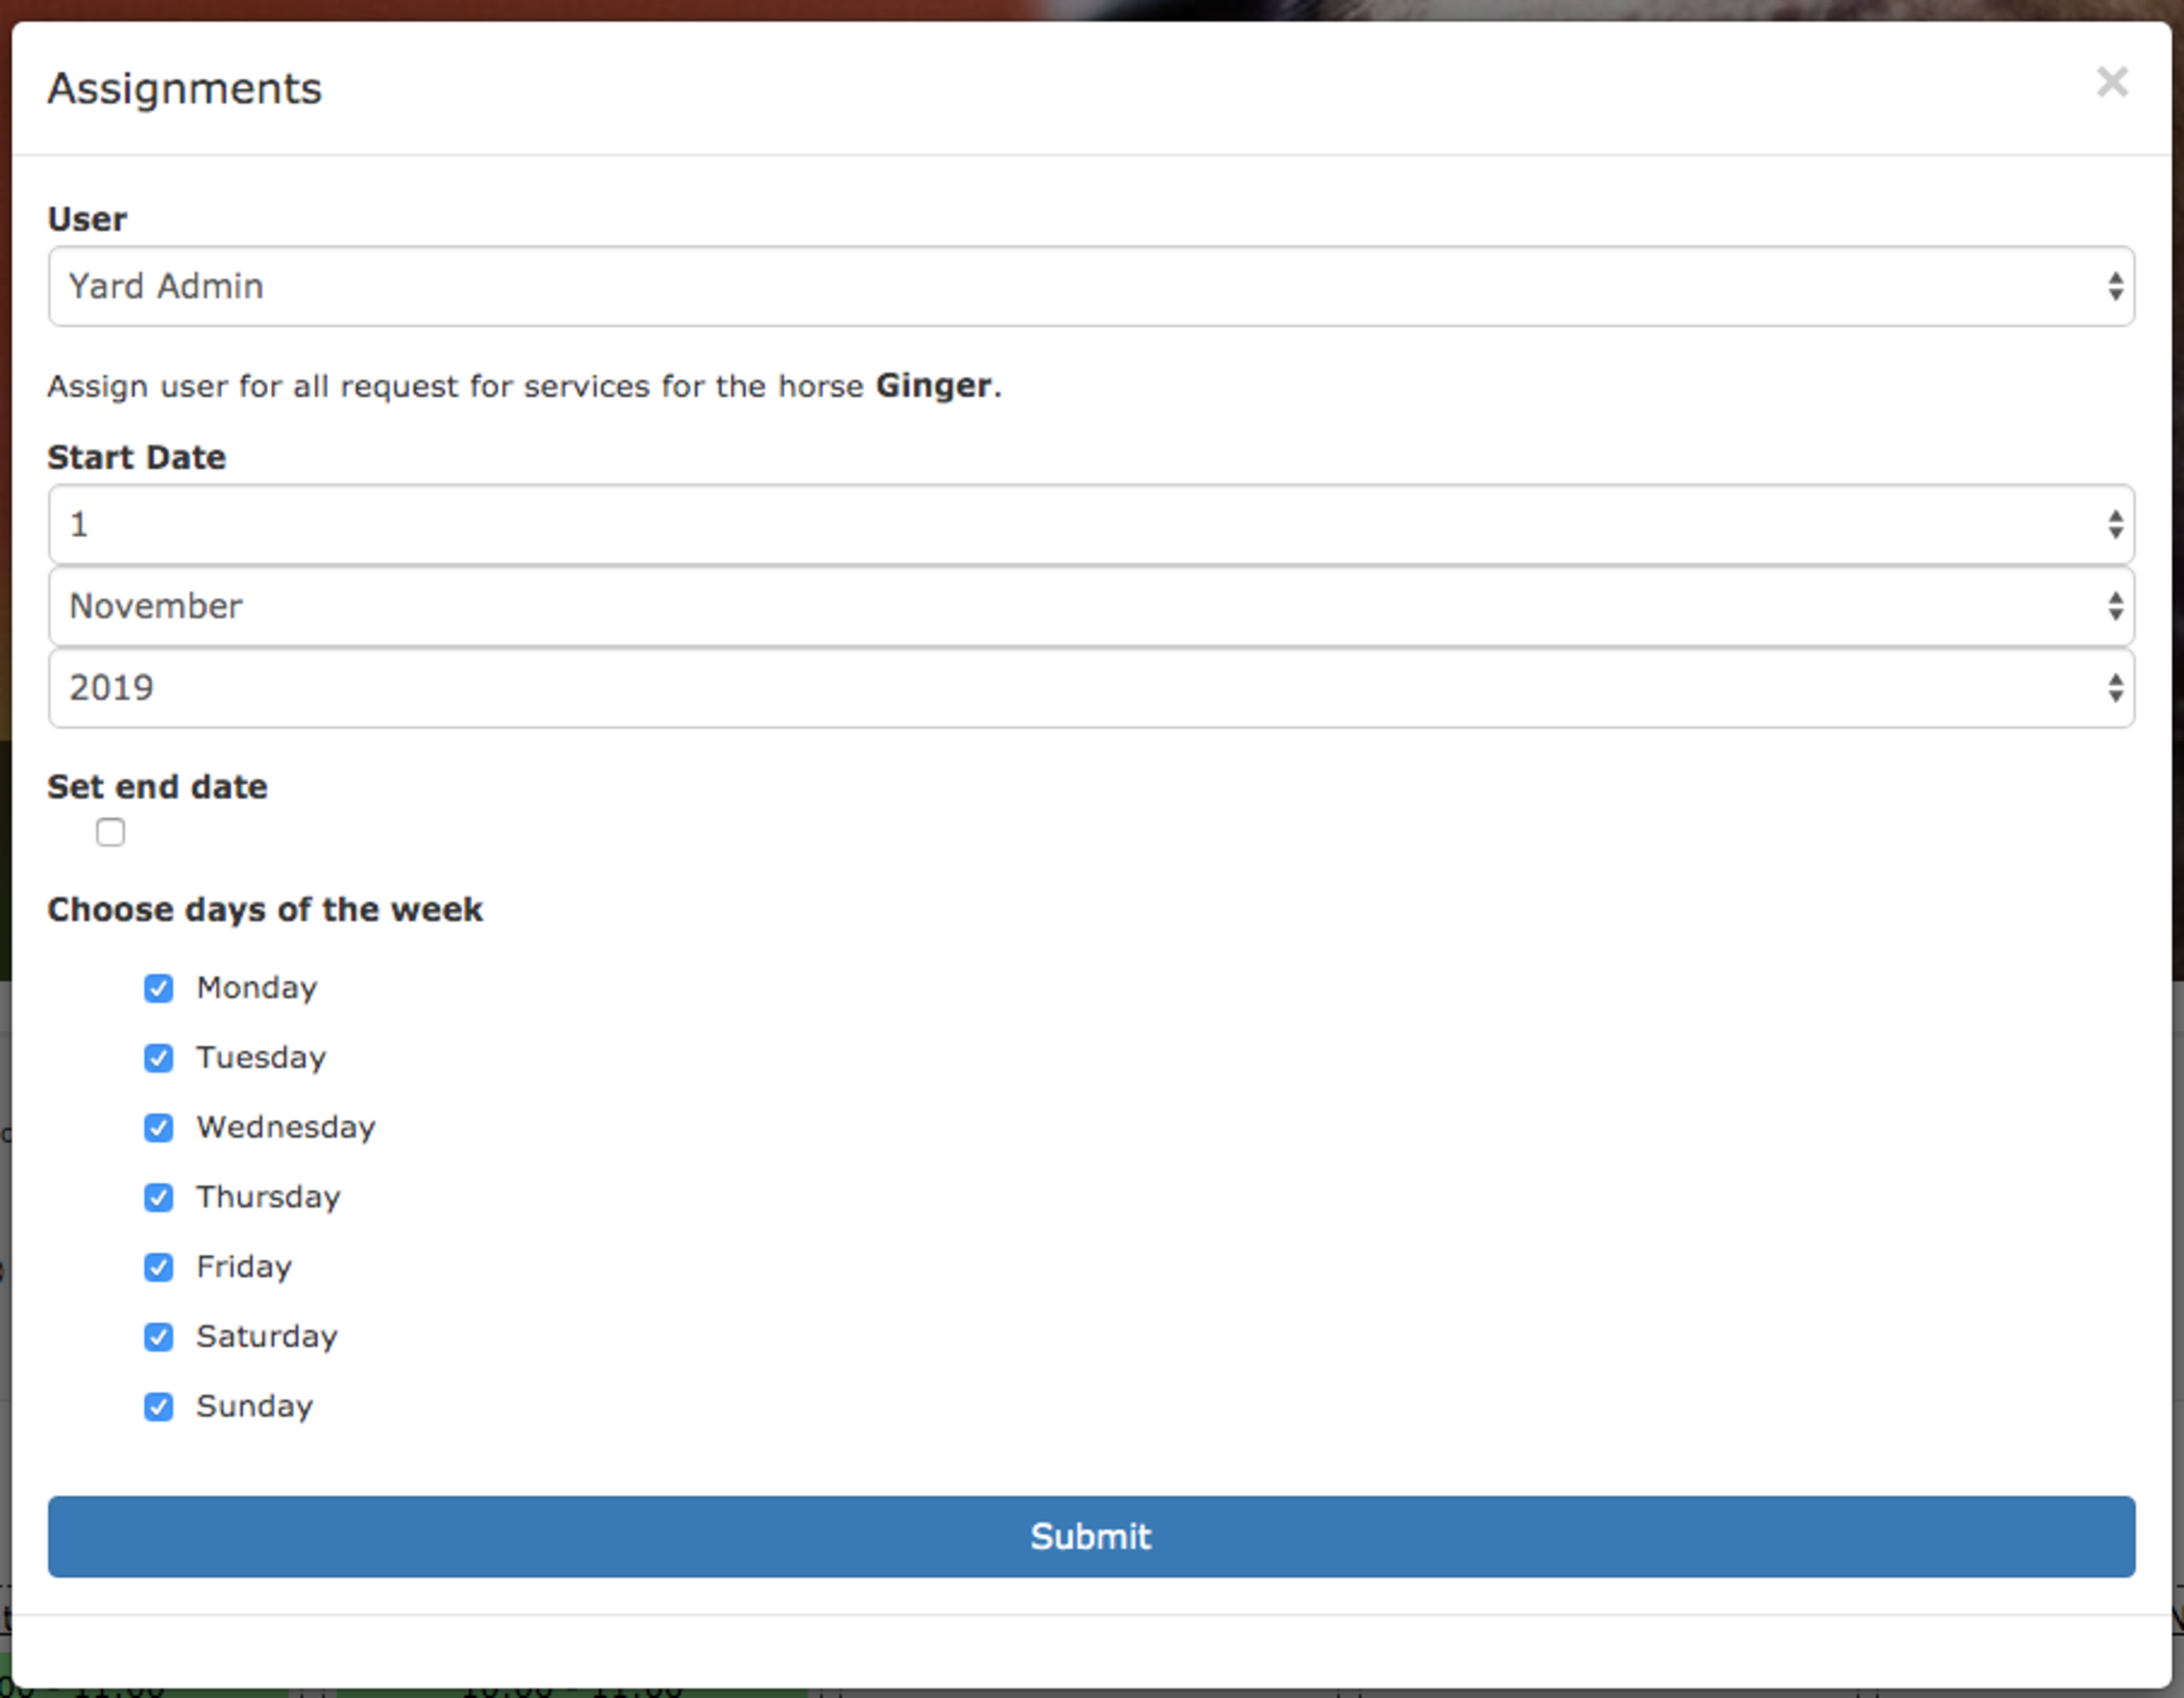
The first thing you need to do is choose the user to whom you are assigning the task to. Then the date the assignment starts (and stops) and the days of the week the assignment applies (allowing you to have different weekday and weekend staff for example).
Once you’re ready click Submit and the assignment is complete. You can now return to any of the Forecast views and see the assignments. Each assignment is shown by the staff members personal icon (in the example below the ATY jumping horse).

As you can see everything requested for Ginger The Horse is now assigned to Yard Admin.
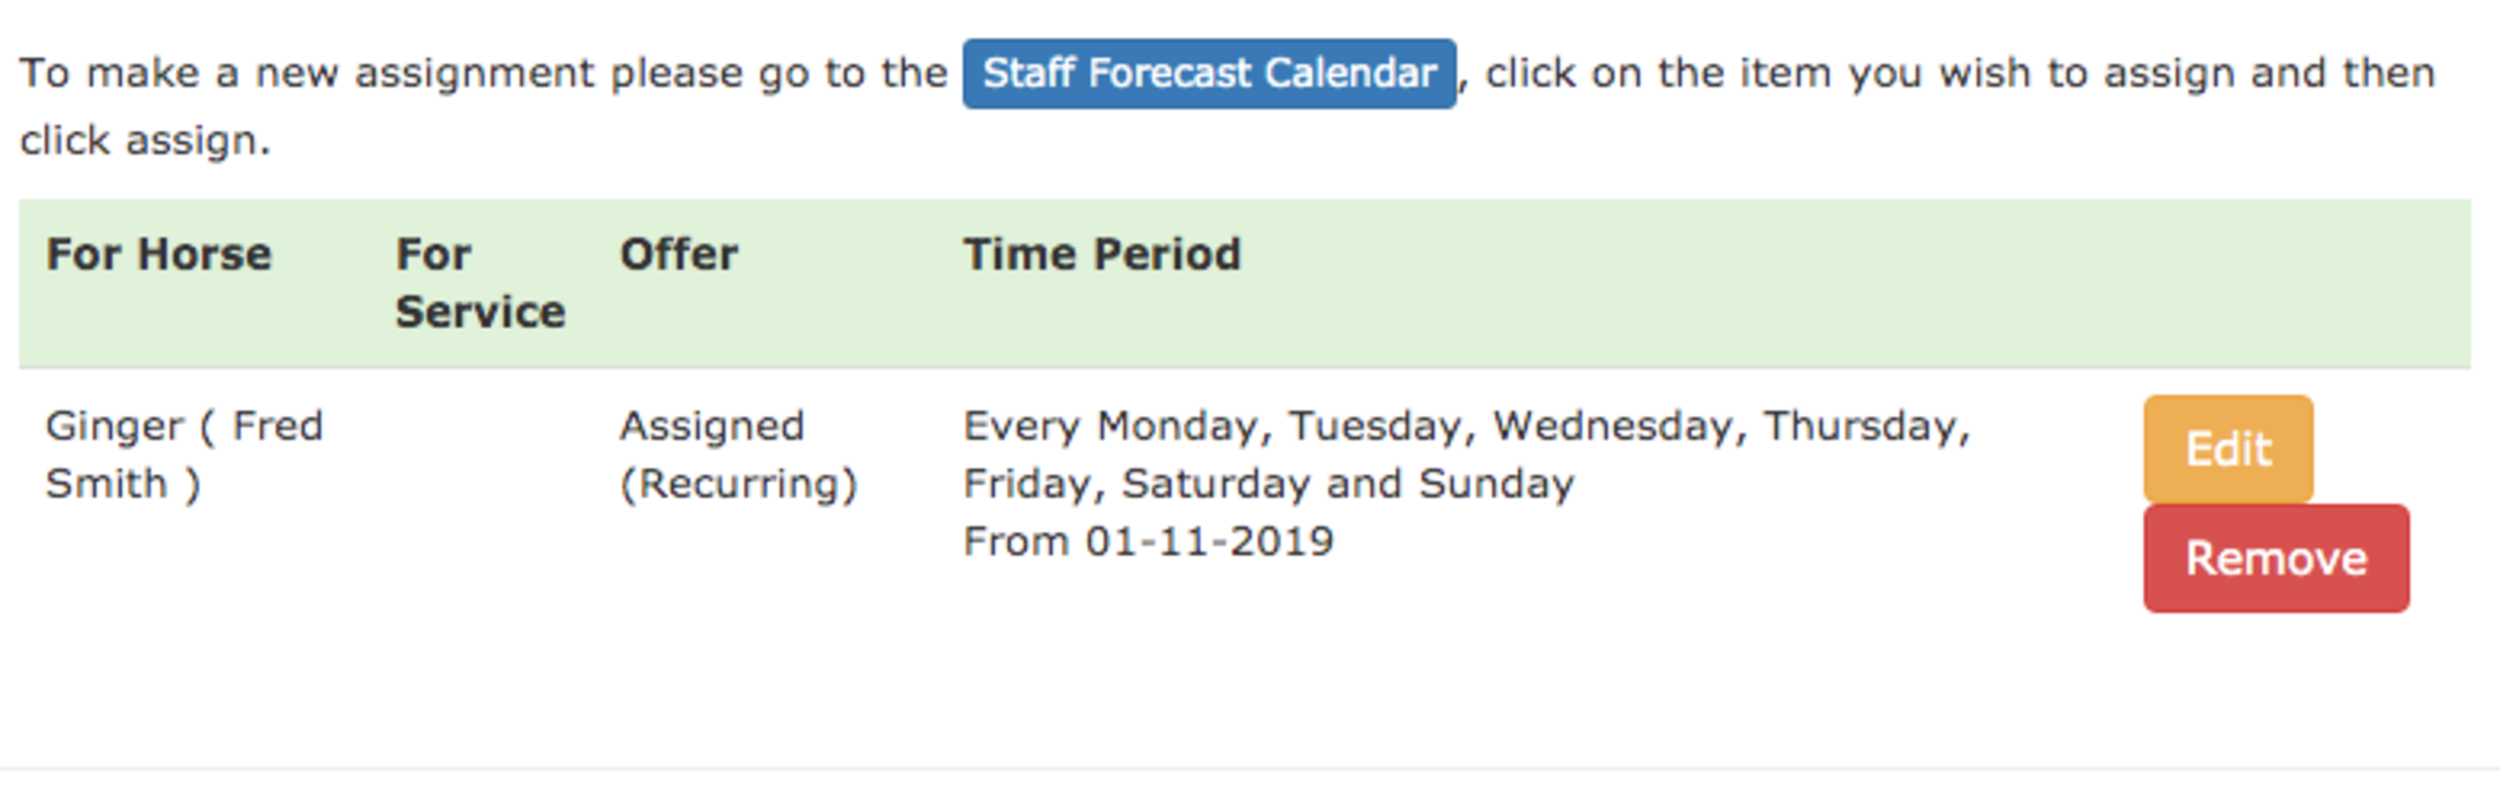
If you want to make a change to an existing assignment you have two choices.
The first is to simply repeat the process and make a new assignment. The most recent assignment will override older ones and so making a new one will be sufficient (except in certain cases which are explained in the choice screen).
The other is to go under the management tab and click on Assignments. This screen will show you all the existing assignments, allow you to edit them and also to remove them.
The assignments feature is one that’s been requested by lots of different yards so we’re excited to be releasing it.
We’ve got some more tweaks coming soon to allow you to filter the forecasts to the tasks assigned to a particular user along with a few other usability features so check back soon for the next update.
The assignment filtering has now been added to the staff calendar view. This will allow you, for example, to see what’s been assigned to a member of staff and more importantly what’s yet to been assigned to anyone.